Bulk Create or Edit Articles
Alation Cloud Service Applies to Alation Cloud Service instances of Alation
Customer Managed Applies to customer-managed instances of Alation
To create a set of articles, do the following:
Ensure that the Feature Flags Glossary Terms GA and Bulk Utility (Beta) are both enabled. See Feature Configuration.
If you don’t have an existing article template for the terms you are creating, create one as described in Build Custom Templates for Articles.
Manually create a single article using the desired article template.
Using full-page search, search for your new article.
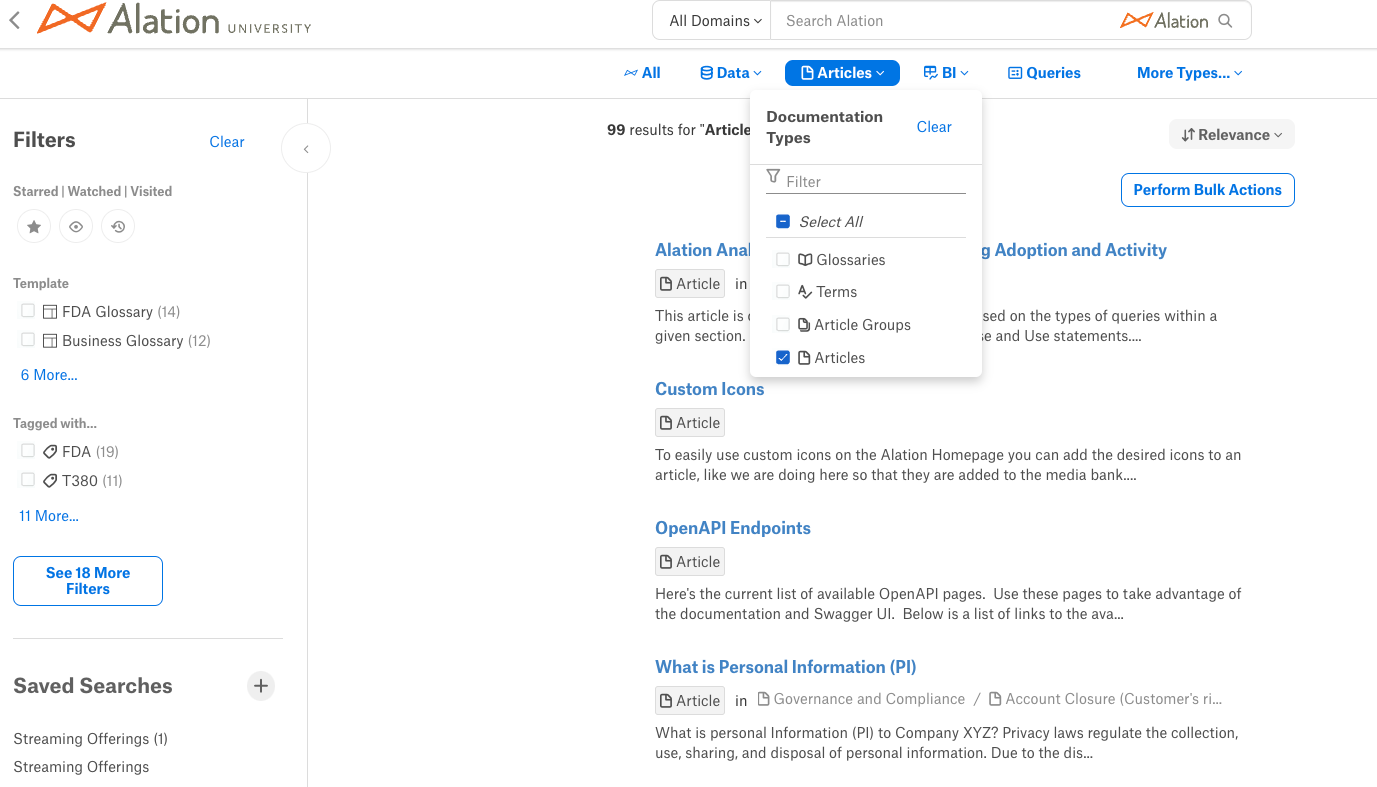
Filter search results for articles, that is, select the Documentation dropdown and then select Articles.
Under Saved Searches, click the + button (Save as New Search). Remember the name you use to save the search.
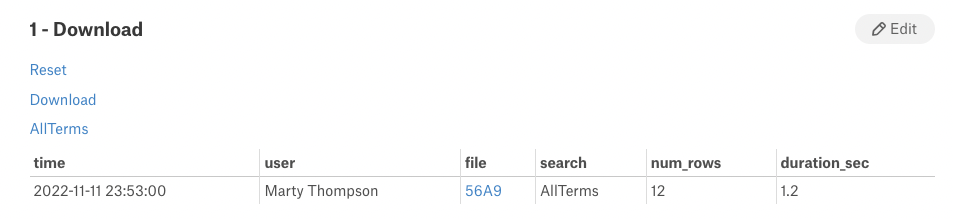
Navigate to the Bulk Utility either from the Admin Settings menu or by appending /bulk-utility/ to the catalog base URL. If you already have the Bulk Utility page open, click Reset. Your saved search should appear as a button within the 1-Download field.
Click the button to generate an editable spreadsheet. This file, along with a more human-readable reference version, contains columns for all the fields included in the article template. Both files are packaged into a zip file for download. Once the zip file is prepared, it should appear in the 1-Download field as a row in the table at the bottom of the field:
Click the link in the file column to download the zip file.
Unzip the zip file and open the included file with name beginning “use_this_for_upload”.
Add a row for each Article to be created, using the manually-created Article as a template. Leave the id column blank, to indicate you want new Article objects to be created.
Delete the row containing the Article you created manually. (This is optional; if you make no changes to it leaving it in the file should have no effect.)
Save the file.
On the Bulk Utility page, under Attachments, delete any existing attachments by hovering over them one at a time and clicking the X that appears beside them.
Click the + icon to add your saved file.
Click the Upload button in the 2-Upload field. A new browser tab opens, and once the upload is complete you are directed back to the Bulk Utility article.
Warning
If the file is large, it may appear that the utility is not working. Do NOT click Upload more than once. If you believe the process is stuck or unresponsive, contact Alation Support before re-uploading to avoid any unwanted side effects.
Note
After each upload, download the associated “feedback file” under Attachments in the Bulk Utility article, with a name of the form <first-8-letters-of-username>-<4-random-characters>.xlsx.
To edit a set of Articles, do the following:
Navigate to the Alation search bar and press Enter to open the full-page search.
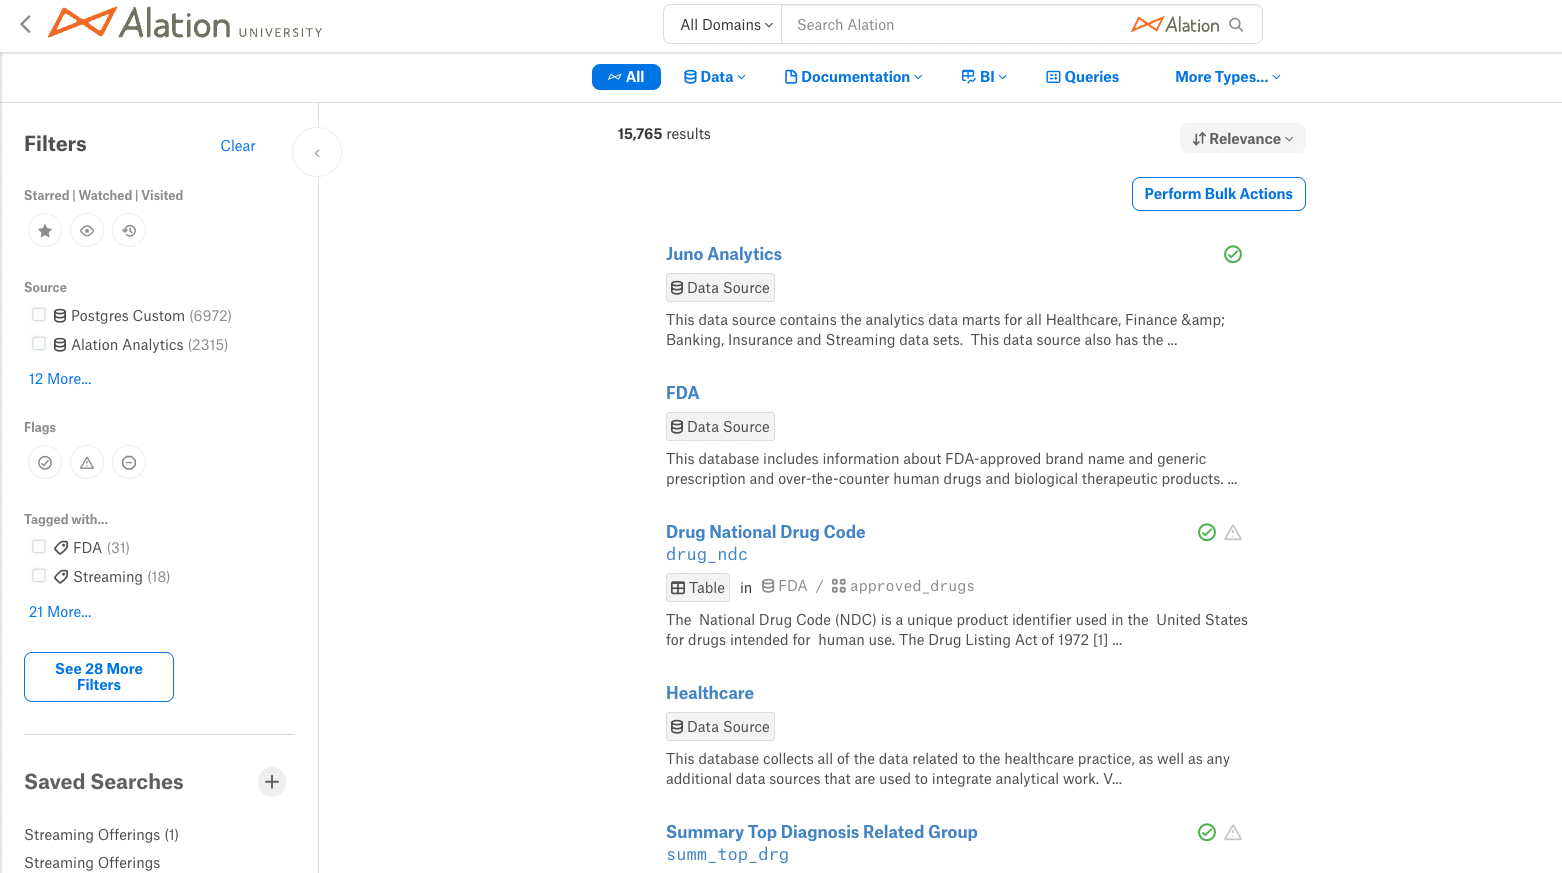
Filter search results for Articles, that is, select the Documentation dropdown and then select Articles.
Choose additional filters to limit the export to Articles you’d like to edit, then save your search by clicking the Save Search button (+) in the Saved Searches area of the left sidebar. Remember the name of your Saved Search as you will use it in the Bulk Utility.
Warning
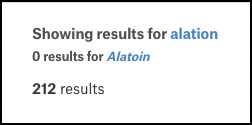
If there are typos in your search query, Alation tries to correct for them and will often return results with the corrected spelling. However, the bulk utility does not make this same correction. You should therefore verify that the search results you are seeing are for the term or terms in your search query. Check the top of your search results—if you see a message similar to the following, you should correct your query:
Under Saved Searches, click the + button (Save as New Search). Remember the name you use to save the search.
Navigate to the Bulk Utility either from the Admin Settings menu or by appending /bulk-utility/ to the catalog base URL. If you already have the Bulk Utility page open, click Reset. Your saved search should appear as a button within the 1-Download field.
Click the button to generate an editable spreadsheet. This file, along with a more human-readable reference version, contains columns for all the fields included in the article template. Both files are packaged into a zip file for download. Once the zip file is prepared, it should appear in the 1-Download field as a row in the table at the bottom of the field:
Click the link in the file column to download the zip file.
Unzip the zip file and open the included file with name beginning “use_this_for_upload”.
Edit the articles as desired.
Save the file.
On the Bulk Utility page, under Attachments, delete any existing attachments by hovering over them one at a time and clicking the X that appears beside them.
Click the + icon to add your saved file.
Click the Upload button in the 2-Upload field. A new browser tab opens, and once the upload is complete you are directed back to the Bulk Utility article.
Warning
If the file is large, it may appear that the utility is not working. Do NOT click Upload more than once. If you believe the process is stuck or unresponsive, contact Alation Support before re-uploading to avoid any unwanted side effects.
Note
After each upload, download the associated “feedback file” under Attachments in the Bulk Utility article, with a name of the form <first-8-letters-of-username>-<4-random-characters>.xlsx.
To soft-delete articles:
Open the file you originally downloaded for bulk creation.
Add a column action containing the word delete for all rows containing articles you want to delete.
Save the file.
On the Bulk Utility page, under Attachments, delete any existing attachments by hovering over them one at a time and clicking the X that appears beside them.
Click the + icon to add your saved file.
Click the Upload button in the 2-Upload field. A new browser tab opens, and once the upload is complete you are directed back to the Bulk Utility article.
Spot check that your action was successful.