Configuration in Azure Active Directory
Alation Cloud Service Applies to Alation Cloud Service instances of Alation
Customer Managed Applies to customer-managed instances of Alation
Use the recommendations below to configure External OAuth for a Snowflake data source with Azure Active Directory (AD) as IdP.
Prerequisite
The instructions below assume that the required OAuth authorization server (the External OAuth Authorization Server) already exists in Azure AD and that the corresponding security integration was already created on Snowflake. See Configure Microsoft Azure AD for External OAuth in Snowflake documentation for information about creating an External OAuth Authorization Server in Azure AD and the required security integration in Snowflake.
Use the steps below as an example to create an OAuth client for Alation and to collect the required authentication to provide in the Alation user interface:
Register a Client Application
You must be an Azure AD admin to register client applications.
Note
The steps in this section serve as an example of configuring an OAuth client in Azure AD. You have the flexibility to adapt the configuration to your specific needs in accordance with your organization’s policies. These steps are meant to demonstrate how you can gather the required information for further configuration in Alation.
To register a client application for Alation:
Log in to Azure Portal.
Go to Active Directory.
In Active Directory, from the menu on the left, open App registrations.
Click New registration. A new app registration editor will open.
In the Name field, provide a name for your app registration. The name will be visible to users establishing individual connections.
Note
We recommend indicating that this app is used with Alation, for example:
ALATION_EXTERNAL_OAUTH_CLIENT.Under Supported account types, select Accounts in this organizational directory only (<directory name> only - Single tenant).
Under Redirect URI (optional), select Web as platform.
Provide the Redirect URI in the following format:
https://<your_alation_domain>/api/datasource_auth/oauth/callback. For example,https://mycatalog.alation.com/api/datasource_auth/oauth/callback.Note
No trailing forward slash at the end of the Redirect URI.
Click Register. You will land on the properties page of your new registered app.
At this point, we recommend creating a list of values you’ll need in Alation using any method you prefer. Store the list securely.
Under Essentials, locate the application (client) ID property. Copy it to your list. You will need to provide this value when configuring OAuth for your Snowflake data source in Alation.
From the menu on the left, select Certificates and secrets. The Certificates and secrets page will open.
Click New client secret.
In the secret editor that opens, add a description of the secret.
Select an expiration value, for example:
180 days (6 months).Click Add.
Copy the secret and save it to your list. You will need to provide it when configuring OAuth for your Snowflake data source in Alation.
Important
Secrets can only be viewed right after creation. Save it before leaving the page.
From the menu on the left, select API Permissions.
Under Configured permissions, click Add a permission.
In the Request API permissions panel that opens, click on My APIs.
In the list of applications on My APIs tab, click the authorization server app that you registered for Snowflake as the OAuth Resource. See Configure the OAuth Resource in Azure AD in Snowflake documentation for information about what this is.
Note
You’ll only find apps that expose APIs under My APIs if you are the app Owner. If you don’t see the Snowflake authorization server app, verify that you have been added as an Owner.
Click on the Delegated permissions box.
Under Select permissions, select the checkbox of the permission that defines the scope that you wish to grant to Alation’s client, for example:
SESSION:ROLE-ANY.Click Add permissions. The permission you selected should appear under API/Permissions name on the API permissions page of your client app.
Click Grant admin consent for <your directory> and confirm the consent.
Note
You may require another Azure AD admin to confirm the consent.
Next, collect the authentication information from Azure AD that you haven’t collected yet.
Collect the Authentication Information
You will need to provide the following authentication information from Azure AD in Alation:
Client ID
Use the application (client) ID of the client application registration you created for Alation in Azure AD. See Register a Client Application for Alation <register-aad_client>.
Client Secret
Use the client secret you generated for Alation’s client application registration.
OAuth 2.0 Endpoints
Find the OAuth 2.0 token endpoint value in the authorization server app (OAuth Resource):
In Azure AD, open the Overview page of the authorization server app.
Click Endpoints.
Copy the values for OAuth 2.0 authorization endpoint (v2) and OAuth 2.0 token endpoint (v2) and store them securely. The values will look similar to the following:
Authorize endpoint:
https://login.microsoftonline.com/f8e32097-5c65-485f-9eb7-f40149462461/oauth2/v2.0/authorizeToken endpoint:
https://login.microsoftonline.com/f8e32097-5c65-485f-9eb7-f40149462461/oauth2/v2.0/token
Default Scope
You can find the available scopes in the authorization server app (OAuth Resource):
Open the properties page of the authorization server app.
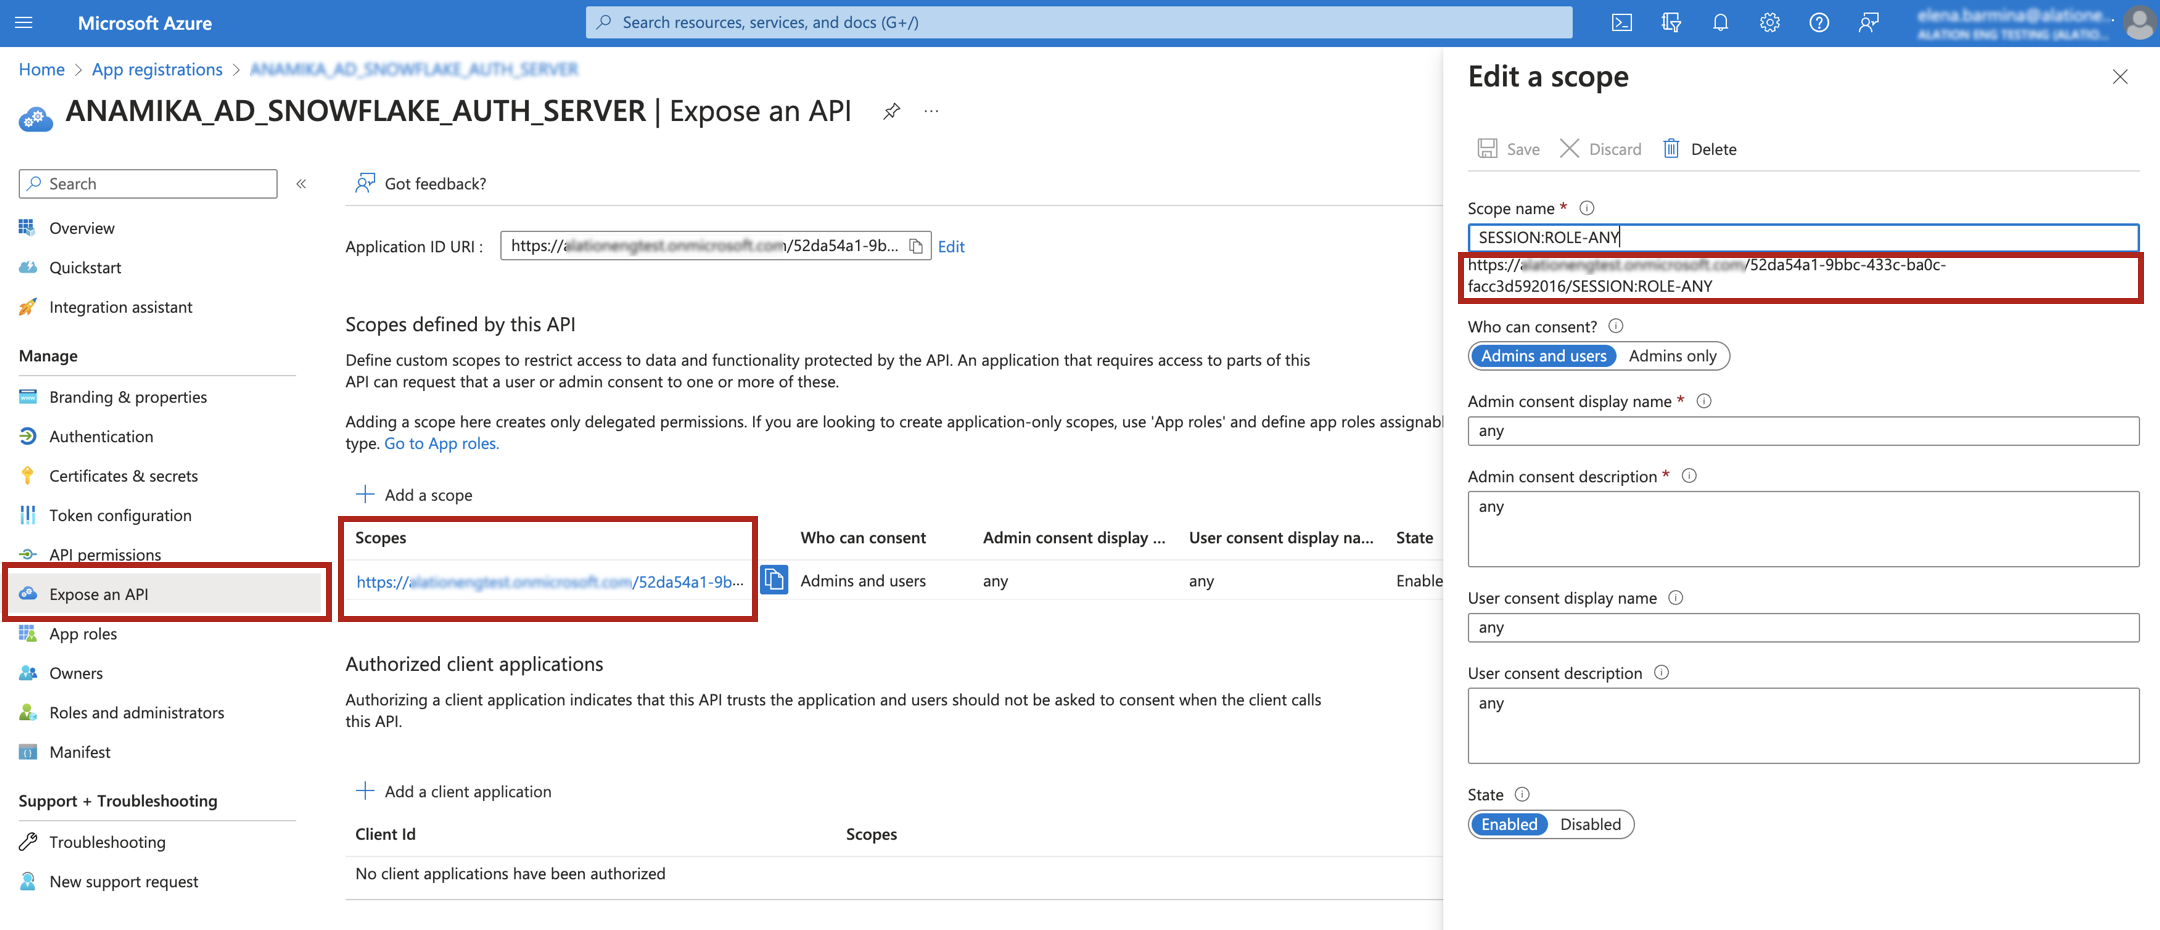
In the menu on the left, select Expose an API.
Click the scope that applies to Alation.
Copy the value that you find under the Scope name field in the scope editor and save it to your securely stored configuration value list.
Close the editor.
Note
To pass a Snowflake role in authorization requests to Azure AD, the scope value must include the Application ID URI, for example:
https://my_account.onmicrosoft.com/52da54a1-9bbc-433c-ba0c-facc3d592016/SESSION:ROLE-ANY.If the Application ID URI is not specified, the role will be searched in the Microsoft Graph resource, which is not relevant for this configuration.
Username Field/Claim
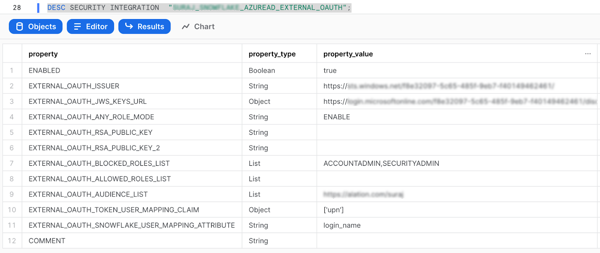
You can find out the value of the Username Field/Claim attribute from the corresponding property of the Azure AD security integration in Snowflake. This is the security integration you created to work with your authorization server app (OAuth Resource). Refer to Step 4: Create a Security Integration in Snowflake in Snowflake documentation for details.
You can review the properties of a security integration using the following SQL command on your Snowflake database:
DESC SECURITY INTEGRATION "<integration_name>";Example:
DESC SECURITY INTEGRATION "EXTERNAL_OAUTH_AZURE";
In the results of this query, locate the attribute EXTERNAL_OAUTH_TOKEN_USER_MAPPING_CLAIM. Copy the corresponding property value and save it to your securely stored configuration value list. You’ll use it in Alation as the value for the Username Field/Claim attribute.
When you’ve collected all the authentication information you need, you can configure OAuth via Azure AD for your Snowflake data source.
Configure OAuth via Azure AD for Your Snowflake Data Source
Perform this configuration in Alation after completing these steps:
To enable OAuth in Compose for a Snowflake data source:
In Alation, open the data source Settings page.
Go to the Compose tab.
Locate the OAuth Connection block and select the checkbox Enable OAuth 2.0 in Compose. This reveals the parameters for OAuth setup.
Specify the OAuth connection information:
Property
Value
Client ID
Use the client ID of the app registration you created for Alation’s OAuth client.
Client Secret
Use the client secret of the OAuth client.
Request Refresh Tokens
Select this checkbox.
Enable PKCE
Leave this checkbox clear if PKCE was not configured.
Select it if you configured PKCE on the Snowflake integration.
Authorization Endpoint
Provide the authorization endpoint. See OAuth 2.0 Endpoints.
Token Endpoint
Provide the token endpoint.
Default Scope
Provide the scope value. See Default Scope.
Refresh Scope
Use the value
offline_access.Username Field/Claim
Provide the claim value. See Username Field/Claim. Example:
upnJWT
Select this checkbox.
Access token parameter name
Use the value token.
OAuth enablers
Use the value
authenticator=oauth.Click Save.
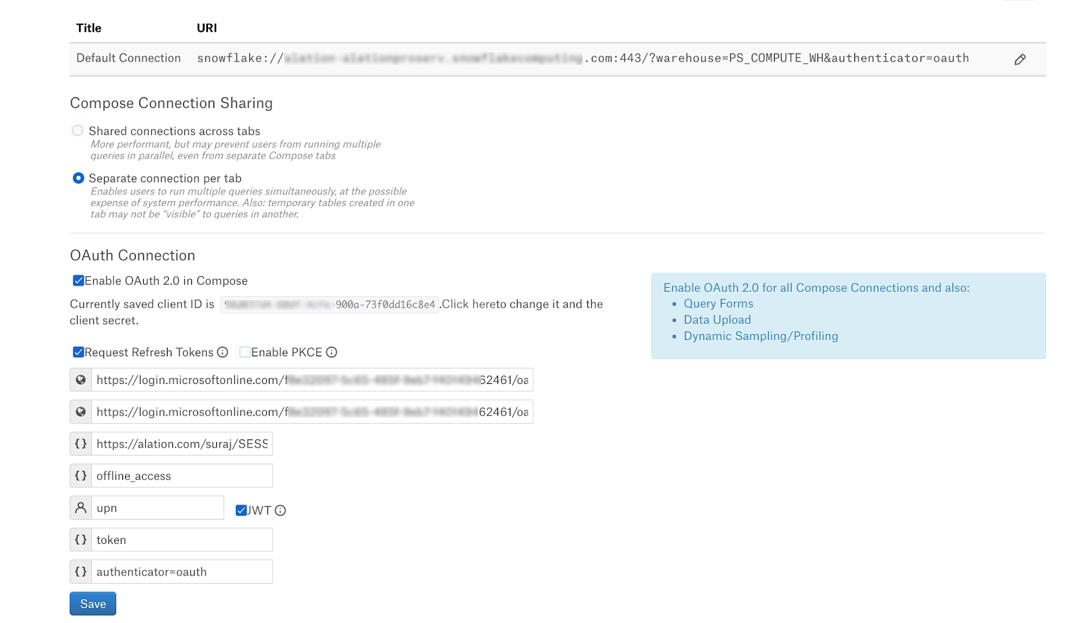
Edit the default Compose connection to use OAuth as described below or add a new Compose connection that is OAuth-enabled. For making the connection string OAuth-enabled, add the query parameter
authenticator=oauthto the connection URI with the&symbol as the separator.Example:
snowflake://alation_test.us-east-1.snowflakecomputing.com:443/?warehouse=DEMO_WH&db=TEST&authenticator=oauthTest the configuration in Compose by connecting to your Snowflake data source and running a query. For more details, see Working with Data Source Connections.
Allow Role-Specific Connections With Azure AD
Compose users have the flexibility to open role-specific connections to Snowflake by including the role property to the connection URI. An example of a Compose connection URI with the role property included would be: snowflake://my_snowflake.us-east-1.snowflakecomputing.com:443/?warehouse=TEST&db=NEW&authenticator=oauth&role=%22ANALYST%22
With Azure AD as the IdP, enabling the use of the role property in the URI requires adjusting an alation_conf parameter on the Alation server. This configuration is only required for Azure AD due to the specifics of configuring scopes in an Azure AD OAuth client. You do not need to do this for other OAuth providers supported by Alation, such as Okta or PingFederate.
To allow users to specify a role in the Compose connection URI, change the value of the parameter alation.datasource_auth.oauth.snowflake.role_switching.add_uri_role_scope to False.
On how to use alation_conf, see Using alation_conf. No restart is required when you change this parameter.
Note
Alation Cloud Service customers can request server configuration changes through Alation Support.
Root Cause
When configuring Alation’s OAuth client in Azure AD, you create an Application ID URI that is to be prepended to the value of the scope you configure in the settings of the data source in Alation. Example: https://alation.com/1f356099-752d-4ad5-b3a8-68463e4bbcf5/SESSION:ROLE-ANY.
Passing a Compose role to Azure AD is expected in the format <application_id_uri>/session:role:ANALYST; however, the format in the URI is role=%22YOUR_ROLE%22, and an attempt to connect will fail.
Setting the parameter alation.datasource_auth.oauth.snowflake.role_switching.add_uri_role_scope to False stops Alation from passing the role in the URI in the authorization request to Azure AD, and the access token can be retrieved successfully. The user is allowed to connect with the desired role as it is passed to Snowflake, but not to Azure AD.