Hive OCF Connector: Install and Configure
Alation Cloud Service Applies to Alation Cloud Service instances of Alation
Customer Managed Applies to customer-managed instances of Alation
Network Connectivity
Open the ports that apply to your Hive configuration:
Port 10000 to the Hive server
Port 9083 to the Hive metastore server
Port 50070 or 9870 to the WebHDFS server
The default WebHDFS port depends on the Hadoop version and distribution. For Hadoop 2.x, the default WebHDFS port is 50070. For Hadoop 3.x, in some of the distributions, the default WebHDFS port may be 9870. For example, on CDH, the default WebHDFS port may be 9870.
Port 14000 to the HttpFS server, if using HttpFS.
Port 1006 on datanodes. WebHDFS requests are redirected to this port.
If using Kerberos authentication:
TCP/UDP port 88 to all Kerberos servers involved in the authentication chain.
If using Apache Knox:
Port 8443 for Knox connections.
Service Account
We recommend creating a Hive service account for Alation before adding the Hive data source to the catalog. The service account requires permissions to access schemas and tables in Hive for metadata extraction (MDE), data sampling and profiling, and access to the query log directory on HDFS for query log ingestion (QLI).
Permissions for Metadata Extraction
Basic authentication |
No requirements |
Kerberized Hive instance |
We recommend creating the service account in the same realm as the one used by Hive users. |
Permission for Sampling and Profiling
Basic authentication |
No requirements |
Kerberized Hive instance |
Depending on your Hive authorization configuration,
grant
|
Permissions for Query Log Ingestion
The service account needs the read permission for the job history logs directory on HDFS.
Hive Client Configuration Files
When configuring your OCF Hive data source in Alation, you will need to upload Hive configuration files as a .tgz archive. Hive client configuration files enable metadata extraction and query log ingestion. Alation will use these files to connect to Hive over the APIs and perform metadata extraction (MDE) and query log ingestion (QLI).
This section describes how to get client configuration files for Hive from several Hive management systems. In case of kerberized Hive and connection over SSL, you will need to place additional files into the configuration archive.
Adding Kerberos Configuration File
If your Hive is kerberized, you will need to add the krb5.conf file to the Hive client configurations archive. The default_realm should be set to the realm that has the user principal which you are planning to use as the service account in Alation.
Example of the krb5.conf file
[libdefaults]
default_realm = TEST.ALATIONDATA.COM
dns_lookup_realm = false
dns_lookup_kdc = false
ticket_lifetime = 24h
forwardable = true

[realms]
TEST.ALATIONDATA.COM = {
kdc = 10.11.21.205
admin_server = 10.11.21.205
}

[domain_realm]
.alationdata.com = TEST.ALATIONDATA.COM
alationdata.com = TEST.ALATIONDATA.COM
Adding ssl-client.xml and Keystore Files to Client Configurations Archive
If connecting over SSL, you will need to add the .jks keystore file specified in the ssl.client.truststore.location property of the ssl-client.xml file to your client configurations archive.
The ssl-client.xml is usually found in the /etc/hadoop/conf directory on HDFS. The location of the .jks file is usually specified in the property ssl.client.truststore.location.
The
ssl.client.truststore.locationproperty often contains an absolute path on the filesystem; however, Alation isolates execution of its Hive engine: we only pay attention to the filename of the truststore.Example
Given a location of /etc/security/awesomeCorp.jks for the ssl.client.truststore.location property, Alation will look for, and use, the first file named awesomeCorp.jks that was uploaded with the client configuration archive.
Ensure that the password specified for the
ssl.client.truststore.passwordproperty is the correct password for the file listed in thessl.client.truststore.locationproperty.
Example of ssl-client.xml
<configuration>
  <property>
      <name>ssl.client.truststore.location</name>
      <value>truststore.jks</value>
  </property>
  <property>
      <name>ssl.client.truststore.password</name>
      <value>changeit</value>
  </property>
  <property>
      <name>ssl.client.truststore.type</name>
      <value>jks</value>
  </property>
</configuration>
Knox SSL
The ssl-client.xml is usually found in the /etc/hadoop/conf directory. The location of the .jks file usually is /var/lib/knox/data-2.6.5.0-292/security/keystores in the Hadoop cluster.
Example of ssl-client.xml for Knox SSL
<configuration>
  <property>
      <name>ssl.client.truststore.location</name>
      <value>gateway.jks</value>
  </property>
  <property>
      <name>ssl.client.truststore.password</name>
      <value>admin</value>
  </property>
  <property>
      <name>ssl.client.truststore.type</name>
      <value>jks</value>
  </property>
</configuration>
Adding the aha-conf.xml file
This step applies only if Alation supports QLI for your Hive distribution.
Create and save an additional file named aha-conf.xml.
By default, the OCF Hive connector returns URL-encoded queries. To get the query format suitable for ingestion, you will need to include the aha-conf.xml file into the configuration tarball for your data source.
Use the following example to create the file:
<?xml version="1.0" encoding="UTF-8"?><?xml-stylesheet type="text/xsl" href="configuration.xsl"?>

<configuration>

<property>

    <name>alation.qli.check-url-decode</name>

    <description>Some distributions of hive will arbitrarily url-encode queries. This will break QLI.
    Setting this to true will add an extra preprocessing step to check each query before ingesting it,
    decoding as needed. Enabling this may increase QLI time.
    </description>

    <value>true</value>

</property>

</configuration>
Prepare the Client Configurations Archive
CDH, HDP, and EMR
To prepare the Hive client configurations archive:
SSH to your cluster and form the tarball file with the Hive client configurations.
Example
mkdir hive_configs
cp -r /etc/hive/conf/* hive_configs
cp -r /etc/hadoop/conf/* hive_configs
If applicable to your Hive deployment, add:
The krb5.conf file if using Kerberos authentication
The keytab file for the service account you are going to use in Alation
The .jks certificate file if using SSL
The aha-conf.xml file if your Hive deployment supports QLI (see Adding the aha-conf.xml file).
Example
cp /etc/krb5.conf hive_configs
Form the archive.
tar -czf hive_configs.tgz hive_configs
Copy the client configuration archive to your machine. This file will need to be uploaded to Alation on your Hive data source Settings page.
HDInsight (Apache Ambari)
On your Hadoop manager dashboard, in the left-hand menu, click Actions and Download All Client Configs:
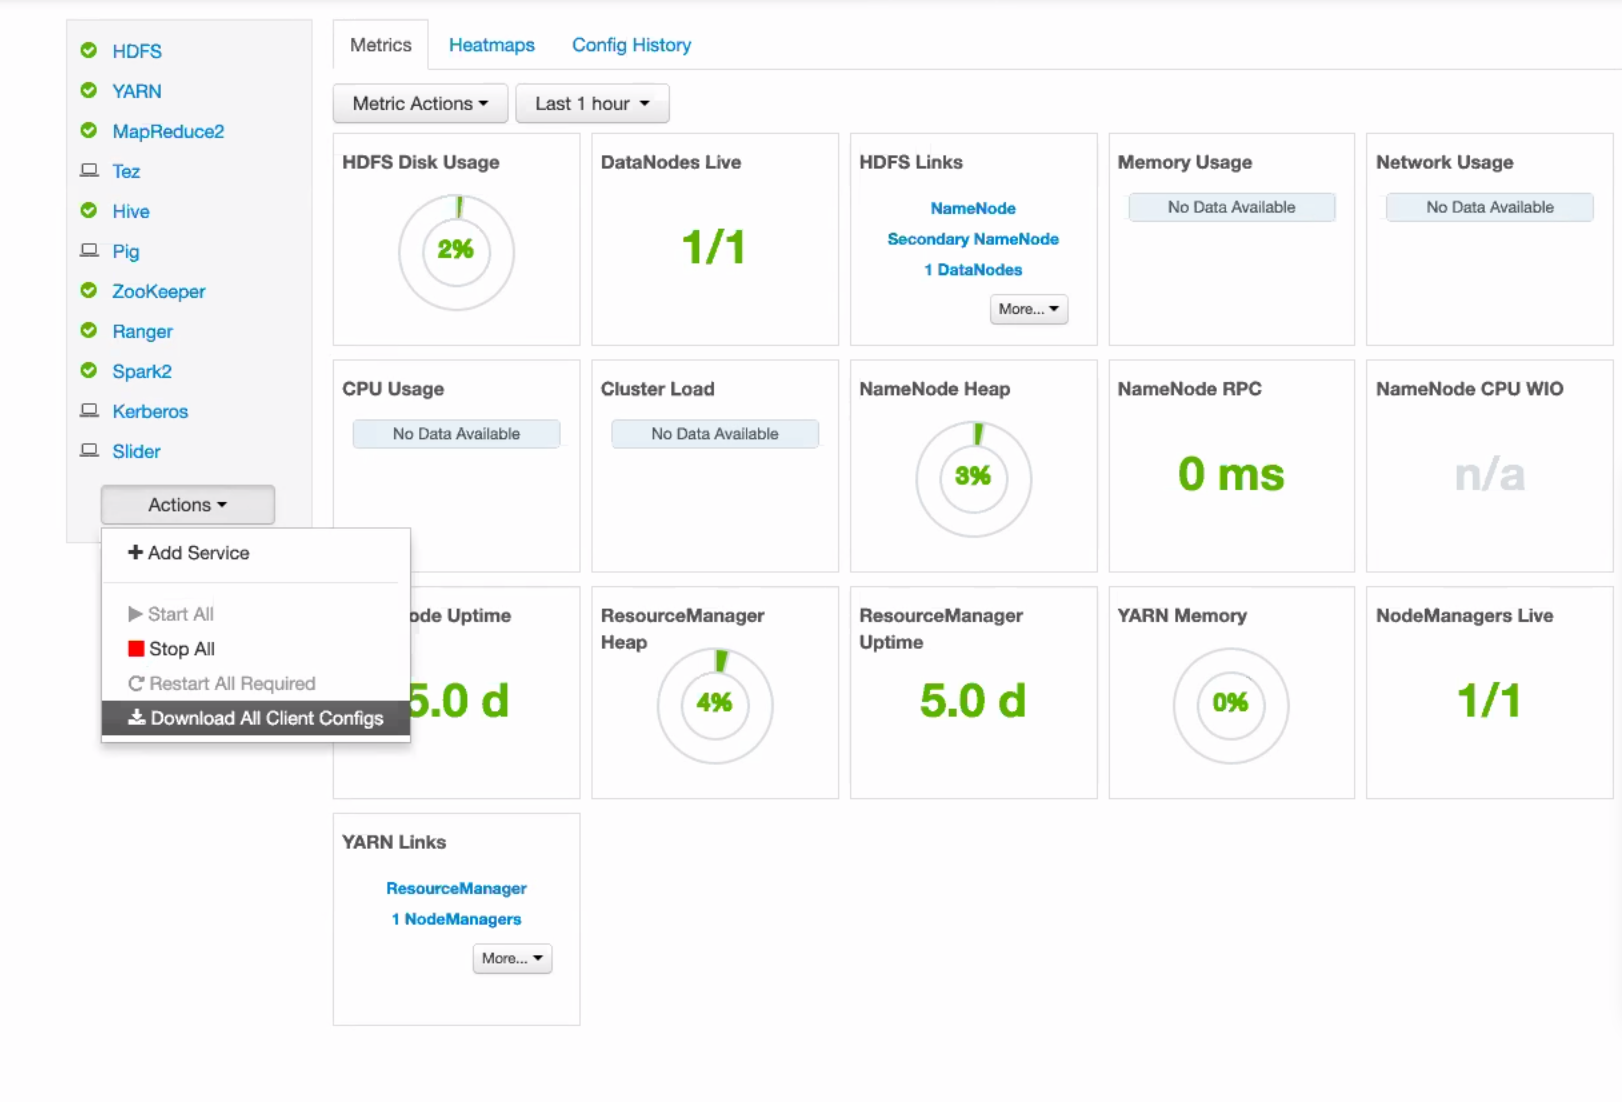
Un-package your download to a directory.
If applicable to your Hive configuration, add the keytab file to the directory.
Note
You do not need to add the krb5.conf file because it is already in the archive you downloaded.
If using SSL, make sure the ssl-client.xml file is present and add the .jks keystore file.
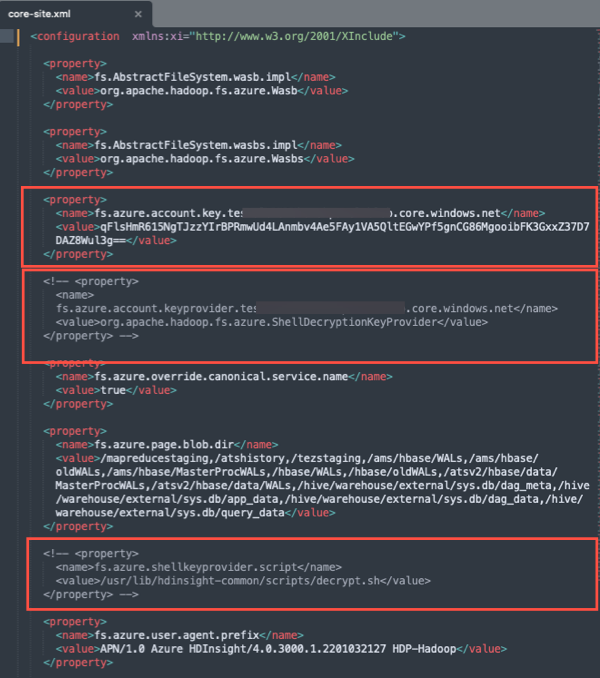
Open the core-site.xml for editing and make the following changes:
5.1 Replace the encrypted account key present in the
fs.azure.account.key.<YOUR_STORAGE_ACCOUNT_NAME>.blob.core.windows.netproperty with the unencrypted key value for your storage account<YOUR_STORAGE_ACCOUNT_NAME>.5.2 Comment out the following properties to disable encryption and decryption of the account key:
fs.azure.account.keyprovider.YOUR_STORAGE_ACCOUNT_NAME.blob.core.windows.netfs.azure.shellkeyprovider.scriptExample:
Create a .tgz archive from this directory.
Copy the client configuration archive to your machine. This file will need to be uploaded to Alation on your Hive data source Settings page.
MapR
MapR configurations are spread out and there is no way to download them using a Hive manager UI.
To get Hive client configuration files from MapR:
SSH to your manager instance and form the configuration tarball file.
Example
mkdir client_configs
cp -r /opt/mapr/conf/ client_configs
cp -r /opt/mapr/hive/hive-2.3/conf/ client_configs
cp -r /opt/mapr/hadoop/hadoop-2.7.0/etc/hadoop/ client_configs
If applicable, add:
The krb5.conf file for Kerberos authentication
The keytab file for the service account
The ssl-client.xml file and the .jks file
The aha-conf.xml if your Hive deployment supports QLI (see Adding the aha-conf.xml file).
Copy the client configuration tarball (client_configs.tgz in this example) to your machine. This file will need to be uploaded to Alation on your Hive data source Settings page.
Prepare Kerberos Configuration File and Certificate
Apart from the configuration tarball, make sure you have the krb5.conf file, the keytab file, and the SSL certificate on your machine. You will need to upload them separately and in addition to the client configurations tarball. For sampling and profiling, Alation uses the Hive JDBC driver and passes the Kerberos configuration file, keytab, and the certificate in the JDBC connection parameters. The certificate needs to be exported from the corresponding .jks file to the .cer format.
Prepare the SSL Certificate
The .jks file won’t work with this OCF connector. Create a certificate file from the .jks file using the commands below:
Collect the alias from the .jks file.
keytool -list -v -keystore <jks_file_path>
Export certificate from the .jks file.
keytool -exportcert -alias <alias_name> -keystore <jks_file_path> -file <cer_file_name>
JDBC URI
Basic Authentication
Format
hive2://<hostname_or_ip>:<port>
Example
hive2://10.13.80.155:10000
Basic Authentication + SSL
hive2://10.13.80.155:10000/default;ssl=true;
Kerberos Authentication + SSL
Format
hive2://<hostname_or_ip>:<port>/default;principal=<principal>;ssl=true;
Example
hive2://10.13.80.155:10000/default;principal=hive/ip-10-13-80-155.alation-test.com@ALATION-TEST.COM;ssl=true;
Using ZooKeeper
Format
hive2://<hostname_or_ip>:<port>/;principal=<principal>;serviceDiscoveryMode=zooKeeper;zooKeeperNamespace=<namespace>;ssl=true;
Example
hive2://ip-10-13-10-125.alation-test.com:2181/;principal=hive/_HOST@ALATION-TEST.COM;serviceDiscoveryMode=zooKeeper;zooKeeperNamespace=hiveserver2;ssl=true;
Using Knox
Knox is supported, replacing the Hive server URI with the Knox Server URI in the data source settings. If using Apache Knox, you will need to provide the Knox WebHDFS URI in the JDBC URI field. Documentation on this URI, as well as on how Knox routes gateways, topologies, and clusters using this URI can be found in the Knox book.
Configuration in Alation
Step 1: Install the Connector
Alation On-Premise
Important
Installation of OCF connectors requires Alation Connector Manager to be installed as a prerequisite.
To install an OCF connector:
If this has not been done on your instance, install the Alation Connector Manager: Install Alation Connector Manager.
Ensure that the OCF connector Zip file is available on your local machine.
Install the connector on the Connectors Dashboard page using the steps in Manage Connectors.
Alation Cloud Service
Note
On Alation Cloud Service instances, Alation Connector Manager is available by default.
Depending on your network configuration, you may need to use Alation Agent to connect to databases.
Connection via Alation Agent
Ensure that Alation Agent is enabled on your Alation instance. If necessary, create a Support ticket with Alation for an Alation representative to enable the Alation Agent feature on your instance and to receive the Alation Agent installer.
Connection Without Agent
To install an OCF connector:
Ensure that the OCF connector Zip file is available on your local machine.
Install the connector on the Connectors Dashboard page using the steps in Manage Connectors.
STEP 2: Create and Configure a New Data Source
In Alation, add a new data source:
Log in to Alation as a Server Admin.
Expand the Apps menu on the right of the main toolbar and select Sources.
On the Sources page, click +Add on the top right of the page and in the list that opens, click Data Source. This will open the Add a Data Source wizard.
On the first screen of the wizard, specify a name for your data source, assign additional Data Source Admins, if necessary, and click the Continue Setup button on the bottom. The Add a Data Source screen will open.
On the Add a Data Source screen, the only field you should populate is Database Type. From the Database Type dropdown, select the connector name. After that you will be navigated to the Settings page of your new data source.
Note
Agent-based connectors will have the Agent name appended to the connector name.
The name of this connector is Hive OCF connector.
Access
On the Access tab, set the data source visibility using these options:
Public Data Source—The data source will be visible to all users of the catalog.
Private Data Source—The data source will be visible to the users allowed access to the data source by Data Source Admins.
You can add new Data Source Admin users in the Data Source Admins section.
General Settings
Note
This section describes configuring settings for credentials and connection information stored in the Alation database. If your organization has configured Azure KeyVault or AWS Secrets Manager to hold such information, the user interface for the General Settings page will change to include the following icons to the right of most options:

By default, the database icon is selected, as shown. In the vault case, instead of the actual credential information, you enter the ID of the secret. See Configure Secrets for OCF Connector Settings for details.
Perform the configuration on the General Settings tab.
Application Settings
Specify Application Settings if applicable. Click Save to save the changes after providing the information.
Parameter |
Description |
|---|---|
BI Connection Info |
This parameter is used to generate lineage between the current data source and another source in the catalog, for example a BI source that retrieves data from the underlying database. The parameter accepts host and port information of the corresponding BI data source connection. Use the following format: You can provide multiple values as a comma-separated list:
Find more details in BI Connection Info. |
Disable Automatic Lineage Generation |
Select this checkbox to disable automatic lineage generation from QLI, MDE, and Compose queries. By default, automatic lineage generation is enabled. |
Connector Settings
Data Source Connection
Populate the data source connection information and save the values by clicking Save in this section.
Parameter |
Description |
|---|---|
JDBC URI |
Specify the JDBC URI in the required format. |
Username |
Specify the service account username. |
Password |
Specify the service account password. |
Hive version |
Select your Hive version. |
Hadoop version |
Select your Hadoop version. |
Hive Configuration |
Use the upload link under Hive Configuration to upload your Hive client configurations archive. |
Kerberos Configuration
Provide the Kerberos information and save the values by clicking Save in this section.
Parameter |
Description |
|---|---|
Enable Kerberos Authentication |
Enable or disable Kerberos authentication by selecting or clearing the Enable Kerberos Authentication checkbox. If the Kerberos Authentication checkbox is enabled upload the krb5.conf file using the upload link under the checkbox. |
Use keytab |
To enable Kerberos with keytab authentication, select the Use Keytab checkbox and upload the keytab file for the service account using the upload link under the checkbox. |
SSL Configuration
Provide the SSL information and save the values by clicking Save in this section.
Note
Ensure that you are uploading the certificate in the correct format. See Prepare the SSL Certificate for details.
Parameter |
Description |
|---|---|
Enable SSL |
Enable SSL authentication by selecting the Enable SSL checkbox. If the Enable SSL checkbox is enabled, upload the SSL certificate using the upload link below. |
Truststore password |
Specify the password for the SSL certificate. The password will be deleted if the data source connection is deleted. |
Performance Configuration
Use these settings to enhance the performance of MDE and QLI. Save the values you specify by clicking Save.
Parameter |
Description |
|---|---|
Thread Count |
By default, QLI runs on a single thread. When the number of QLI files is large, ingestion may take a long time as it reads each file. In such cases, you can increase the thread count, so that the connector can process several files in parallel, reducing the QLI time. When the value is set to a specific number, Alation will create this number of threads for QLI. |
Timeout |
The OCF connector calls the standalone executable (AHA) for QLI and MDE. Communication between the connector and AHA happens through gRPC. If AHA does not respond within the timeout configured using this parameter, in seconds, the connector will mark the MDE or QLI job as failed. The default timeout is 120 seconds. We recommend using this parameter for debugging only. You should not have the need to change it in a normal case. |
Logging Configuration
Select the logging level for the connector logs and save the values by clicking Save in this section. The available log levels are based on the Log4j framework.
Parameter |
Description |
|---|---|
Log level |
Select the log level to generate logs. The available options are INFO, DEBUG, WARN, TRACE, ERROR, FATAL, ALL. |
You can view the connector logs in Admin Settings > Manage Connectors > Hive OCF connector.
Obfuscate Literals
Obfuscate Literals—Enable this toggle to hide actual values in the query statements that are ingested during query log ingestion or executed in Compose. This toggle is disabled by default.
Test Connection
Under Test Connection, click Test to validate network connectivity.
If the connection test fails, a detailed error message will be available in connector logs. Below are some known errors that could be encountered during Test Connection:
Error Message |
Solution |
|---|---|
No subject alternative names matching IP address <IP_ADDRESS> found |
Make sure the IP address added in JDBC URI matches with the SSL certificate. If not, change the JDBC URI IP address. |
UnknownHostException |
This error is specific to Azure HDInsight. Change the primary hostname to the IP address in the hive-site.xml file or make the host accessible to the Alation instance. |
Return code 1 from org.apache.hadoop.hive.ql.exec.mr.MapRedTask. Permission denied. javax.security.auth.login.LoginException: Message stream modified (41) |
Change the hostname to |
Could not connect to hostname on port 10000 |
Hostname is incorrect. Check the hostname of the Hive instance and replace it in the JDBC URI. |
Bad URL format. Hostname not found in the authority part of the url: 10.13.54.57:10000;principal=mapr. Are you missing a ‘/’ after the hostname? |
Make sure the JDBC URI is the correct format. See JDBC URI. |
return code 2 from org.apache.hadoop.hive.ql.exec.mr.MapRedTask |
Using the Alation service account, run a query in
Hive Beeline. It will give you the actual error.
If it is a permissions error, grant sufficient
permissions. If the connection fails even after
permissions are granted, add the following JDBC
parameter to the URI:
Example:
|
Error while processing statement: FAILED: Execution Error, return code 1 from org.apache.hadoop.hive.ql.exec.tez.TezTask |
Using the Alation service account, run a query in Hive Beeline.
It will give you the actual error.
If it is a permissions error, grant sufficient
permissions. If the connection fails even after
permissions are granted, add the following JDBC
parameter to the URI:
Example:
|
Metadata Extraction
You can configure metadata extraction (MDE) for an OCF data source on the Metadata Extraction tab of the Settings page. Refer to Configure Metadata Extraction for OCF Data Sources for information about the available configuration options.
Sampling and Profiling
Sampling and profiling is supported. For details, see Configure Sampling and Profiling for OCF Data Sources.
Compose
For details about configuring the Compose tab of the Settings, refer to Configure Compose for OCF Data Sources.
Query Log Ingestion
On the Query Log Ingestion tab of the Settings page, you can perform QLI manually on demand or schedule it. The QLI pipeline goes through the Hive API and uses the Hive client configuration files uploaded on the General Settings tab. No additional configuration is required for QLI on the Query Log Ingestion tab.
Automated and Manual QLI
You can either perform QLI manually on demand or enable automated QLI:
To perform manual QLI, under the Automated and Manual Query Log Ingestion section of the Query Log Ingestion tab, ensure that the Enable Automated Query Log Ingestion toggle is disabled.
Note
Metadata extraction must be completed first before running QLI.
Click Preview to get a sample of the query history data to be ingested.
Click the Import button to perform QLI on demand.
To schedule QLI, enable the Enable Automated Query Log Ingestion toggle.
Set a schedule under Automated Query Log Ingestion Time by specifying values in the week, day, and time fields. The next QLI job will run on the schedule you have specified.
Note
The hourly schedule for automated QLI is not supported.
Troubleshooting
Refer to Troubleshooting for information about logs.