Configure OAuth Via Snowflake Built-In OAuth Service
Alation Cloud Service Applies to Alation Cloud Service instances of Alation
Customer Managed Applies to customer-managed instances of Alation
Use the steps in this section if you want Alation users to authenticate via the Snowflake built-in OAuth service when they run queries in Compose or perform other actions requiring individual connections. This configuration is based on the capabilities of Snowflake OAuth for Custom Clients. It requires a Snowflake security integration to be created for Alation on Snowflake prior to configuring OAuth on the data source in Alation.
To configure OAuth via Snowflake built-in OAuth service, follow these steps:
Create a Snowflake Security Integration for Alation
On Snowflake, create a Snowflake OAuth integration, using the CREATE SECURITY INTEGRATION SQL command.
The name of the security integration will be visible to users on the consent screen following authorization.
Important
The redirect URI must refer to the /api/datasource_auth/oauth/callback endpoint on the Alation instance from which users will be connecting to Snowflake.
Minimal Set of Parameters
The example below shows the minimal required set of parameters for the security integration:
CREATE SECURITY INTEGRATION <integration_name>
  TYPE = OAUTH
  ENABLED = TRUE
  OAUTH_CLIENT = CUSTOM
  OAUTH_CLIENT_TYPE = 'CONFIDENTIAL'
  OAUTH_REDIRECT_URI = 'https://<alation.company.com>/api/datasource_auth/oauth/callback';
In this example:
TYPESpecifies the type of integration. Must be set to
OAUTH.ENABLEDEnables or disables the integration. Set to
TRUEto enable.OAUTH_CLIENTSpecifies the client type. Use the value
CUSTOMfor integrating with Alation.OAUTH_CLIENT_TYPESpecifies the client type. Use the value required by your environment.
OAUTH_REDIRECT_URISpecifies the client URI. Use the format
https://<alation.company.com>/api/datasource_auth/oauth/callback.
Extended Set of Parameters
You can optionally use more parameters, depending on the security requirements at your company and your specific use case. The example below shows an extended configuration for a security integration:
CREATE SECURITY INTEGRATION <integration_name>
  TYPE=OAUTH
  ENABLED=TRUE
  OAUTH_CLIENT = CUSTOM
  OAUTH_CLIENT_TYPE='CONFIDENTIAL'
  OAUTH_REDIRECT_URI='http://<alation.company.com>/api/datasource_auth/oauth/callback'
  OAUTH_ISSUE_REFRESH_TOKENS = TRUE
  OAUTH_REFRESH_TOKEN_VALIDITY = 3600
  OAUTH_ENFORCE_PKCE = TRUE;
In the extended example:
Refresh token parameters
Refresh tokens can greatly minimize the frequency with which Compose users must re-authorize with the Snowflake authorization server. This can be particularly useful for features such as scheduled queries and Excel Live Reports. You can consider including these refresh token parameters:
OAUTH_ISSUE_REFRESH_TOKENS—Controls whether refresh tokens can be used to acquire new access tokens without re-authorization from the user.OAUTH_REFRESH_TOKEN_VALIDITY—Configures the lifetime of refresh tokens and defaults to 90 days.
The PKCE (Proof Key of Code Exchange) parameter
You can consider including the
OAUTH_ENFORCE_PKCEparameter to make the OAuth flow more secure. By default, this is not required by the Snowflake security integration.
Collect Authentication Information
From the Snowflake security integration, collect the authentication information for Alation:
Retrieve the client ID and secret generated by Snowflake when the security integration was created. You can use the SQL command below. For more information this system function in Snowflake, refer to SYSTEM$SHOW_OAUTH_CLIENT_SECRETS.
SELECT SYSTEM$SHOW_OAUTH_CLIENT_SECRETS('<integration_name>');
Note
The command will return two client secrets to facilitate uninterrupted rotation. You don’t need
OAUTH_CLIENT_SECRET_2.Retrieve the authorization and token request endpoints by describing the integration:
DESC SECURITY INTEGRATION "<integration_name>";
You’ll need the values of the following properties:
OAUTH_AUTHORIZATION_ENDPOINT—OAuth 2.0 authorization endpoint.OAUTH_TOKEN_ENDPOINT—OAuth 2.0 token request endpoint.
Configure Your Data Source to Use OAuth
After creating the security integration and retrieving the required information, configure OAuth on your data source in Alation.
You must have Data Source Admin access for a data source to configure its settings.
To enable OAuth for a Snowflake data source:
In Alation, open the data source Settings page.
Go to the Compose tab.
Locate the OAuth Connection block of settings.
Select the checkbox Enable OAuth in Compose. This will reveal the parameters for the OAuth setup.
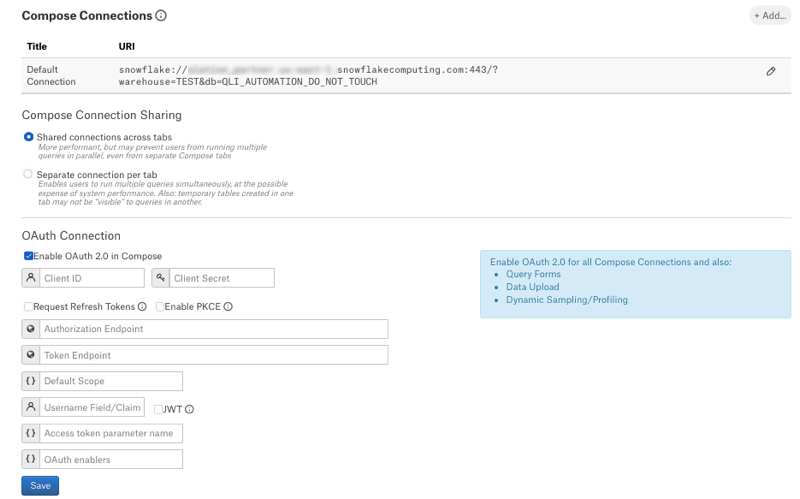
Provide the values.
Property |
Value |
|---|---|
Client ID |
Use the client ID you retrieved from the Snowflake security integration. |
Client Secret |
Use the client secret you retrieved from the Snowflake security integration. |
Request Refresh Tokens |
For the built-in Snowflake OAuth, the ability
to request refresh tokens is controlled by
the Select the Request Refresh Tokens checkbox
if you set the |
Enable PKCE |
For the built-in OAuth, the use of PKCE is
controlled by the Select the Enable PKCE checkbox if the
|
Authorization Endpoint |
Use the value of the property
|
Token Request Endpoint |
Use the value of the property |
Default Scope |
The built-in Snowflake authorization server automatically
assigns a default scope if none is specified in the authorization
request. The default scope is determined by the user’s default
role. If no default role is assigned to the user, the default is
The scope |
Refresh Scope |
The Refresh Scope field becomes available if you select
the Request Refresh Tokens checkbox.
Use value: |
Username Field/Claim |
Use the value |
JWT |
Leave the JWT checkbox clear. |
Access token parameter name |
Leave blank. |
OAuth enablers |
Use the value |
Click Save.
Under Compose Connections, edit the default Compose connection to use OAuth or add a new Compose connection that is OAuth-enabled.
You make a connection OAuth-enabled by adding the query parameter
&authenticator=oauth, for example:snowflake://my_snowflake.us-east-1.snowflakecomputing.com:443/?warehouse=DEMO_WH&authenticator=oauthNote
Enabling OAuth for a Snowflake data source does not prevent you from using basic connections at the same time. OAuth-enabled Compose connections can coexist with basic connections. We recommend changing the URI of the default Connection so that users are required to connect via OAuth by default.
Test the configuration by connecting to your Snowflake data source in Compose and running a query. For information on how OAuth-enabled connections work in Compose, see Connect with OAuth from Compose.