Confluent Kafka
Applies from 2021.3
Alation has certified the Confluent Kafka data source with the following CData driver:
cdata.jdbc.apachekafka.ApacheKafkaDriver.cdata.jdbc.apachekafka
The driver reads the metadata from Confluent Kafka Topics and extracts them as relational tables (include both AVRO/JSON types) and the fields defined in the schema for the specific Topic as columns.
Alation can provide the above mentioned CData driver license for Confluent Kafka. Refer to How to get a CData Driver and use the scenario appropriate to your case.
Scope of Support
Supported as Custom DB with the CData Driver for Confluent Kafka
Metadata Extraction (MDE)
Automated MDE
Nested JSON is not supported
Compose is not supported
Data Sampling is not supported
Data Profiling is not supported
QLI is not supported
Ports
Port 9092 must be open.
Service Account
Create a service account for Confluent Kafka. Refer to Service Accounts for Confluent Cloud.
Permissions
Make sure that the service account has the following permissions:
Cluster resource permissions:
Create
Describe
IdempotentWrite: For producers in Idempotent mode
InitProducerId(idempotent): To initialize the producer(Optional)
Topics resource permissions:
Alter
Create
Describe
Read
Write
Required Information
JDBC URI for the Confluent Kafka data source
JDBC URI
When building the URI, include the following minimal list of required parameters:
RegistryUser - Username to authorize with the server specified in RegistryUrl.
RegistryPassword - Password to authorize with the server specified in RegistryUrl.
AuthScheme - The scheme used for authentication. Accepted entries are Auto,Plain,Scram,Kerberos.
Bootstrapserver - The address of the Kafka BootstrapServer.
RegistryURL - The server for the schema registry. When this property is specified, the driver will read Avro schema from the server.
User - Username that authenticates to Kafka.
Password - Password that authenticates to Kafka.
UseSSL - This field sets whether SSL is enabled.
Important
Include UseSSL=True parameter in the URI when connecting to the Confluent Kafka.
RTK - When you purchase a CData driver from Alation, you are provided an RTK that needs to be included into the URI. If you purchased the driver from CData, you should have a license file that needs to be placed on the Alation server together with the driver .jar file.
Below are the list of optional parameters that can be either included in the URI or in the Properties filed on the General Settings page if required:
TypeDetectionScheme - Comma-separated list of options specifying how the provider will scan the data to determine the fields and datatypes for the bucket. This property must be set to SchemaRegistry if SchemaRegistry is used. This will make use of the Schema Registry API and use a list of predefined schemas.
SerializationFormat - Specifies how to serialize/deserialize the incoming or outgoing message. Set the SerializationFormat value as Auto to read both JSON and Avro topics.
ProxyServer - The hostname or IP address of a proxy to route HTTP traffic through.
ProxyPort (If proxy connection is used) - The TCP port the ProxyServer proxy is running on.
Port Number
Use the following format for the JDBC URI:
apachekafka://RegistryUser=<registryuser>;RegistryPassword=<registrypwd>;SerializationFormat=AUTO;AuthScheme=PLAIN;bootstrapservers=<Server_Address>:<Port_Number>;RegistryURL=<registryendpoint>;TypeDetectionScheme=SchemaRegistry;MessageKeyType=String;UseSSL=True;User=<user>;password=<password>;RTK=<RTK_Key>
Example:
apachekafka://RegistryUser=VXHY5SLU4LOVSJJD;RegistryPassword=pxArnK7Qef+dDnifGPQ8M/Dy7UpJn36968sH76/AxvewZx1/a8vsnkFGFGiih;SerializationFormat=AUTO;AuthScheme=PLAIN;bootstrapservers=<Apache_Kafka_BootstrapServer_Address>:9092;RegistryURL=https://<your_Kafka_instance_URL>;TypeDetectionScheme=SchemaRegistry;MessageKeyType=String;UseSSL=True;User=3MDEYMRCDSOAX6LA;password=WDpLW/E7XLsGtfpGY5GoETS/MadYciDOaon7iFBHD7KkdkmdTfOOYWdYX;RTK=444752465641535552425641454E545042424D33323632390000000000000000000000000000414C5800005559475655474E4E464242370000
Use the following format for the JDBC URI if proxy connection is used:
apachekafka://RegistryUser=<registryuser>;RegistryPassword=<registrypwd>;SerializationFormat=AUTO;AuthScheme=PLAIN;bootstrapservers=<Server_Address>:<Port_Number>;RegistryURL=<registryendpoint>;TypeDetectionScheme=SchemaRegistry;MessageKeyType=String;UseSSL=True;User=<user>;SSLServerCert=*;password=<password>;ProxyServer="<ProxyServer_HostName>";ProxyPort="8866";ProxySSLType="NEVER";RTK=<RTK_Key>
Example:
apachekafka://RegistryUser=VXHY5SLU4LOVSJJD;RegistryPassword=pxArnK7Qef+dDnifGPQ8M/Dy7UpJn36968sH76/AxvewZx1/a8vsnkFGFGiih;SerializationFormat=AUTO;AuthScheme=PLAIN;bootstrapservers=<Apache_Kafka_BootstrapServer_Address>:9092;RegistryURL=https://<your_Kafka_instance_URL>;TypeDetectionScheme=SchemaRegistry;MessageKeyType=String;UseSSL=True;User=3MDEYMRCDSOAX6LA;SSLServerCert=*;password=WDpLW/E7XLsGtfpGY5GoETS/MadYciDOaon7iFBHD7KkdkmdTfOOYWdYX;ProxyServer="localhost";ProxyPort="8866";ProxySSLType="NEVER";RTK=444752465641535552425641454E545042424D33323632390000000000000000000000000000414C5800005559475655474E4E464242370000
Set Up in Alation
Step 1: Add the CData Driver for Confluent Kafka to Alation
Depending on how you purchased the CData driver, from Alation or from CData, the driver installation process will be different. Refer to Add the CData Driver into Alation Instance and use the scenario appropriate to your case.
STEP 2: Add a New Datasource
Add a new Datasource on the Sources page.
Step 3: Set up the Connection
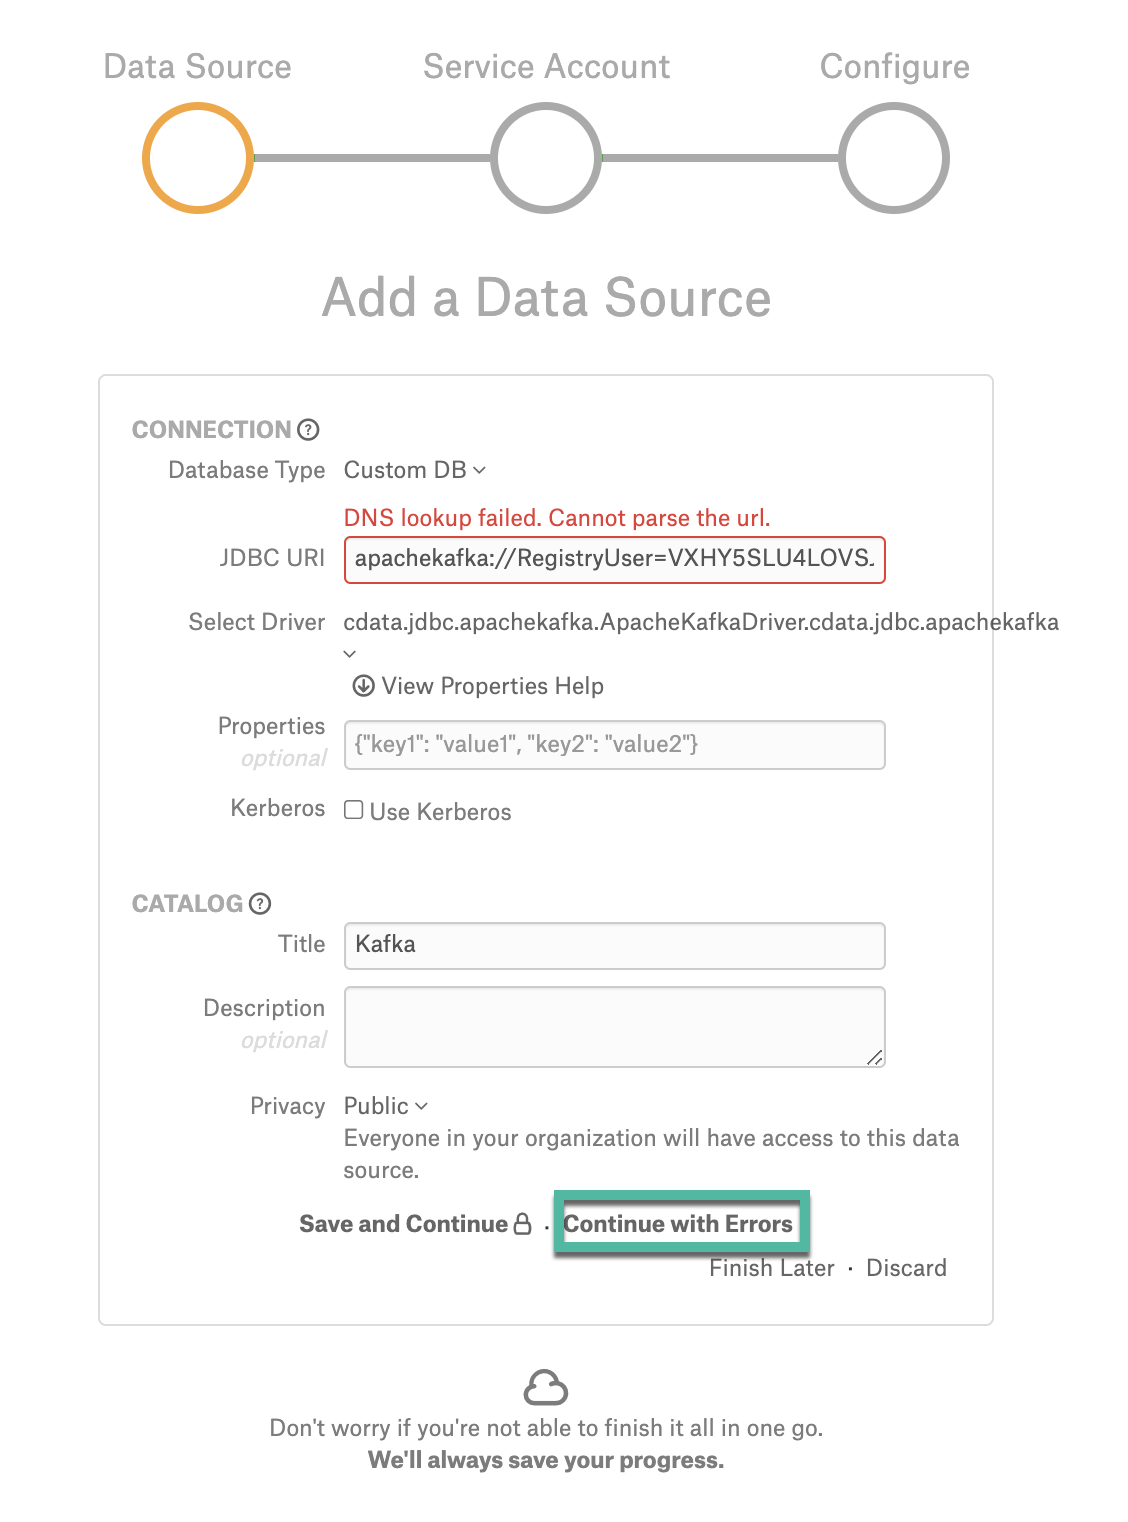
On the Add a Data Source screen of the wizard, specify:
Database Type: Custom DB
JDBC URI: URI in the required format. See JDBC URI.
Select Driver: select the JDBC driver for Confluent Kafka from the Select Driver drop-down list:
cdata.jdbc.apachekafka.ApacheKafkaDriver.cdata.jdbc.apachekafka
Do not select the ‘Use Kerberos’ checkbox
Click Save and Continue.
An error message will appear. Click Continue with Errors to navigate to the Set Up a Service Account wizard.
Step 4: Enter Service Account Credentials
Select Yes.
Provide the username and password of the service account created for Alation.
Click Save and Continue. The next wizard screen, Configure Your Data Source, will open.
Step 5: Configure Your Data Source
Click Skip this Step. After this step, you are navigated to the Settings page of your data source.
General Settings
Once you successfully create a connection, you will land on the General Settings page. Click the Test button under the Network Connection to test the connection. An error message will appear which is expected.
Metadata Extraction
Configure and perform metadata extraction and verify the results:
In Settings > Custom Settings, set the Catalog Object Definition to Catalog.Schema.Table:
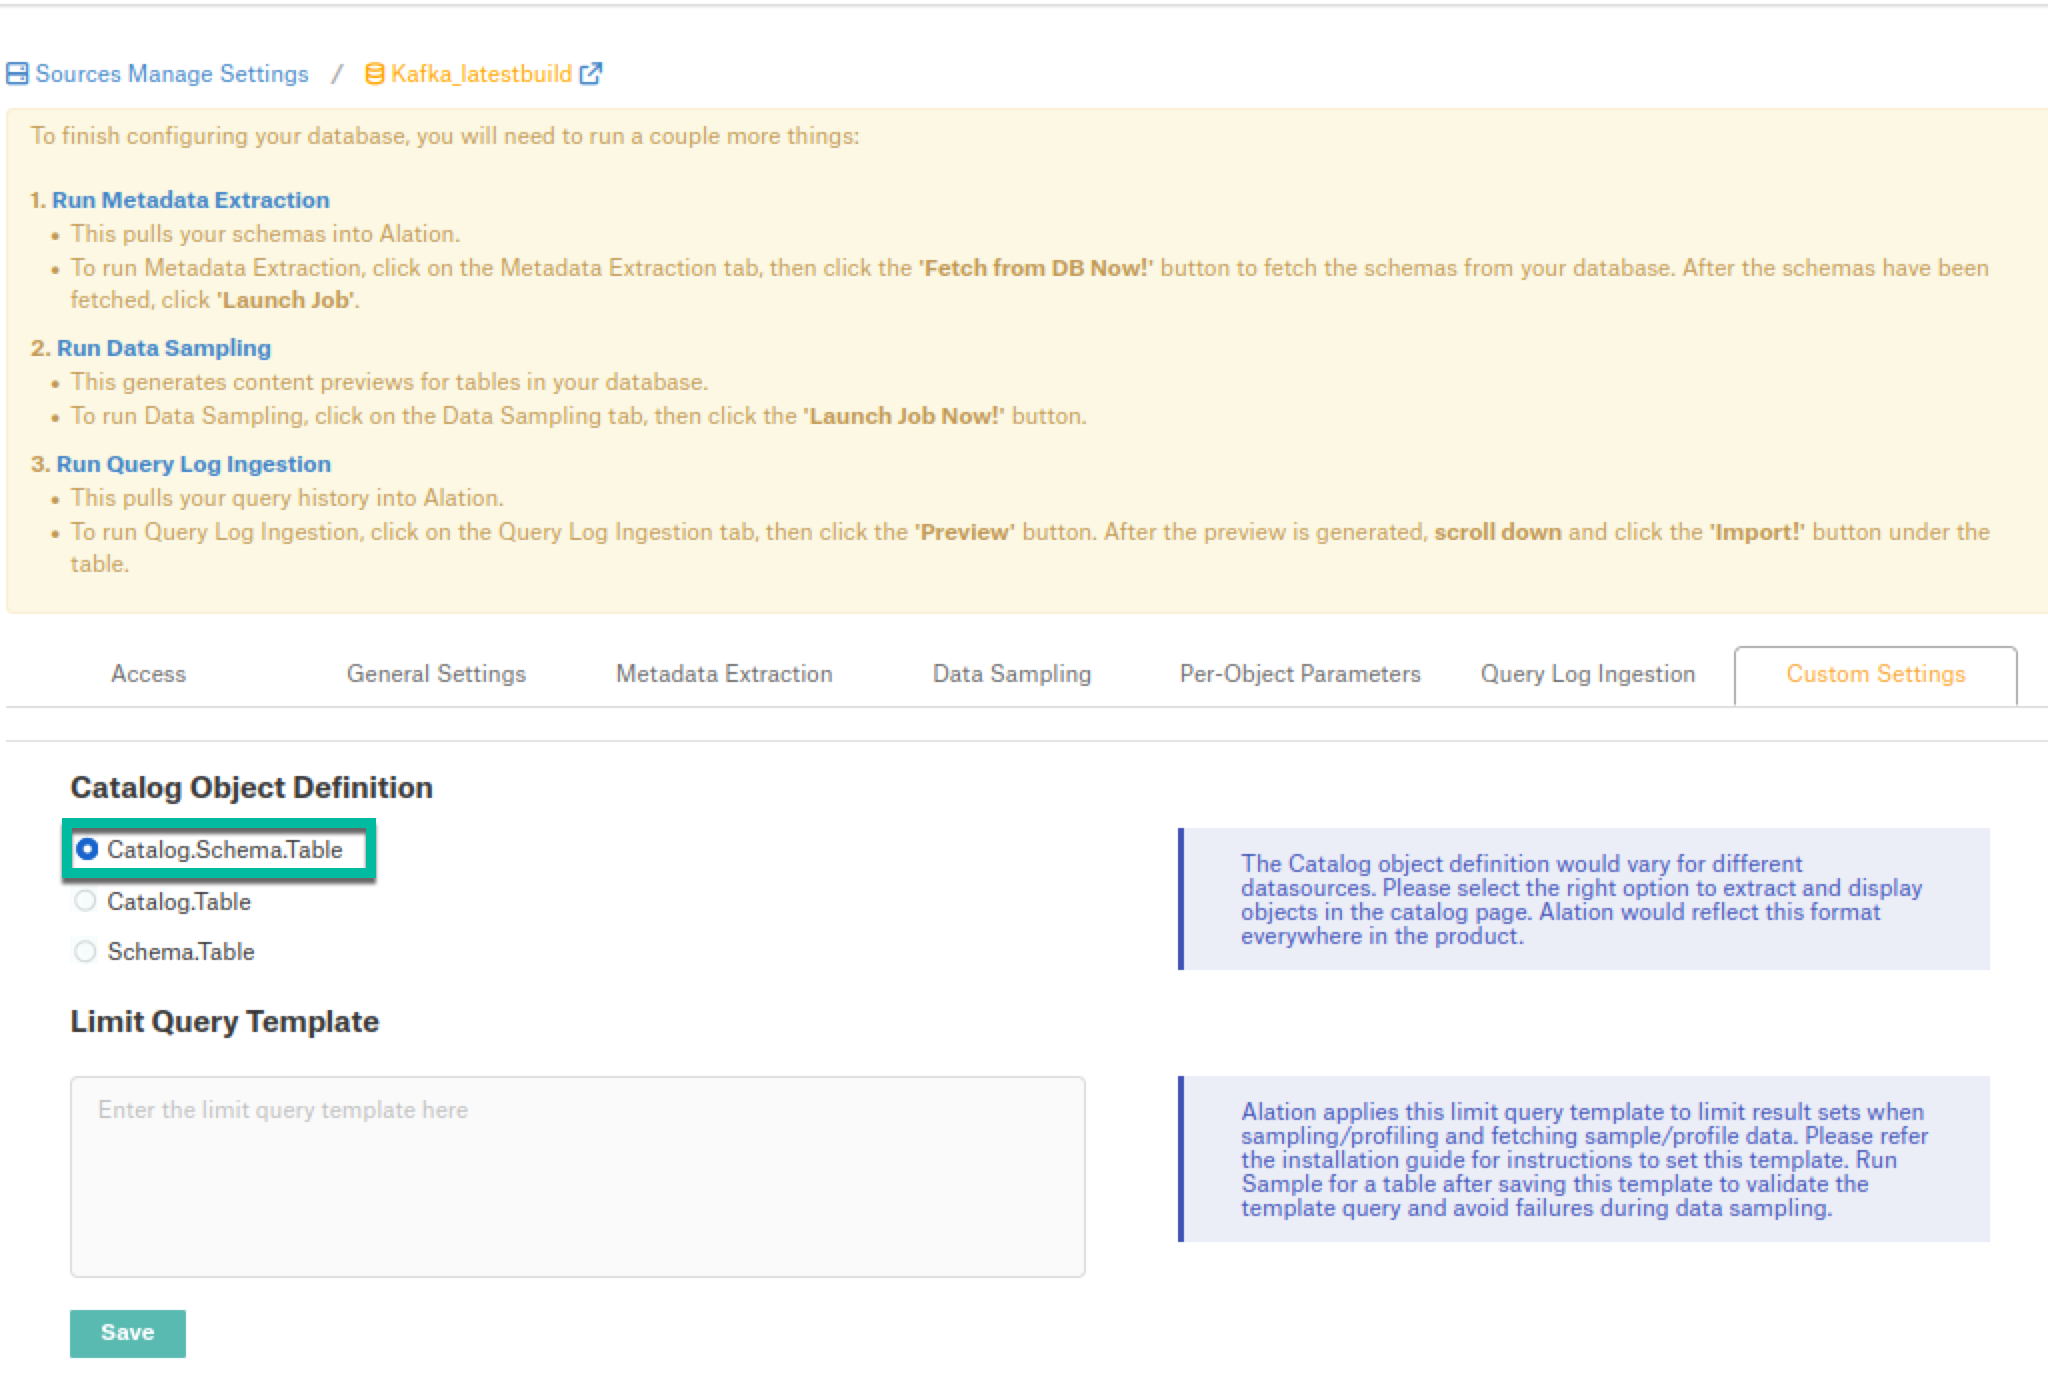
In Settings > Metadata Extraction, set up and perform MDE. Refer to Metadata Extraction.
Profiling
Not supported.
Sampling
Not supported
Query Log Ingestion
Not supported.
Compose
Not supported.
Troubleshooting
Logs to collect/review:
For logs related to MDE: taskserver.log, taskserver_err.log.
For logs related to Compose: connector.log, connector_err.log.
For any other errors: alation-error.log, alation-debug.log
To show driver activity from query execution to network traffic, use Logfile and Verbosity. At the end of the JDBC URI, add Logfile=/tmp/log.file;Verbosity=3; which will generate the log file in the specified directory. Set the Verbosity level as required, refer to Logging.
Contact Alation support for help tracing the source of an error or to avoid a performance issue. Following are the examples of common connection errors and show how to use these properties to get more context.
Authentication Errors: Recording a Logfile at Verbosity 4 is necessary to get full details on an authentication error.
Queries Time Out: A server that takes too long to respond will exceed the driver’s client-side timeout. Setting the Timeout property to a higher value will avoid the connection error. Also you can disable the timeout by setting the property to 0 and setting the Verbosity to 2 will show where the time is spent.
The certificate presented by the server cannot be validated: This error indicates that the driver cannot validate the server’s certificate through the chain of trust. If you are using a self signed certificate, there is only one certificate in the chain. To resolve this error, you must verify yourself that the certificate can be trusted and specify to the driver that you trust the certificate. One way you can specify that you trust a certificate is to add the certificate to the trusted system store; another is to set SSLServerCert.