SAP BusinessObjects Connector: Install and Configure
Alation Cloud Service Applies to Alation Cloud Service instances of Alation
Customer Managed Applies to customer-managed instances of Alation
Configuration in SAP BO
Create a Service Account
STEP 1: Create User
Use the steps described below to create a service account and to grant it the required permissions.
Log in into SAP BO Central Management Console (CMC) with admin credentials.
Select the Users and Groups option.
Click the Users List option.
Right-click and select New User:
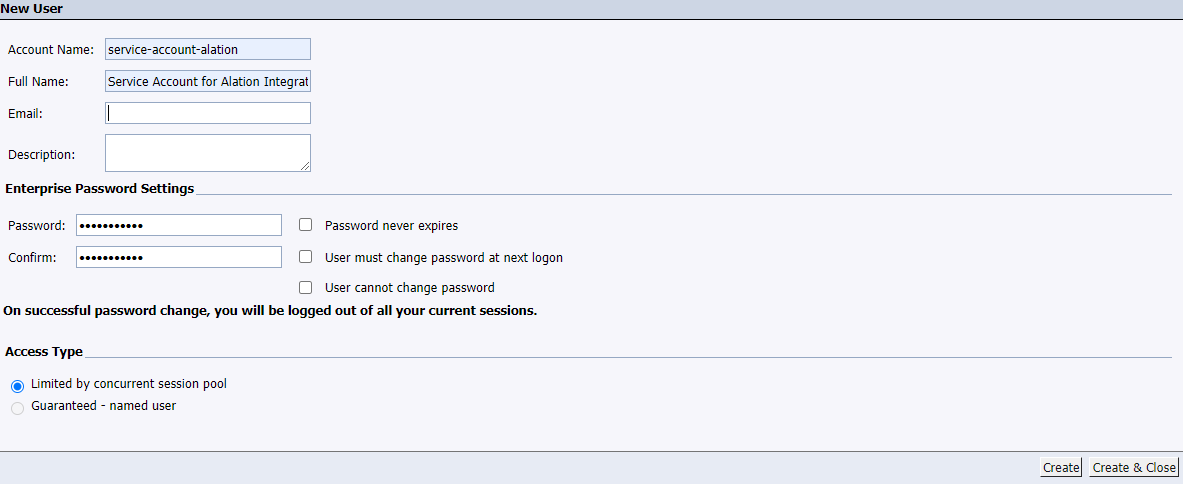
Select Authentication type as Enterprise and fill in the other details.
Select Access type as Guaranteed - named user. Alation recommends Guaranteed - named user so that the service account can get a token at any time to run extraction.
Click Create & Close.
The user can be found in the users list.
STEP 2: Create User Group
Create a user group:
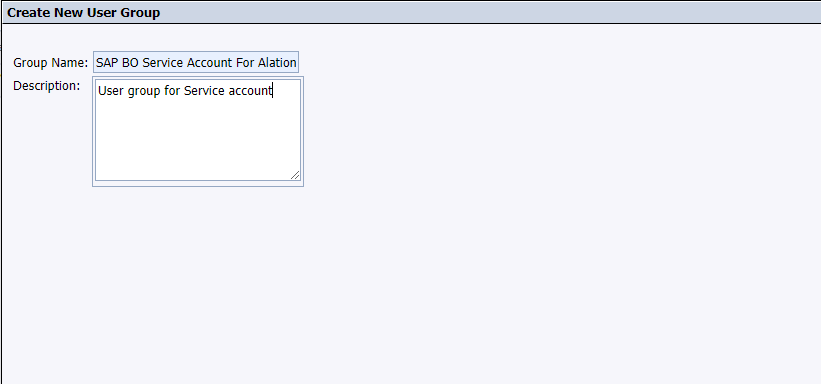
Add the user created for Alation in Step 1 to this group.
STEP 3: Grant Permissions
The Service Account requires View permissions on folders and universes to extract metadata.
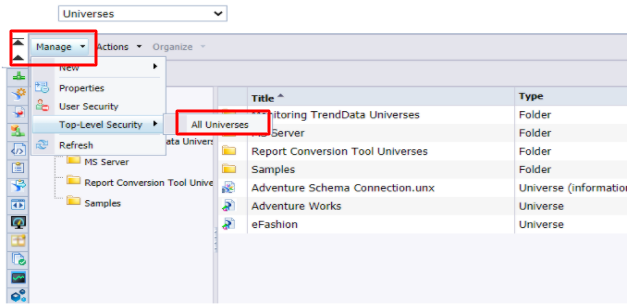
Universe Permissions
Log in into CMC and select Universes in the dropdown.
Click on Manage and select All Universes:
Click on Add Principals:
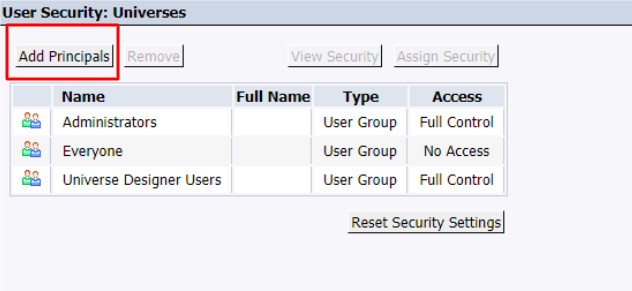
Click on the Group list and select the User Group created in Step 2. Click on Add and Assign Security:
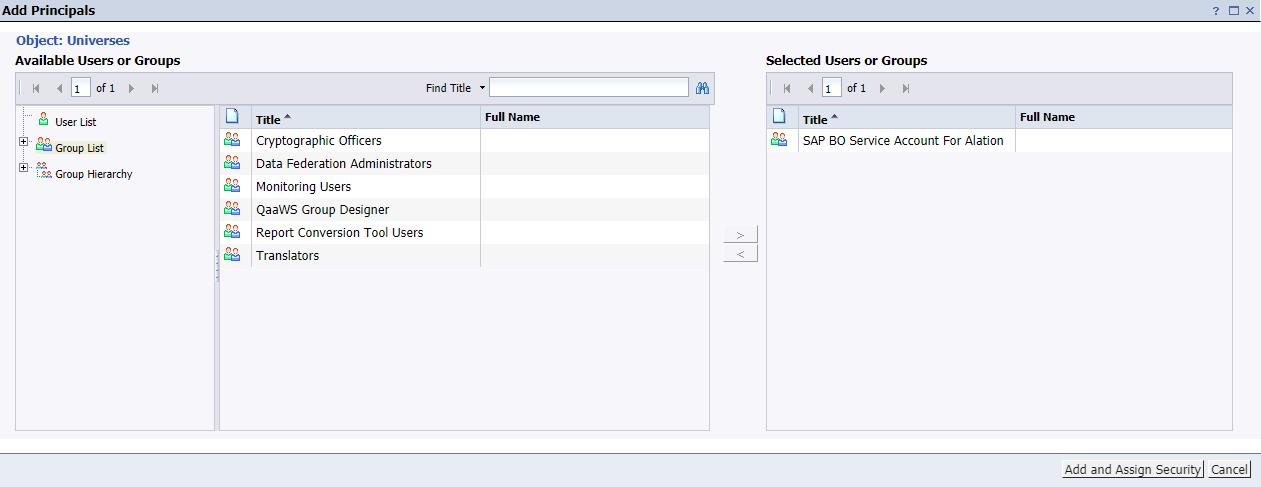
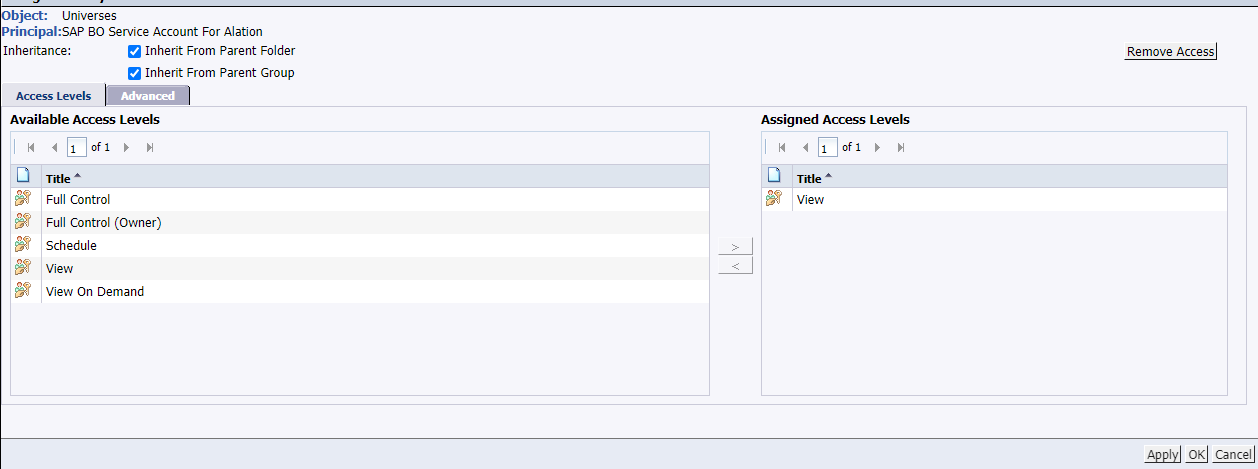
Select the View permission and click OK:
Folder Permissions
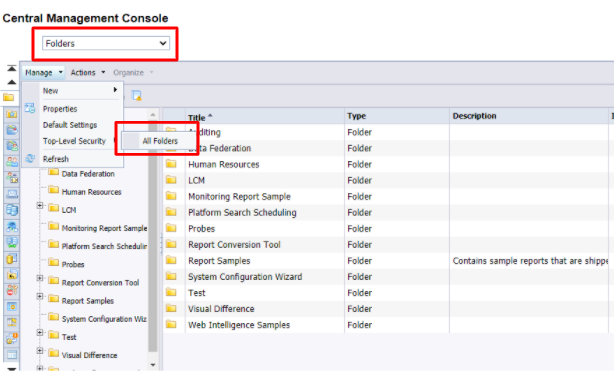
Similarly, select Folders and select All Folders:
Click Add Principals and select the group created in Step 2 of Universe Permissions.
Click Add and Assign Security.
Under the Access levels tab, select the View permission.
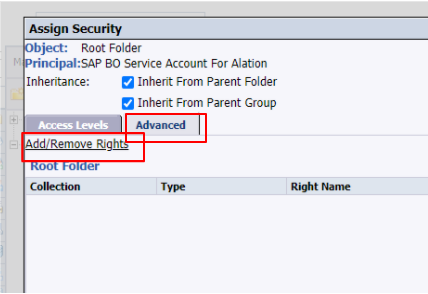
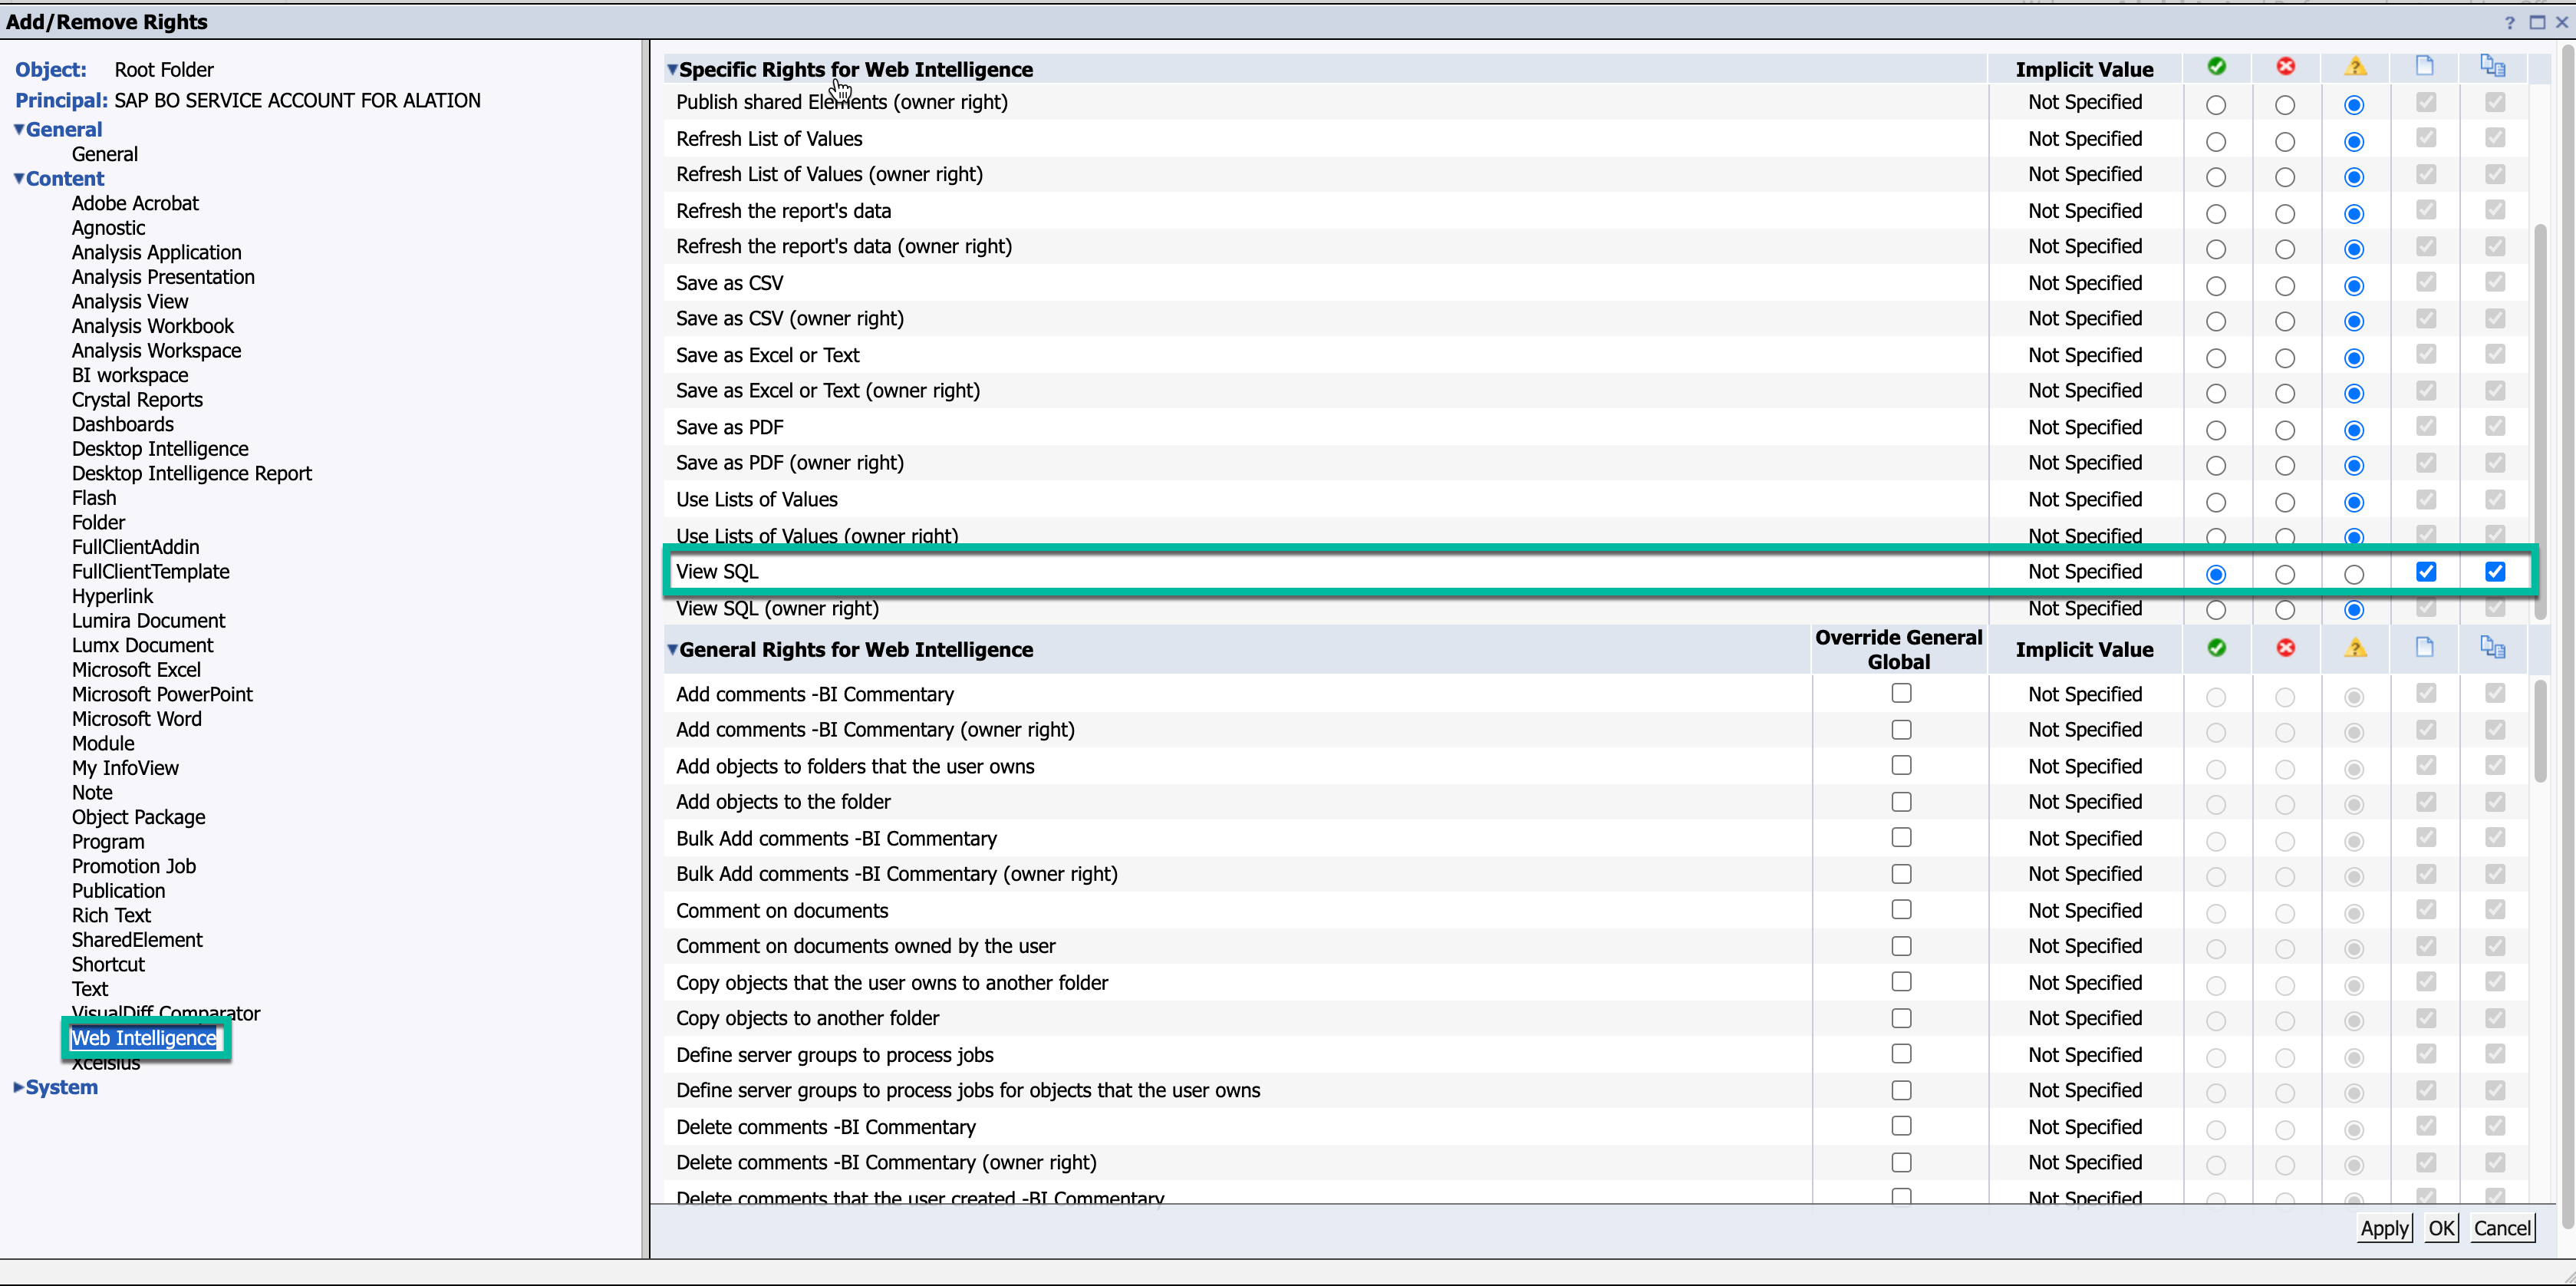
Under the Advanced tab, click on Add/Remove Rights:
Click Content:
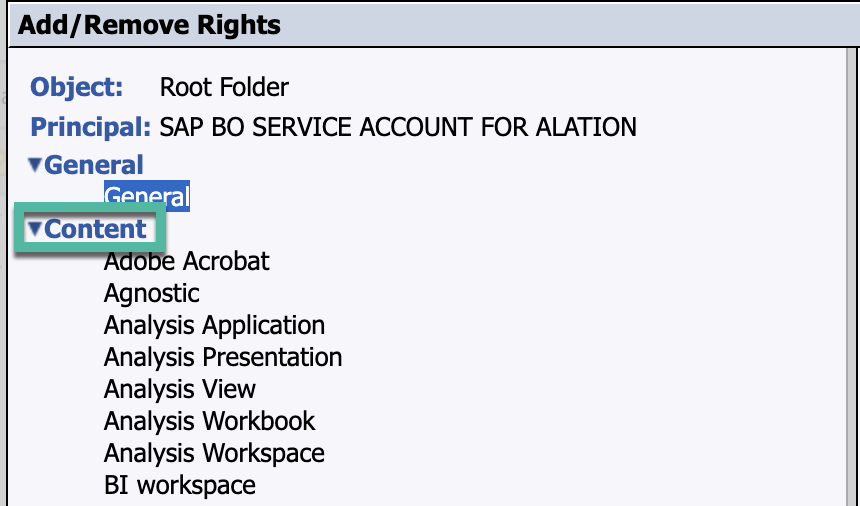
Select Web Intelligence under Content. Grant permissions to View SQL and click OK.
Configuration in Alation
STEP 1: Install the Connector
Alation On-Premise
Important
Installation of OCF connectors requires Alation Connector Manager to be installed as a prerequisite.
To install an OCF connector:
If this has not been done on your instance, install the Alation Connector Manager: Install Alation Connector Manager.
Ensure that the OCF connector Zip file is available on your local machine.
Install the connector on the Connectors Dashboard page using the steps in Manage Connectors.
Alation Cloud Service
Note
On Alation Cloud Service instances, Alation Connector Manager is available by default.
Depending on your network configuration, you may need to use Alation Agent to connect to databases.
Connection via Alation Agent
Ensure that Alation Agent is enabled on your Alation instance. If necessary, create a Support ticket with Alation for an Alation representative to enable the Alation Agent feature on your instance and to receive the Alation Agent installer.
Connection Without Agent
To install an OCF connector:
Ensure that the OCF connector Zip file is available on your local machine.
Install the connector on the Connectors Dashboard page using the steps in Manage Connectors.
STEP 2: Create and Configure a New BI Server Source
This configuration requires the role of the Server Admin.
Add a New BI Server Source
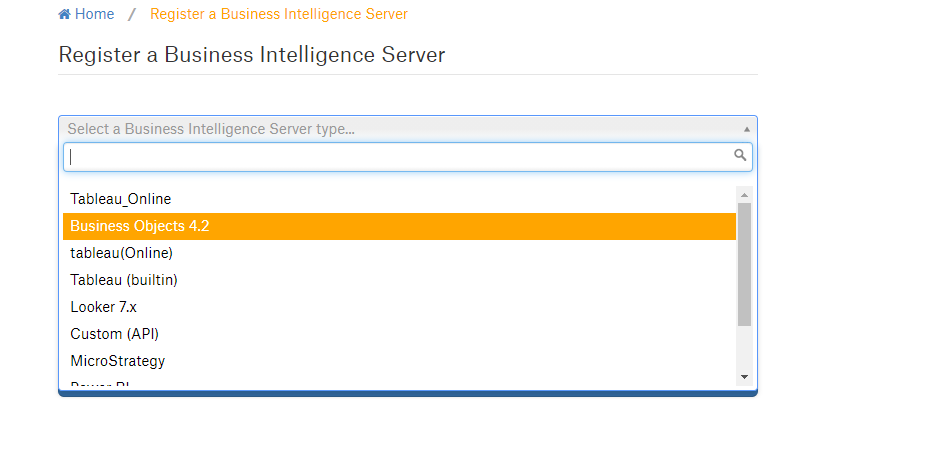
Log in to the Alation instance and add a new BI Server source: Apps > Sources > Add > BI Server. The Register a Business Intelligence Server screen will open.
From the Select a Business Intelligence Server type list, select BusinessObjects and enter a Title and a Description:
Click Add. You will be navigated to your new BI Server source Settings page.
Configure the BusinessObjects BI Source
Perform the configuration on the Settings page.
Configure Access:
You can configure the visibility of a BI source and its child objects such as Folder and Report on the Access tab of the settings page. Refer to for information on how to configure the object privacy settings.
Configure BI Source Visibility
Applies from release 2023.3.5
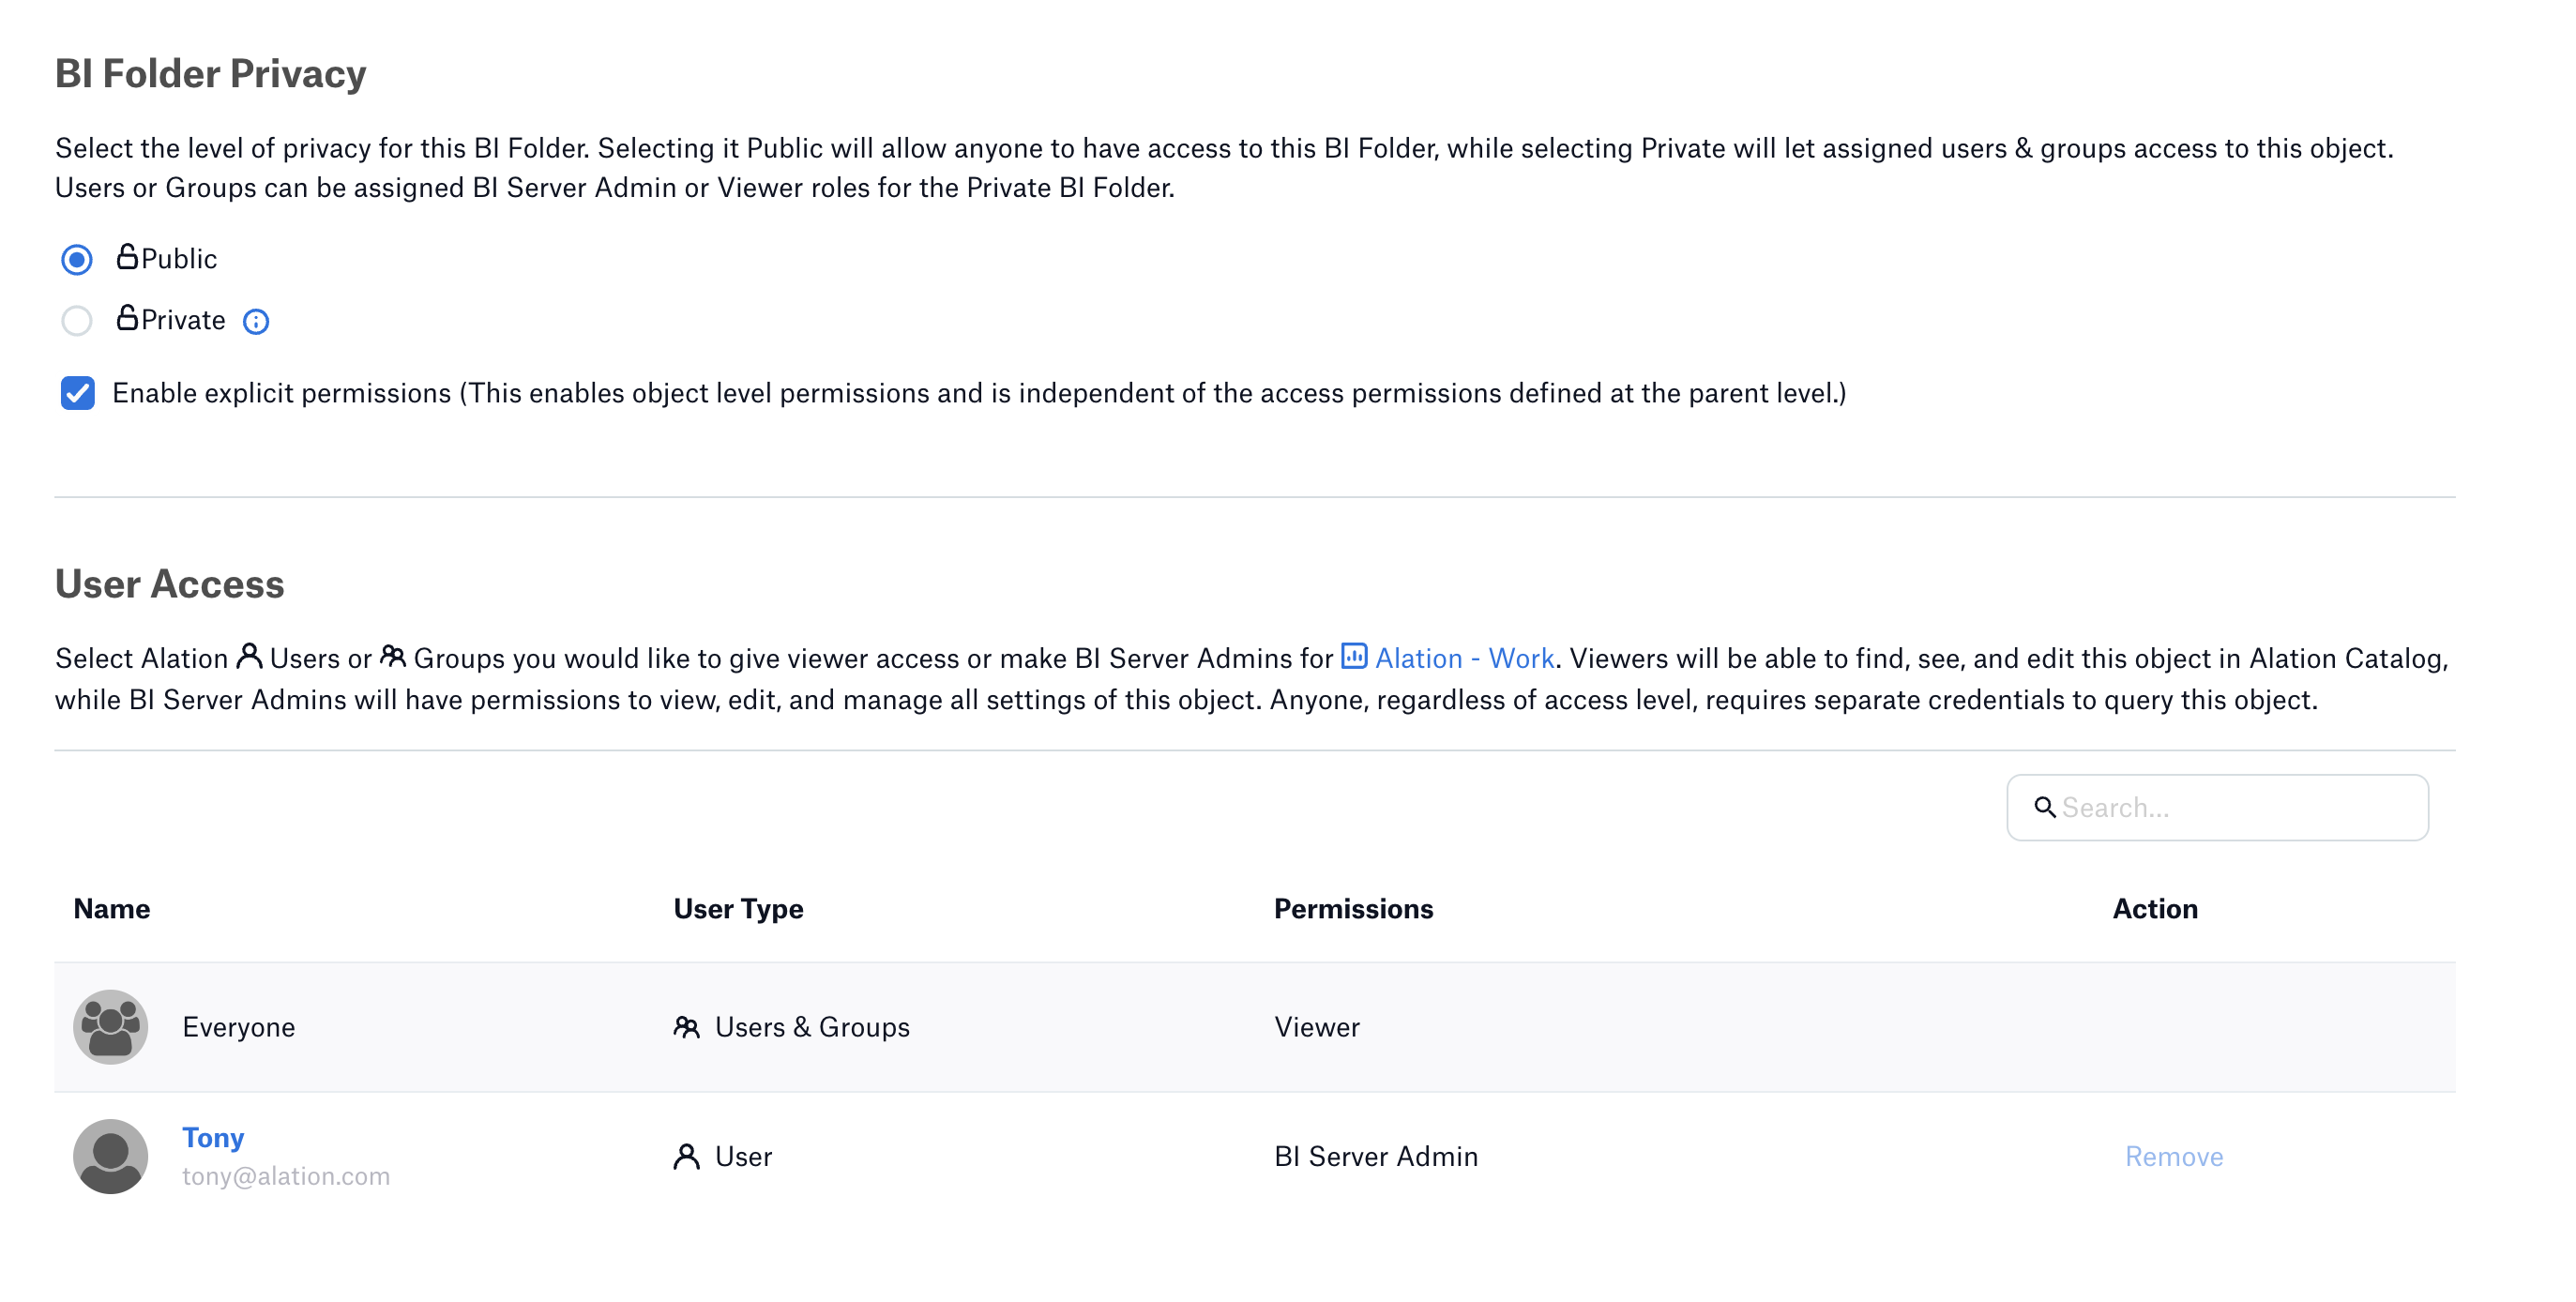
On the Access tab, follow these steps to set the BI source visibility:
Select one of the following options for setting privacy level:
Public BI Server—The BI source will be visible to all users of the catalog.
Private BI Server—The BI Source will be visible to users that have been assigned the BI Server Admin or Viewer role. It will be hidden for all other users.
Add one or more BI Server Admins or Viewers in the User Access section if required.
For more information on BI Source, see Configure Access to OCF BI Sources
Configure BI Folder and Report Visibility
Applies from release 2024.1.4
On the Settings under a BI Folder or Report, follow these steps to set visibility:
Check the option Enable explicit permission to change access permission defined at the parent level object.
This enables and allows permissions at the object level. By default, the access permissions are inherited from the parent level and are not editable.
Select one of the following options for setting privacy level:
Public—The BI folder or report will be visible to all users of the catalog.
Private—The BI folder or report will be visible to users that have been assigned the BI Server Admin or Viewer role. It will be hidden for all other users.
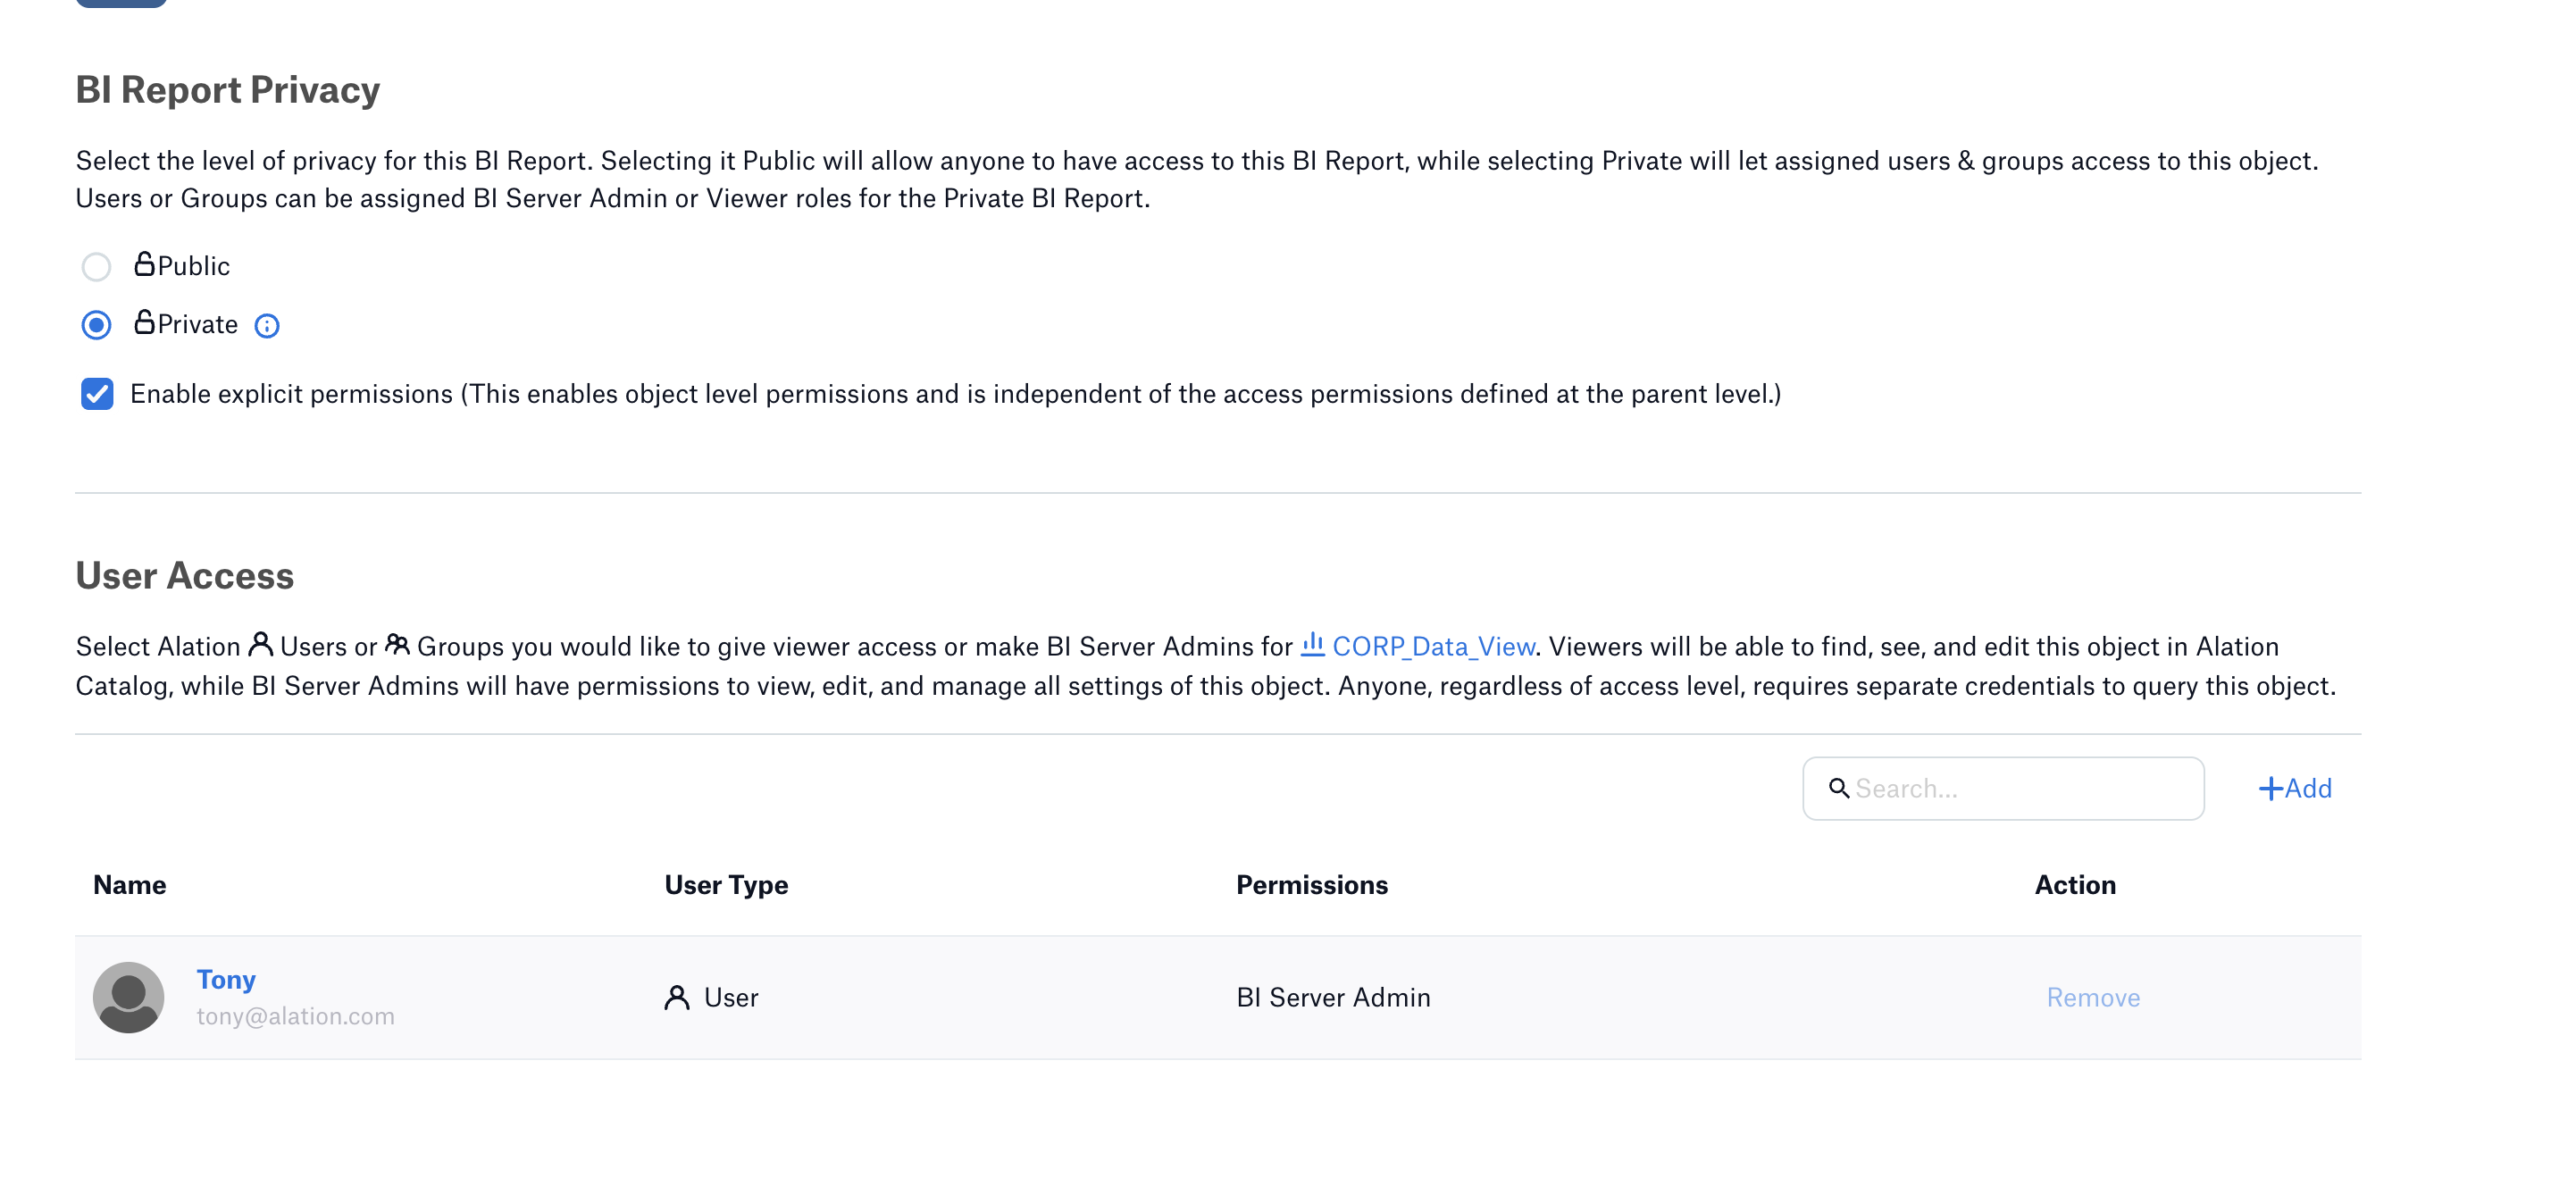
Add one or more BI Server Admins or Viewers in the User Access section if required.
For more information on how to enable the feature and configure access to a folder or report, see Configure Access to OCF BI Folders and Reports
Configure General Settings:
Note
This section describes configuring settings for credentials and connection information stored in the Alation database. If your organization has configured Azure KeyVault or AWS Secrets Manager to hold such information, the user interface for the General Settings page will change to include the following icons to the right of most options:

By default, the database icon is selected, as shown. In the vault case, instead of the actual credential information, you enter the ID of the secret. See Configure Secrets for OCF Connector Settings for details.
Upto 2021.1:

From 2021.2:
From 2021.3:
Parameter
Description
Disable Hard Sync
Leave this checkbox unselected.
Selecting it will disable synchronization of BI objects between Alation and SAP BO.
Note
This is not applicable from version 2021.2
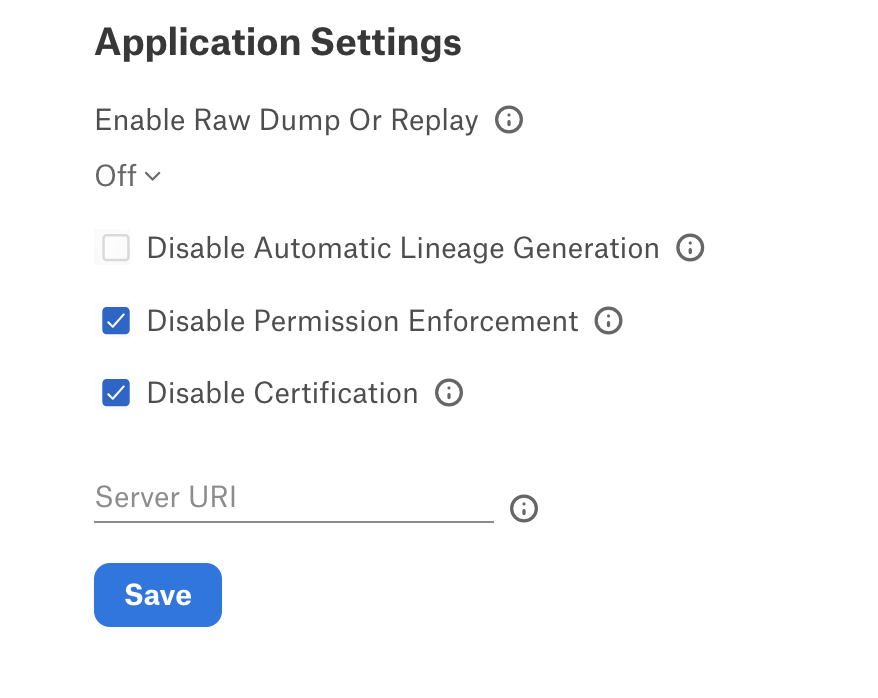
Disable Automatic Lineage Generation
Select the Disable Automatic Lineage Generation checkbox to skip the creation of automatic Lineage after extraction. When automatic Lineage generation is disabled, during extraction Alation does not calculate Lineage data for this BI source.
For more information, see Disable Automatic Lineage Generation.
Note
This is applicable from version 2021.3
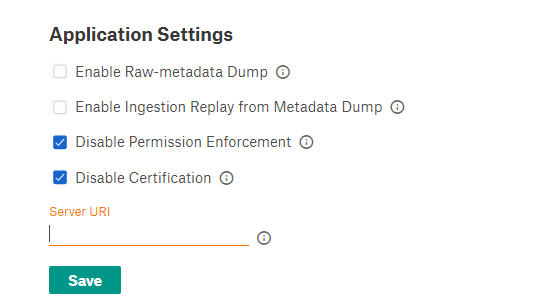
Enable Raw-metadata Dump
Leave this checkbox unselected.
This parameter can be used for debugging. When selected, the connector will not post extracted meta data to Alation. The data will be stored in files which can be shared with Support for debugging.
Enable Ingestion Replay from Metadata Dump
Leave this checkbox unselected.
This parameter can be used for debugging. Metadata from the files created when the Enable Raw-metadata Dump checkbox is selected will be loaded into Alation.
Disable Permission Enforcement
Leave this checkbox selected.
Permission enforcement is not supported between BusinessObjects and Alation.
Disable Certification
Leave this checkbox selected.
Certification of BI objects in BusinessObjects from Alation is not supported.
Server URI
Enter the server URI used to access BusinessObjects Launch Pad URL.
Click Save to save the information you have entered.
Specify Connector Settings:
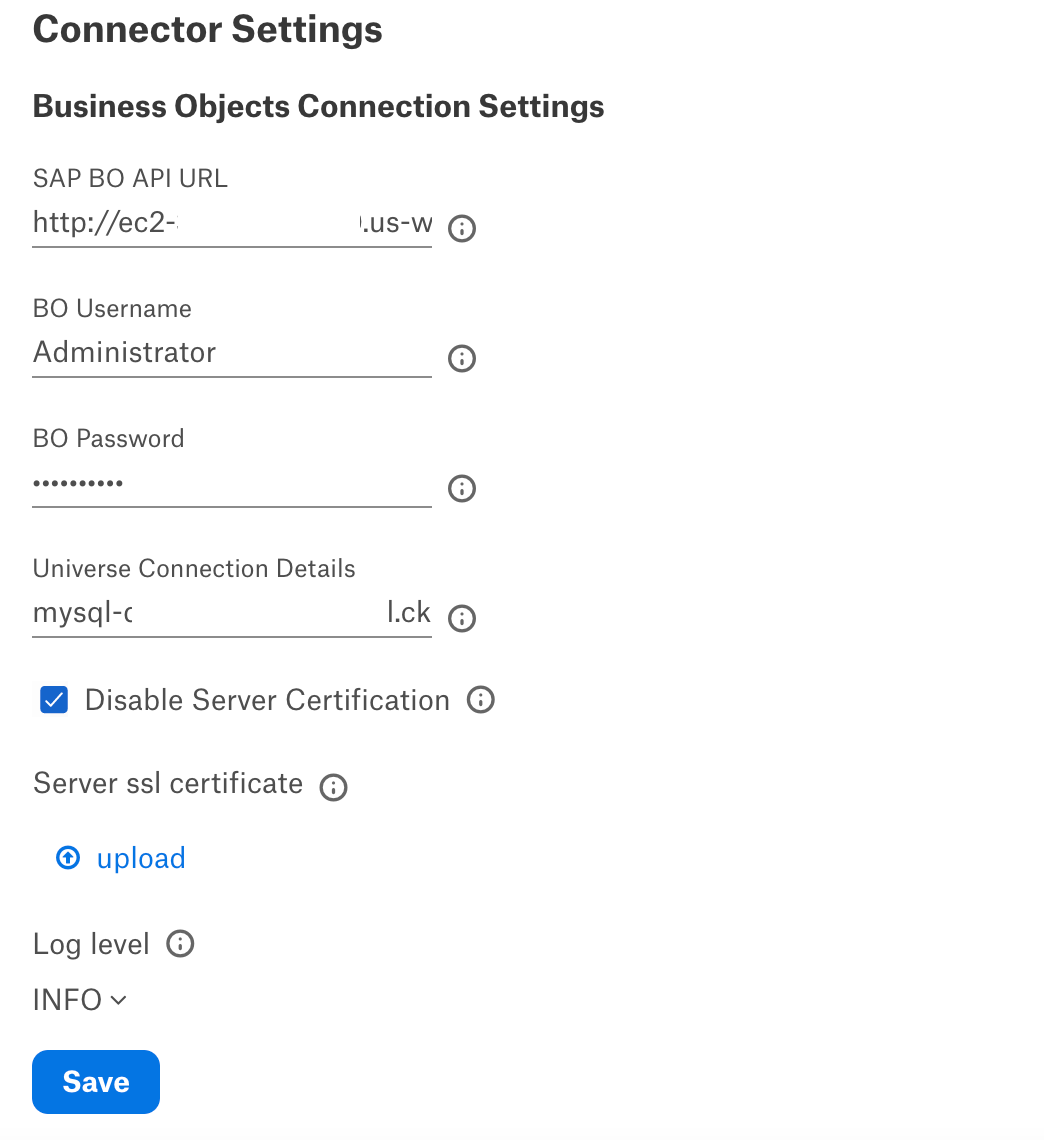
Parameter
Description
SAP BO API URL
Enter BO API URL. API URL should end with a slash (“/”)
BO Username
Enter username of BusinessObjects Service Account
BO Password
Enter password of Business Objects Service Account
Universe Connection Details
Used to populate lineage. Provide the universe name and its data source hostname as key value pairs separated by the
equals(=) symbol. Multiple universes should be separated by semicolons (;).Example: If the
Customeruniverse is created fromhttps://oracle.datasource.comand theHuman Resources.unxis derived fromhttp://mysql.server.com, then the values will beCustomer=https://oracle.datasource.com;Human Resources.unx=http://mysql.server.comDisable Server Certification
Used to bypass certificate validation for REST APIs (Not recommended). Applicable for HTTPS.
Server SSL Certificate
Upload the SAP BO Server certificate.
Log Level
Select the log level to generate logs. The available options are INFO, DEBUG, WARN, TRACE, ERROR, FATAL, ALL.
Note
This field is available from SAP BO OCF Connector version 1.1.0.
Extract child Folders
Enable this checkbox to extract child folders of selected folders along with selected folders from folders list.
Request timeout in seconds
Provide time in seconds to set timeout for each API.
Cross-System Lineage:
Cross-System Lineage is to generate lineage between this SAP BusinessObjects BI source and any supported data source by this connector. To generate the cross-system Lineage, specify the host name and the port number of this BI source on the RDBMS connector’s General Settings > Application Settings > BI Connection Info field in the format mentioned below:
Host_Name:Port_NumberExample:
adb-8443049157651279.19.azuredatabricks.net:443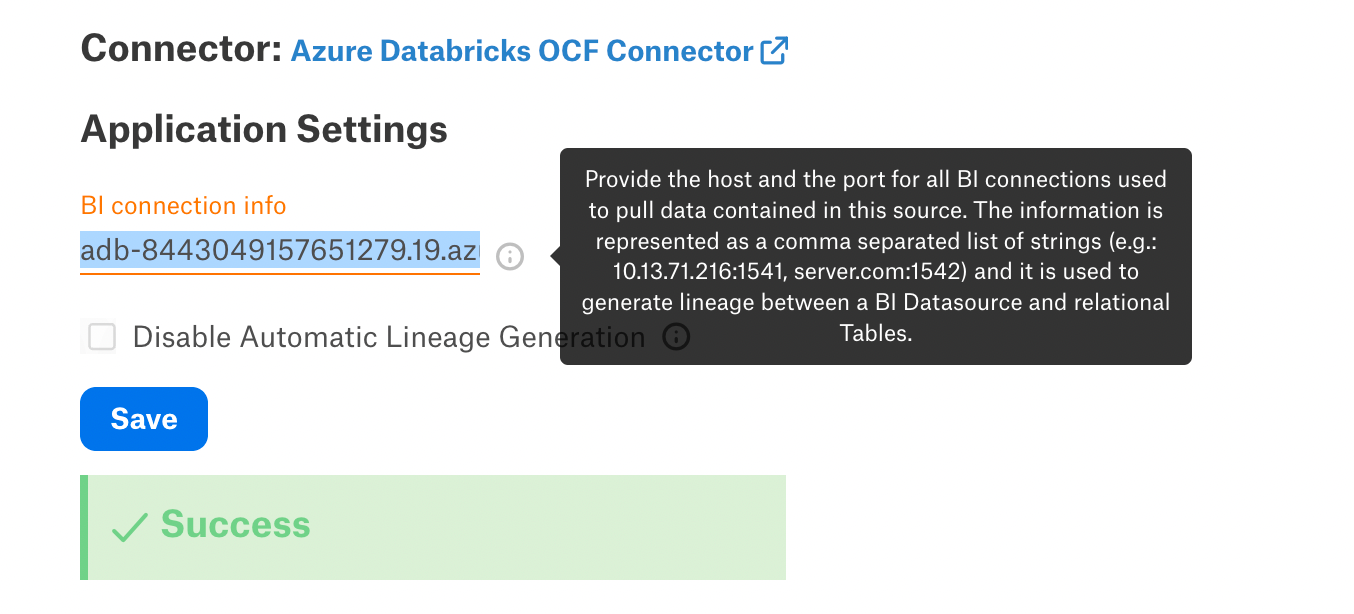
Note
This image is from the supported data source General Settings page.
Click Save.
Under Test Connection, click Test to validate network connectivity.
Configure metadata extraction under Extraction Settings. Turn on Selective Extraction, if required. Selective extraction settings are used to apply a filter to include or exclude a list of Folders.
From connector version 1.1.0:
Extraction of nested folders is supported in selective extraction. Users can extract the sub-folders by performing selective extraction and catalog them without extracting its parent folders.

Click Get List of Projects to first fetch the list of Folders from BusinessObjects.
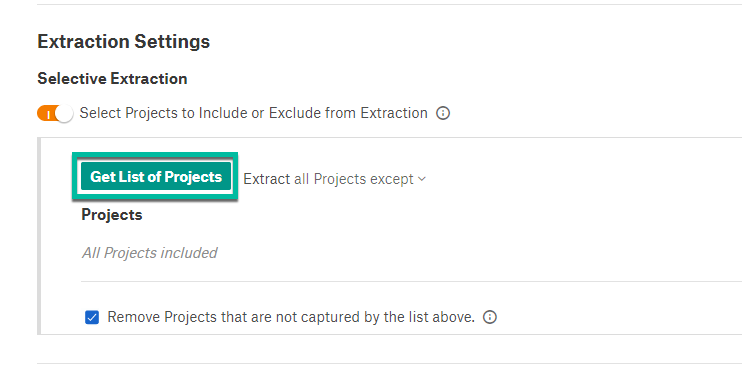
The status of the Get Projects action is logged in the Job History table at the bottom of the Settings page.
After folder synchronization is complete, a drop-down list of the main Level of public folders will become enabled.
Select one or more Folders:

Check if you are using the desired filter option. Available filter options are described below:
Filter Option
Description
Extract all Folders except
Extract metadata from all Folders except from the workspaces selected.
Extract only these Folders
Extract metadata only from the selected Folders.
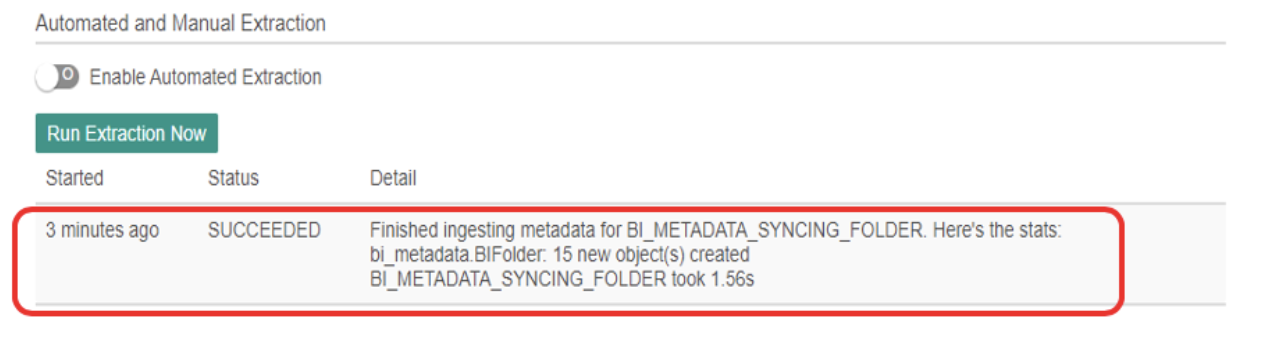
Click Run Extraction Now to extract metadata. The status of the extraction action is also logged in the Job History table at the bottom of the page.
If you wish to automatically update the metadata extracted into the Catalog, under Automated and Manual Extraction, turn on the Enable Automated Extraction switch and select the day and time when metadata must be extracted. The metadata extraction will be automatically scheduled to run on the selected schedule.
Limitations
Incremental MDE is not supported.
Metadata extraction can take more time if the number of objects selected for MDE is large.
The SAP BO queries should not have SAP BO specific template objects, as it does not show the lineage for the tables used in that query.
The SAP BO queries should be fully qualified for their datasources. For example, the query represented below is not fully qualified for MySQL as the schema is missing:
SELECT TEST5.TEST2_COL1, customer_details_new_1.col FROM TEST5, customer_details_new_1
For the above query the lineage will be shown as a temp object for TEST5 and customer_details_new_1.
In SAP BO, a context is a set of joins in the universe that provides a valid join path between tables and Web UI for generating SQL. For more information, see https://help.sap.com/docs/SAP_BUSINESSOBJECTS_BUSINESS_INTELLIGENCE_PLATFORM/512fca6758c4495bb6a50fe3e1e4b892/464f95486e041014910aba7db0e91070.html In SAP BO, you can use contexts when creating universes. When you use such a universe while creating a document without selecting a context, report creation within the document fails as the query plan API for fetching the data provider query returns an error response. Hence, connection objects will be missing for such data providers. To resolve this issue, get to the corresponding document in the SAP BO instance and provide a context for properly creating the report.
For SAP version 4.2, the query plan API returns a 404 error response for data providers associated with specific documents on the first try. However, SAP version 4.2 will reach the end of support (EOL) by 2025 (https://pages.community.sap.com/topics/bi-platform/maintenance) This issue has been resolved since SAP version 4.3. If connections are missing in your instance, which is still in version 4.2, Alation recommends upgrading the SAP instance to version 4.3.
If you trigger multiple metadata extractions in a single SAP BO instance using the same credentials, metadata will be missing because SAP BO APIs return 404, which is likely due to simultaneous API calls.
Troubleshooting
Test Connection
If test connection fails, make sure the API URL and Service Account credentials are entered correctly.
If Lineage from data provider to underlying data sources table is not generated:
Lineage details for reports created from the universe and the universe should be created from a single data source.
Check whether the connection objects are populated with the queries under the data provider. If connection objects are missing, it is a permission issue. Check STEP 3: Grant Permissions.
Make sure the Universe Name and the Host Name details are provided in the Connector Settings.
Check if the tables used in queries in the connection object are cataloged in Alation by searching.
Lineage will be generated by parsing queries. Query parsing will be done by Alation QLI and not by the Connector. Check if there are any query parsing errors.
Logs to be collected
NGINX logs: /opt/hydra/agent/logs
Alation Connector Manager logs:
To tail:
docker logs -f agentWrite to a file:
docker logs agent >& agent.logs 2>&1Connector logs
Note
alation_ypireticommands should be run from the Alation shell as useralation.
To get Connector ID:
alation_ypireti list --fields id nameTo tail:
alation_ypireti kratos --subcommand tail <connector_id>Write logs to a file:
alation_ypireti kratos --subcomand tail <conector_id> > connector.log 2>&1Write logs from specific date to a file:
alation_ypireti kratos --subcommand logs --since 2020-08-15 <connector_id> > connector.log 2>&1Ingestion logs:
Ingestion logs are available in the celery-default_error.log file.