SQL Server Analysis Service (SSAS)
Applies from 2022.2
Alation has certified the SSAS data source with the following CData driver:
cdata.jdbc.ssas.SSASDriver.cdata.jdbc.ssas
Alation can provide a license for the SSAS CData driver. Refer to How to get a CData Driver and use the scenario appropriate to your case.
Scope of Support
Supported as Custom DB with the CData driver for SSAS
Metadata Extraction (MDE)
Automated MDE
Data profiling
Sampling
Compose
Query log ingestion (QLI) - not applicable
Lineage - not applicable
Service Account
Follow the steps in Configure Service Accounts (Analysis Services) and create a Service Account.
Required Information
JDBC driver to connect to the database: CData JDBC driver for SSAS
JDBC URI for the SSAS data source
JDBC URI
When building the URI, include the following minimal list of required parameters:
URL - The URL used to connect to the SQL Server Analysis Services.
User - The SQL Server Analysis Services user account used to authenticate.
Password - The password used to authenticate the user.
AuthScheme - The scheme used for authentication. Accepted entries are NTLM, Basic, Digest, None, and Negotiate.
RTK Key - when you purchase a CData driver from Alation, you are provided an RTK that needs to be included in the URI. If you purchased the driver from CData, you should have a license file that needs to be placed on the Alation server together with the driver .jar file.
Below are the list of optional parameters that can be either included in the URI or in the Properties field on the General Settings page if required:
ProxyServer - The hostname or IP address of a proxy to route HTTP traffic through.
ProxyPort (If proxy connection is used) - The TCP port the ProxyServer proxy is running on.
Use the following format for the JDBC URI:
ssas://URL="<SSAS_URL>";User="<username>";Password="<password>";AuthScheme=<Authentication_Type>;RTK=<RTK_Key>;
Example:
ssas://URL="22.108.96/OLAD/mdmpump.dll";User="admin";Password="password";AuthScheme=NTLM;RTK=444752465641535552425641454E545042424D33323632390000000000000000000000000000414C5800005559475655474E4E464242370000
Use the following format for the JDBC URI if proxy connection is used:
ssas://URL="<SSAS_URL>";User="<username>";Password="<password>";AuthScheme=<Authentication_Type>;ProxyServer=<ProxyServer_Hostname>;ProxyPort=8888;RTK=<RTK_Key>;
Example:
ssas://URL="22.108.96/OLAD/mdmpump.dll";User="admin";Password="password";AuthScheme=NTLM;ProxyServer=122.5.2.1;ProxyPort=8888;RTK=444752465641535552425641454E545042424D33323632390000000000000000000000000000414C5800005559475655474E4E464242370000
Set Up in Alation
Step 1: Add the CData Driver for SSAS to Alation
Depending on how you purchased the CData driver, from Alation or from CData, the driver installation process will be different. Refer to Add the CData Driver into Alation Instance and use the scenario appropriate to your case.
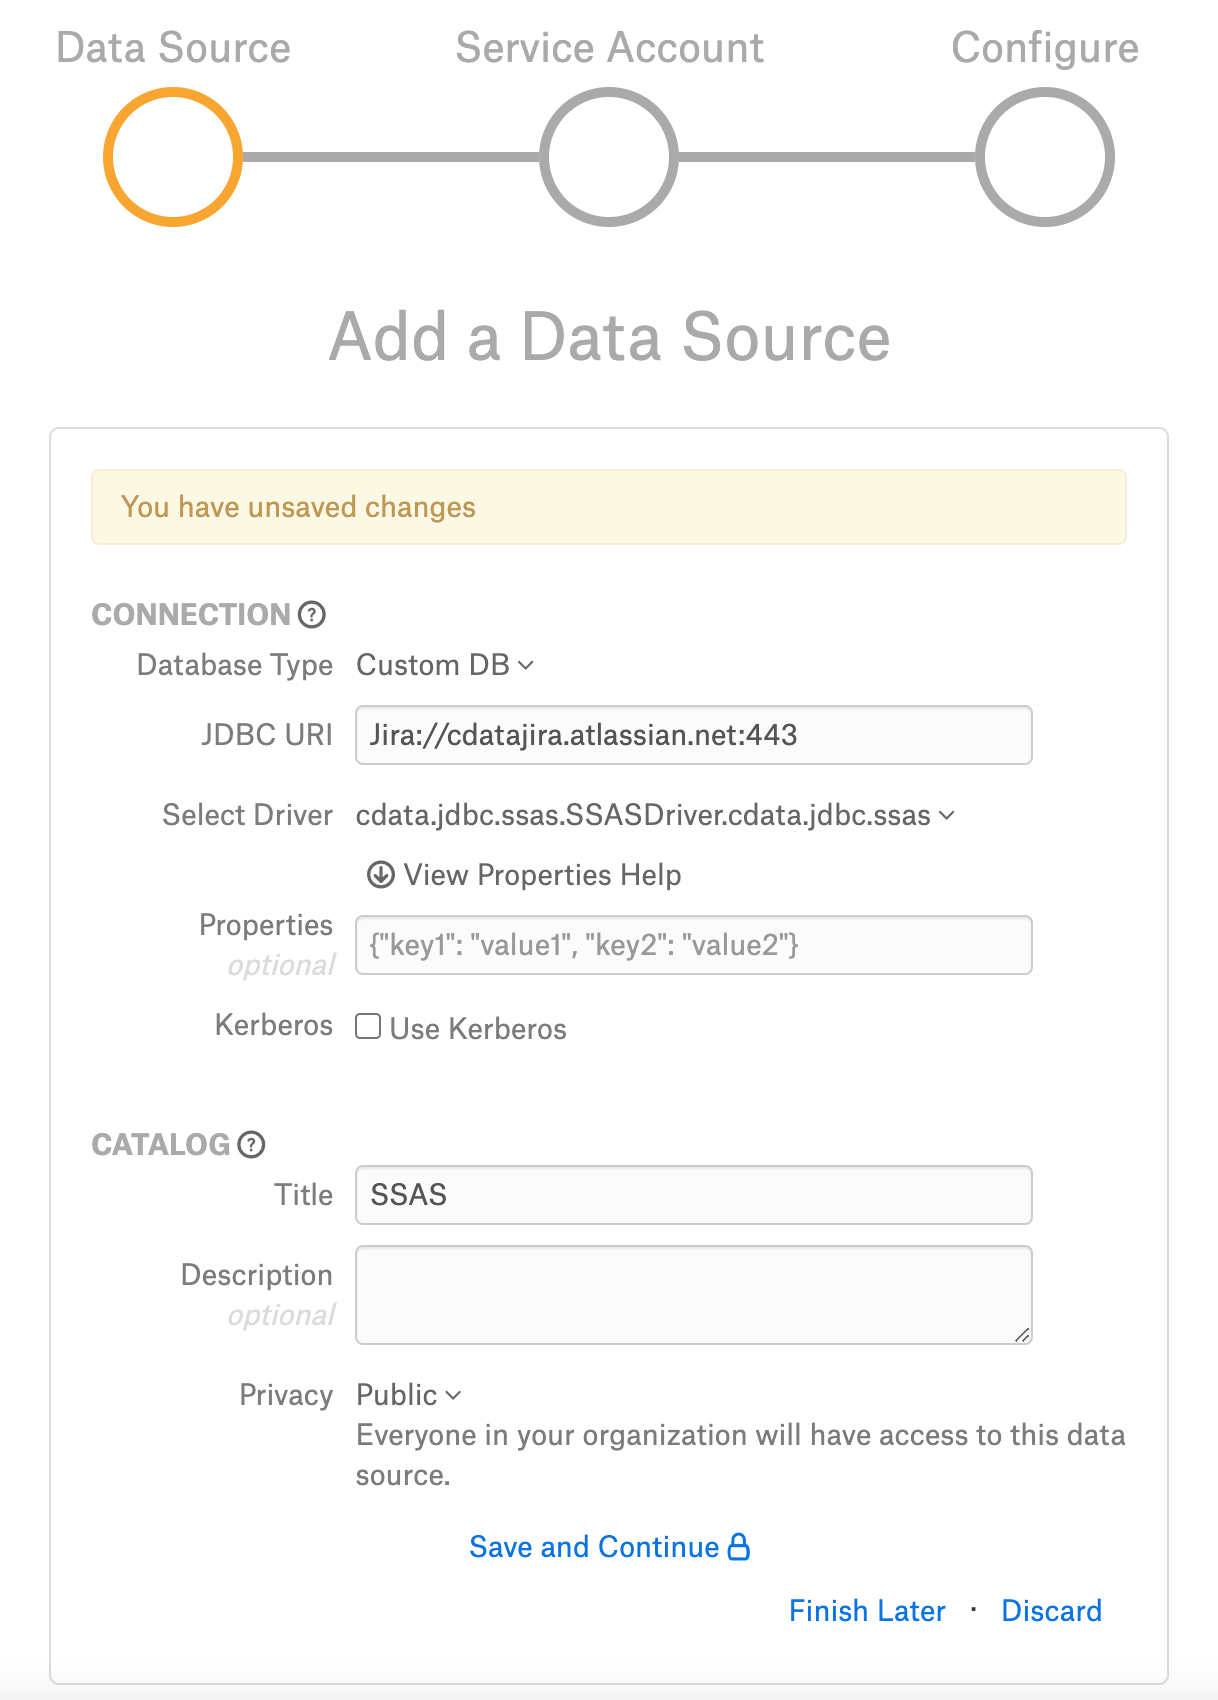
Step 2: Add a New Data Source
Add a new Data Source on the Sources page.
Step 3: Set up the Connection
On the Add a Data Source screen of the wizard, specify:
Database Type: Custom DB
JDBC URI: Provide any valid URI with port number 443. This is only a temporary URI to move through the Add Data Source wizard.
Example:
Jira://jira.atlassian.net:443Note
The correct JDBC URI must be provided on the General Settings tab of the data source Settings page.
Select Driver: select the JDBC driver for SSAS from the Select Driver drop-down list:
cdata.jdbc.ssas.SSASDriver.cdata.jdbc.ssas
Do not select the Use Kerberos checkbox
Click Save and Continue. The next wizard screen - Set Up a Service Account - will open.
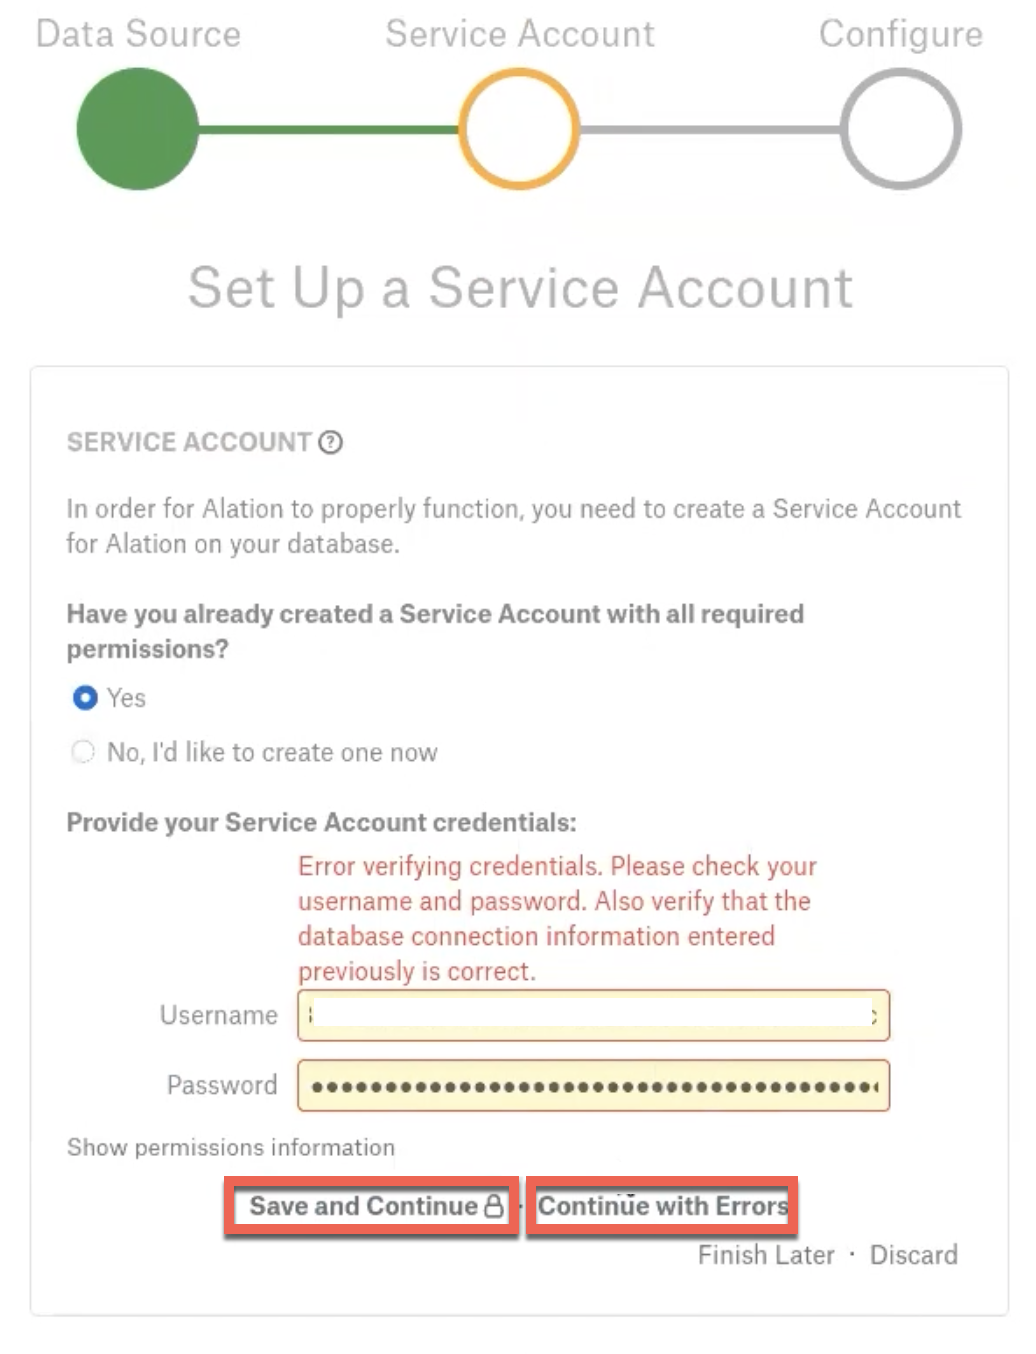
Step 4: Enter Service Account Credentials
Select Yes.
Provide the service account username and password created in the Service Account section.
Click Save and Continue. The next wizard screen, Configure Your Data Source, will open.
An error message will appear. Click Continue with Errors to navigate to the next wizard screen, Configure Your Data Source.
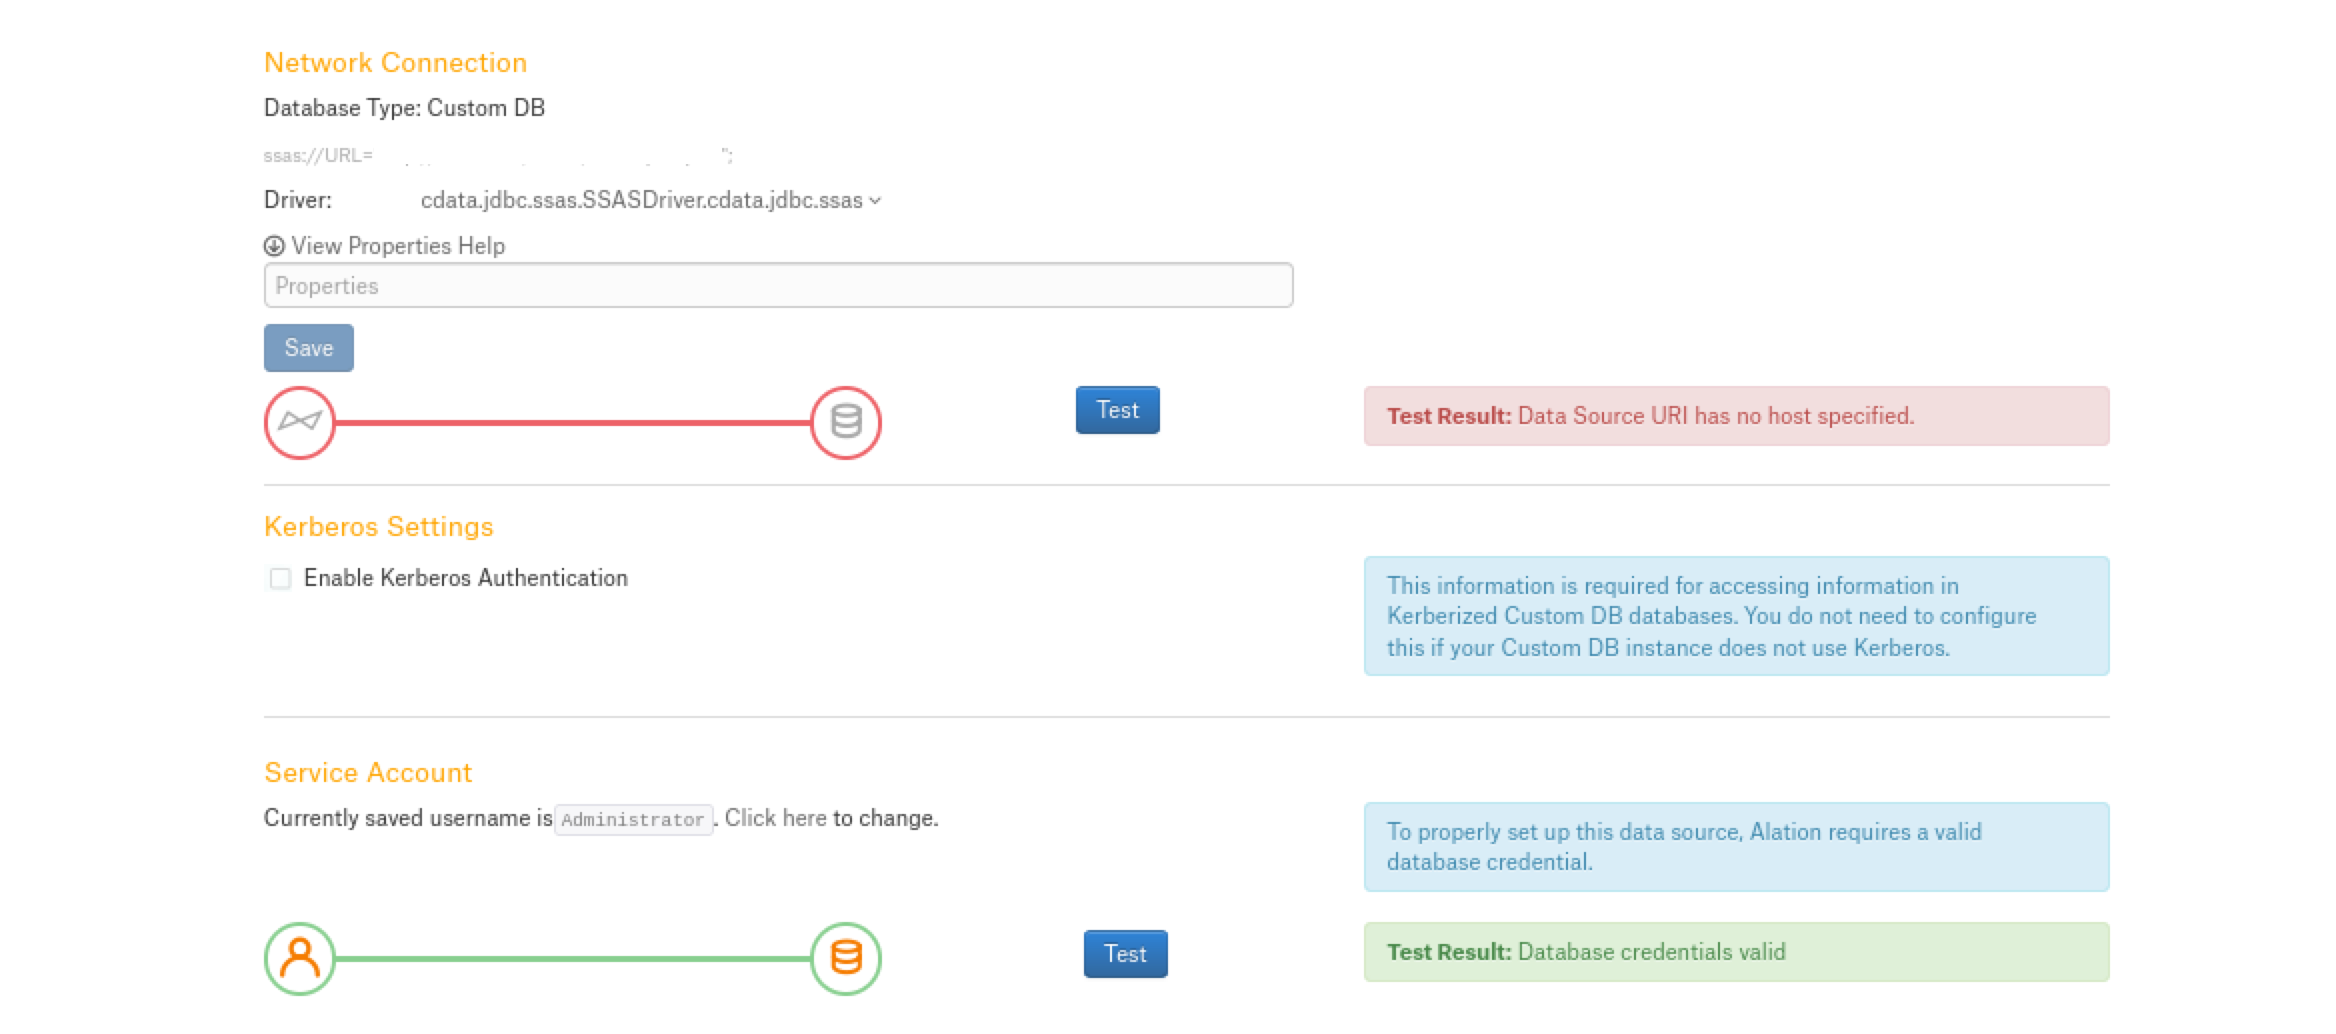
Step 5: Configure Your Data Source
Click Skip this Step. After this step, you are navigated to the Settings page of your data source.
Step 6: General Settings
Once you successfully create a connection, you will land on the General Settings page. On the General Settings tab:
Change the temporary URI to the correct URI. Refer to JDBC URI for information about the correct format.
Click the Test button to test the connection. An error message will appear. This error is expected and you can disregard it.
Metadata Extraction
Configure and perform metadata extraction and verify the results:
In Settings > Custom Settings, set the Catalog Object Definition to Schema.Table:
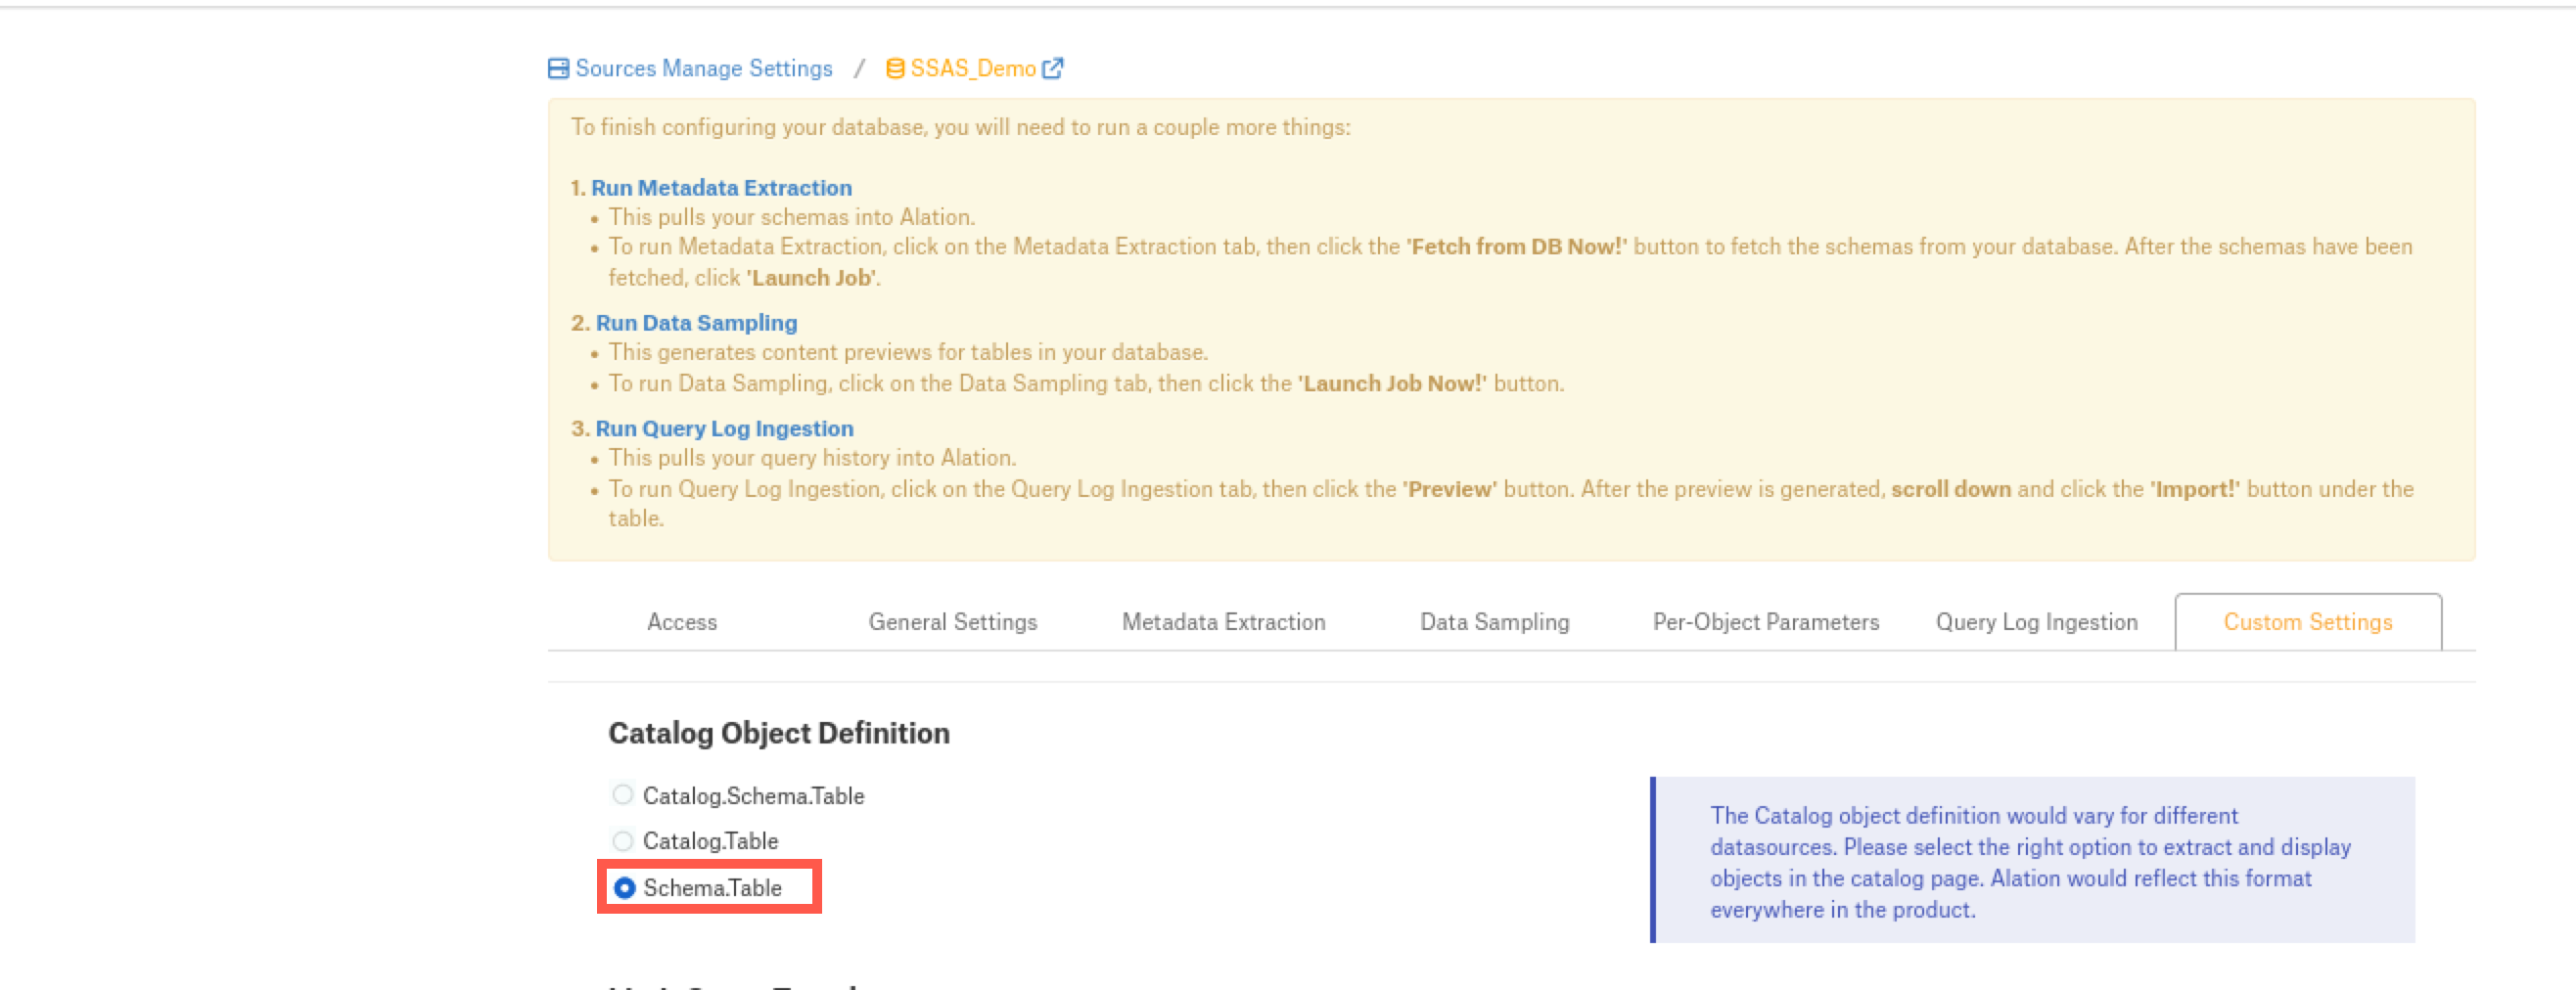
Automatic MDE is supported.
Profiling
Configure and perform Profiling :
Users can run a sample for an individual table on the Samples tab of the Table Catalog page or profile an individual column on the Overview tab of the Column page.
Automatic full and selective Profiling is supported.
Use the Per-Object Parameters tab of the Settings to specify which objects to profile.
Note
Make sure that the Skip Views checkbox of the respective schemas is unchecked to perform the Profiling.
Custom query-based Sampling is supported. Custom Query-Based Sampling allows you to provide a custom query for profiling each specific table.
Deep Column Profiling (Profiling V2 ) is supported.
Sampling
Perform Sampling: refer to Sampling.
Query Log Ingestion
Not applcable.
Compose
Log into Compose:
Authenticate in Compose with your SSAS credentials.
Use Schema.Table format for writing queries.
Troubleshooting
Refer to Troubleshooting for CData Data Sources.