SAP ASE OCF Connector: Install and configure
Alation Cloud Service Applies to Alation Cloud Service instances of Alation
Customer Managed Applies to customer-managed instances of Alation
Network Connectivity
Open outbound TCP port 5000 to the SAP ASE (Sybase ASE) server.
Create a Service Account
Sample SQL to create an account:
CREATE LOGIN alation WITH PASSWORD password
USE <database>;
sp_adduser alation;
Permissions for Metadata Extraction
Ensure the user alation has the following privileges on system tables.
GRANT SELECT on master.dbo.sysdatabases to alation;
GRANT SELECT on sysusers to alation;
GRANT SELECT on sysobjects to alation;
GRANT SELECT on syscomments to alation;
GRANT SELECT on syscolumns to alation;
GRANT SELECT on systypes to alation;
GRANT SELECT on sysindexes to alation;
GRANT SELECT on sysprocedures to alation;
GRANT SELECT on sysconstraints to alation;
GRANT SELECT on syskeys to alation;
Permissions for Sampling and Profiling
On each database, provide the following grant for profiling each table:
GRANT SELECT ON <table_name> to alation;
JDBC URI
Format
Use the following format to build the JDBC URI:
sybase:Tds:<Host_Name>:<Port>/<DB_name>
DB_name is an optional parameter. If not included, Alation will extract all metadata that the service account was allowed access to.
Example:
sybase:Tds:10.13.0.242:5000/my_database
Query Log Ingestion Setup
Query Log Ingestion requires access to Monitoring Data Access (MDA) tables. The following configuration setting must be set on the SAP ASE server before using MDA tables:
Ensure that the configuration parameter
enable cisis set to 1. If the value is not set to 1, then set it to 1 and restart the ASE server.sp_configure "enable cis" 1 GoAssign
mon_roleto the service account to allow MDA access.use master go grant role mon_role to alation goThe same procedure is applicable to the
salogin. In version 15.7 and onwards, ESD#2, themon_roleis assigned tosaby default so you may not need to make this change.use master go grant role mon_role to sa goNote
If the
mon_roleis not granted to the service account, you will not be able to access themonSysStatementandmonSysSQLTexttables.You might need to disconnect or reconnect to activate
mon_roleafter the role is granted to the login.
Test the basic MDA configuration:
select * from master..monState
go
Enable Monitoring:
The
enable monitoringsetting is essentially the master switch for most of MDA functionality. This must be set to 1 for Alation to have logs to read.use master go sp_configure "enable monitoring", 1 goEnable all configuration parameters.
For all “pipe” tables, the number of messages is set to 1,000,000. However, you may want to choose a larger size.
Logs will be rolled off after the maximum value is set. The maximum permissible value is 2147483647.
SQL text pipe max messages and statement pipe max messages should be set as equal.
Parameter
Command
monSysSQLText
sp_configure “sql text pipe active”, 1 go sp_configure “sql text pipe max messages”, 1000000 go
monSysStatement
sp_configure “statement pipe active”, 1 go sp_configure “statement pipe max messages”, 1000000 go
Column in MDA table
sp_configure “statement statistics active”, 1 go sp_configure “per object statistics active”, 1 go
Cmon*SQLTexttables
sp_configure “SQL batch capture”, 1 go
Configuration in Alation
STEP 1: Install the Connector
Alation On-Premise
Important
Installation of OCF connectors requires Alation Connector Manager to be installed as a prerequisite.
To install an OCF connector:
If this has not been done on your instance, install the Alation Connector Manager: Install Alation Connector Manager.
Ensure that the OCF connector Zip file is available on your local machine.
Install the connector on the Connectors Dashboard page using the steps in Manage Connectors.
Alation Cloud Service
Note
On Alation Cloud Service instances, Alation Connector Manager is available by default.
Depending on your network configuration, you may need to use Alation Agent to connect to databases.
Connection via Alation Agent
Ensure that Alation Agent is enabled on your Alation instance. If necessary, create a Support ticket with Alation for an Alation representative to enable the Alation Agent feature on your instance and to receive the Alation Agent installer.
Connection Without Agent
To install an OCF connector:
Ensure that the OCF connector Zip file is available on your local machine.
Install the connector on the Connectors Dashboard page using the steps in Manage Connectors.
STEP 2: Create and Configure a New Data Source
In Alation, add a new data source:
Log in to Alation as a Server Admin.
Expand the Apps menu on the right of the main toolbar and select Sources.
On the Sources page, click +Add on the top right of the page and in the list that opens, click Data Source. This will open the Add a Data Source wizard.
On the first screen of the wizard, specify a name for your data source, assign additional Data Source Admins, if necessary, and click the Continue Setup button on the bottom. The Add a Data Source screen will open.
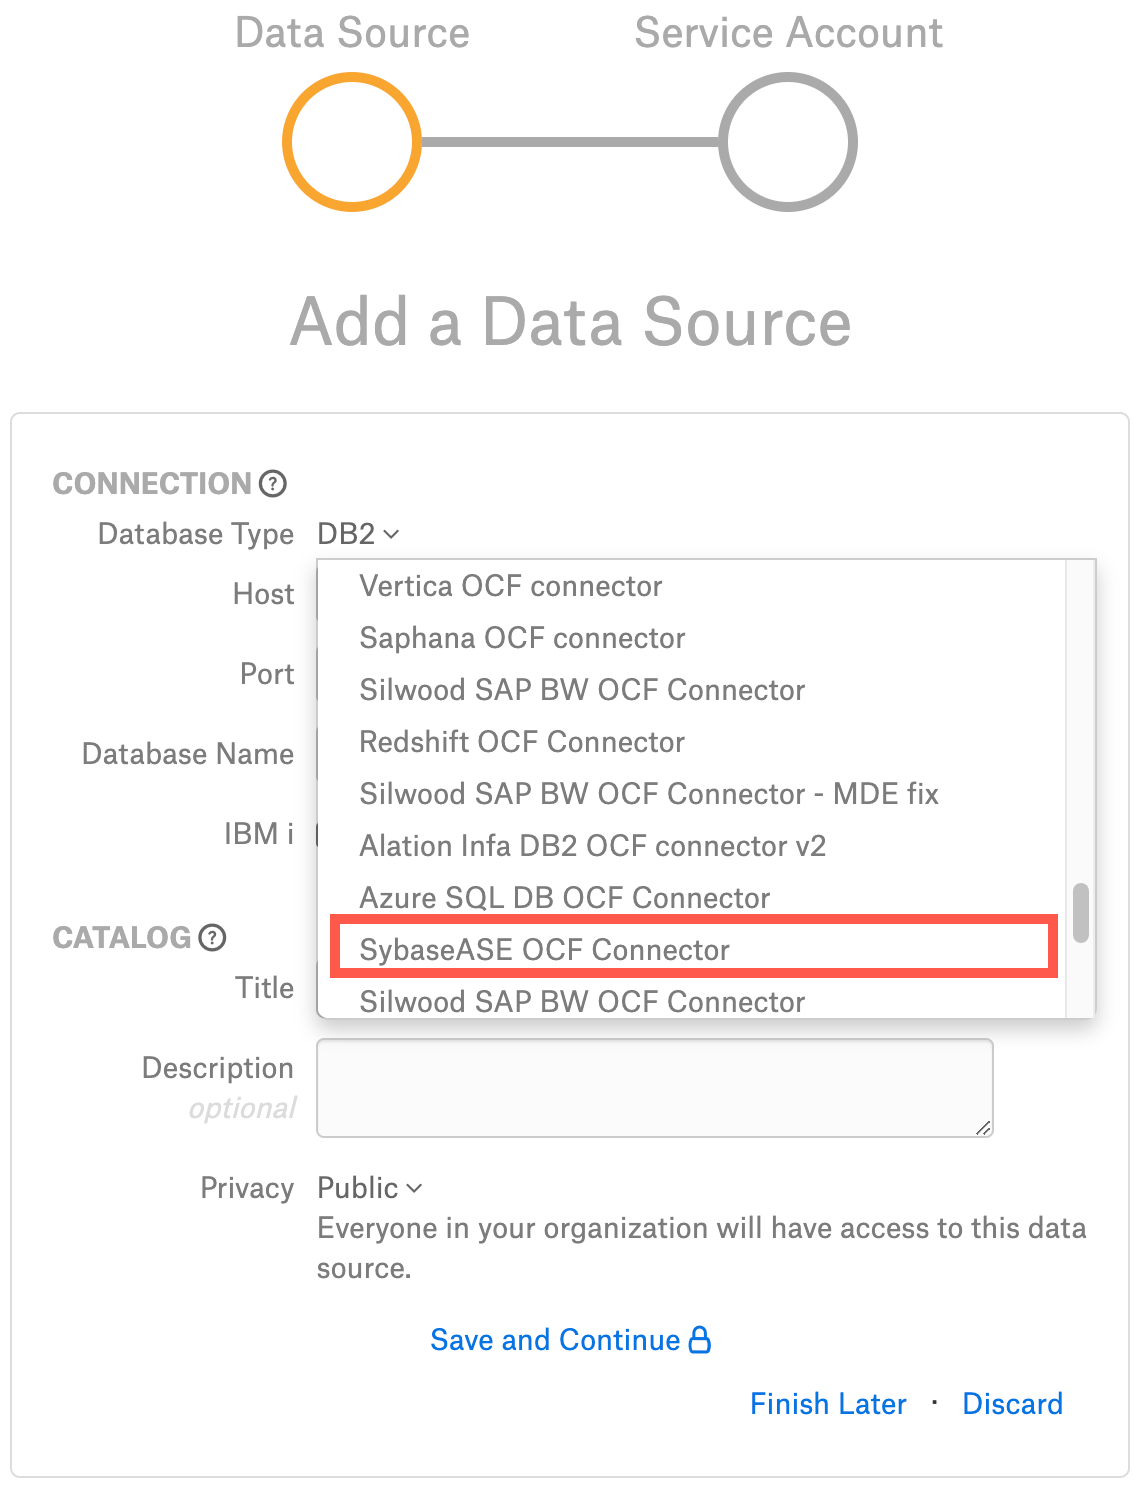
On the Add a Data Source screen, the only field you should populate is Database Type. From the Database Type dropdown, select the connector name. After that you will be navigated to the Settings page of your new data source.
Note
Agent-based connectors will have the Agent name appended to the connector name.
The name of this connector is SybaseASE OCF connector.
Access
On the Access tab, set the data source visibility using these options:
Public Data Source—The data source will be visible to all users of the catalog.
Private Data Source—The data source will be visible to the users allowed access to the data source by Data Source Admins.
You can add new Data Source Admin users in the Data Source Admins section.
General Settings
Note
This section describes configuring settings for credentials and connection information stored in the Alation database. If your organization has configured Azure KeyVault or AWS Secrets Manager to hold such information, the user interface for the General Settings page will change to include the following icons to the right of most options:

By default, the database icon is selected, as shown. In the vault case, instead of the actual credential information, you enter the ID of the secret. See Configure Secrets for OCF Connector Settings for details.
Application Settings
Skip this section as it is not applicable to this data source.
Connector Settings
Data Source Connection
Populate the data source connection information and save the values by clicking Save in this section.
Parameter |
Description |
|---|---|
JDBC URI |
Specify the JDBC URI in the required format. |
Username |
Specify the service account username. |
Password |
Specify the service account password. |
Enable SSL |
Enable or disable SSL authentication by selecting or clearing the Enable SSL checkbox. If the Enable SSL checkbox is enabled, upload the SSL certificate using the upload link below. |
Truststore password |
Specify the password for the SSL certificate. The password will be deleted if the data source connection is deleted. |
Logging Configuration
Select the logging level for the connector logs and save the values by clicking Save in this section. The available log levels are based on the Log4j framework.
Parameter |
Description |
|---|---|
Log level |
Select the log level to generate logs. The available options are INFO, DEBUG, WARN, TRACE, ERROR, FATAL, ALL. |
Obfuscate Literals
Obfuscate Literals—Enable this toggle to hide the details of the queries in the catalog page that are ingested via QLI or executed in Compose. This toggle is disabled by default.
Test Connection
After specifying the connector settings, under Test Connection, click Test to validate network connectivity.
Metadata Extraction
You can configure metadata extraction (MDE) for an OCF data source on the Metadata Extraction tab of the Settings page. Refer to Configure Metadata Extraction for OCF Data Sources for information about the available configuration options.
Metadata Extraction Queries
To use query-based metadata extraction, you will need to write custom queries to extract the metadata. Alation expects that these queries conform to a specific structure and use some reserved identifiers. After providing custom queries, save them by clicking Save in this section.
Refer to Extraction Queries for SAP ASE for information about query customization.
Metadata Extraction from Compose
If a table is created from Compose, users will be able to see the relevant table metadata on the catalog page without re-running MDE.
Users should use the following query format to create tables in Compose:
CREATE TABLE “DATABASE_NAME“.“SCHEMA_NAME”.”TABLE_NAME” ({column properties});
Compose
For details about configuring the Compose tab of the Settings, refer to Configure Compose for OCF Data Sources.
Note
Compose is not available for on-prem databases connected to the Alation Cloud Service instances through Alation Agent.
Sampling and Profiling
Sampling and profiling is supported. For details, see Configure Sampling and Profiling for OCF Data Sources.
Query Log Ingestion
You can configure QLI on the Query Log Ingestion tab of the data source Settings page. Select a QLI option for your data source and schedule the QLI job if necessary.
Configure Table-Based QLI
You can choose to create a table or a view on your database to store the query history data (table-based QLI) or to provide a custom query to retrieve query history (custom query-based QLI).
Use the query format below to create a view and flush the query history from the data source:
Substitute the placeholder view name <schema>.<view> with your actual values.
CREATE VIEW <schema>.<view> as
SELECT
  mss.SPID AS SessionId,
  mss.StartTime AS StartTime,
  round(datediff(ms, mss.StartTime, mss.EndTime)/1000000,3) AS seconds,
  mss.DBName AS defaultDatabases,
  msst.SQLText AS queryString,
  mss.StartTime AS sessionStartTime,
  'N' AS cancelled,
  msst.SequenceInBatch - 1 as SequenceId,
  suser_name(msst.ServerUserID) AS userName
FROM master.dbo.monSysSQLText msst
INNER JOIN
master.dbo.monSysStatement mss
ON msst.SPID = mss.SPID
AND msst.KPID = mss.KPID
AND msst.BatchID = mss.BatchID
AND mss.DBName not in ('sybmgmtdb', 'sybsystemprocs', 'sybsecurity', 'sybmgmtdb', 'dbccdb', 'sybdiag')
 AND mss.ProcedureID = 0
 mss.StatementNumber = 0;
On the Query Log Ingestion tab under Connector Settings > Query Extraction, in the Table Name field specify the name of the view in which the query logs are available. Make sure that the service account has SELECT permission to access this view. The table name must be provided in the format db_name.schema.view_name.
Configure Custom Query-Based QLI
If you cannot create the view for QLI, for example, due to access restrictions, you can use a custom QLI query to extract query history into Alation. If you opt for custom query-based QLI, Alation will query the system table storing query history or the table you’ve created to enable QLI every time you manually run QLI or when the QLI job runs on schedule.
For custom query-based QLI to succeed, ensure that the service account has enough permissions to select from the QLI table.
The template for the QLI query is given below. You can customize it by adding, removing, or changing the filter, but the columns and their aliases must remain as is since the connector expects this query structure.
Note
When using the QLI query template, do not substitute the STARTTIME and ENDTIME parameters in the WHERE filter. These parameters are not actual column names and should stay as is. They are expected by the connector and will be substituted with the start and end date of the QLI range selected in the user interface when QLI is run manually or on schedule.
To configure query-based QLI:
Go to the Query Log Ingestion tab of the Settings page of your OCF data source.
Under Connector Settings > Query Extraction, in the Custom QLI Query field, provide the QLI query.
Click Save.
QLI Query Template
SELECT
  mss.SPID AS SessionId,
  mss.StartTime AS StartTime,
  round(datediff(ms, mss.StartTime, mss.EndTime)/1000000,3) AS seconds,
  mss.DBName AS defaultDatabases,
  msst.SQLText AS queryString,
  mss.StartTime AS sessionstarttime,
  'N' as cancelled,
  msst.SequenceInBatch - 1 AS SequenceId,
  suser_name(msst.ServerUserID) AS username
FROM master.dbo.monSysSQLText msst
INNER JOIN
master.dbo.monSysStatement mss
ON msst.SPID = mss.SPID
AND msst.KPID = mss.KPID
AND msst.BatchID = mss.BatchID
AND mss.DBName NOT IN ('sybmgmtdb', 'sybsystemprocs', 'sybsecurity', 'sybmgmtdb', 'dbccdb', 'sybdiag')
AND mss.ProcedureID = 0
AND mss.StatementNumber = 0
WHERE startTime >= STARTTIME
  AND startTime < ENDTIME;
Perform QLI
You can either perform QLI manually on demand or enable automated QLI:
To perform manual QLI, under the Automated and Manual Query Log Ingestion section of the Query Log Ingestion tab, ensure that the Enable Automated Query Log Ingestion toggle is disabled.
Note
Metadata extraction must be completed first before running QLI.
Click Preview to get a sample of the query history data to be ingested.
Click the Import button to perform QLI on demand.
To schedule QLI, enable the Enable Automated Query Log Ingestion toggle.
Set a schedule under Automated Query Log Ingestion Time by specifying values in the week, day, and time fields. The next QLI job will run on the schedule you have specified.
Note
The hourly schedule for automated QLI is not supported.
Troubleshooting
Refer to Troubleshooting.