Configure a Role to Assume on Behalf of Alation’s Instance Profile
Alation Cloud Service Applies to Alation Cloud Service instances of Alation
Customer Managed Applies to customer-managed instances of Alation
Use the information in this topic to integrate your Alation instance with AWS Secrets Manager using an IAM role that can be assumed by the Alation EC2 instance profile.
Note
Other configuration options for integrating with AWS Secrets Manager through your Alation instance:
To integrate with AWS Secrets Manager through the Alation Agent instead, see:
As you go through the configuration steps, you’ll be asked to save some values from the AWS IAM console for future reference. You can use any editor of your choice to save and securely store this configuration information.
Step 1: Create a Security Policy to Access Secrets Manager
This step is performed in the AWS IAM console
For the AWS Secrets Manager integration, you’ll need an AWS IAM policy granting access to AWS Secrets Manager. Here and below, a substitute name read_secrets_policy is used to refer to this policy.
If you haven’t established a read_secrets_policy yet, create one:
Log in to the AWS IAM management console.
From the left-hand menu, under Access management, select Policies.
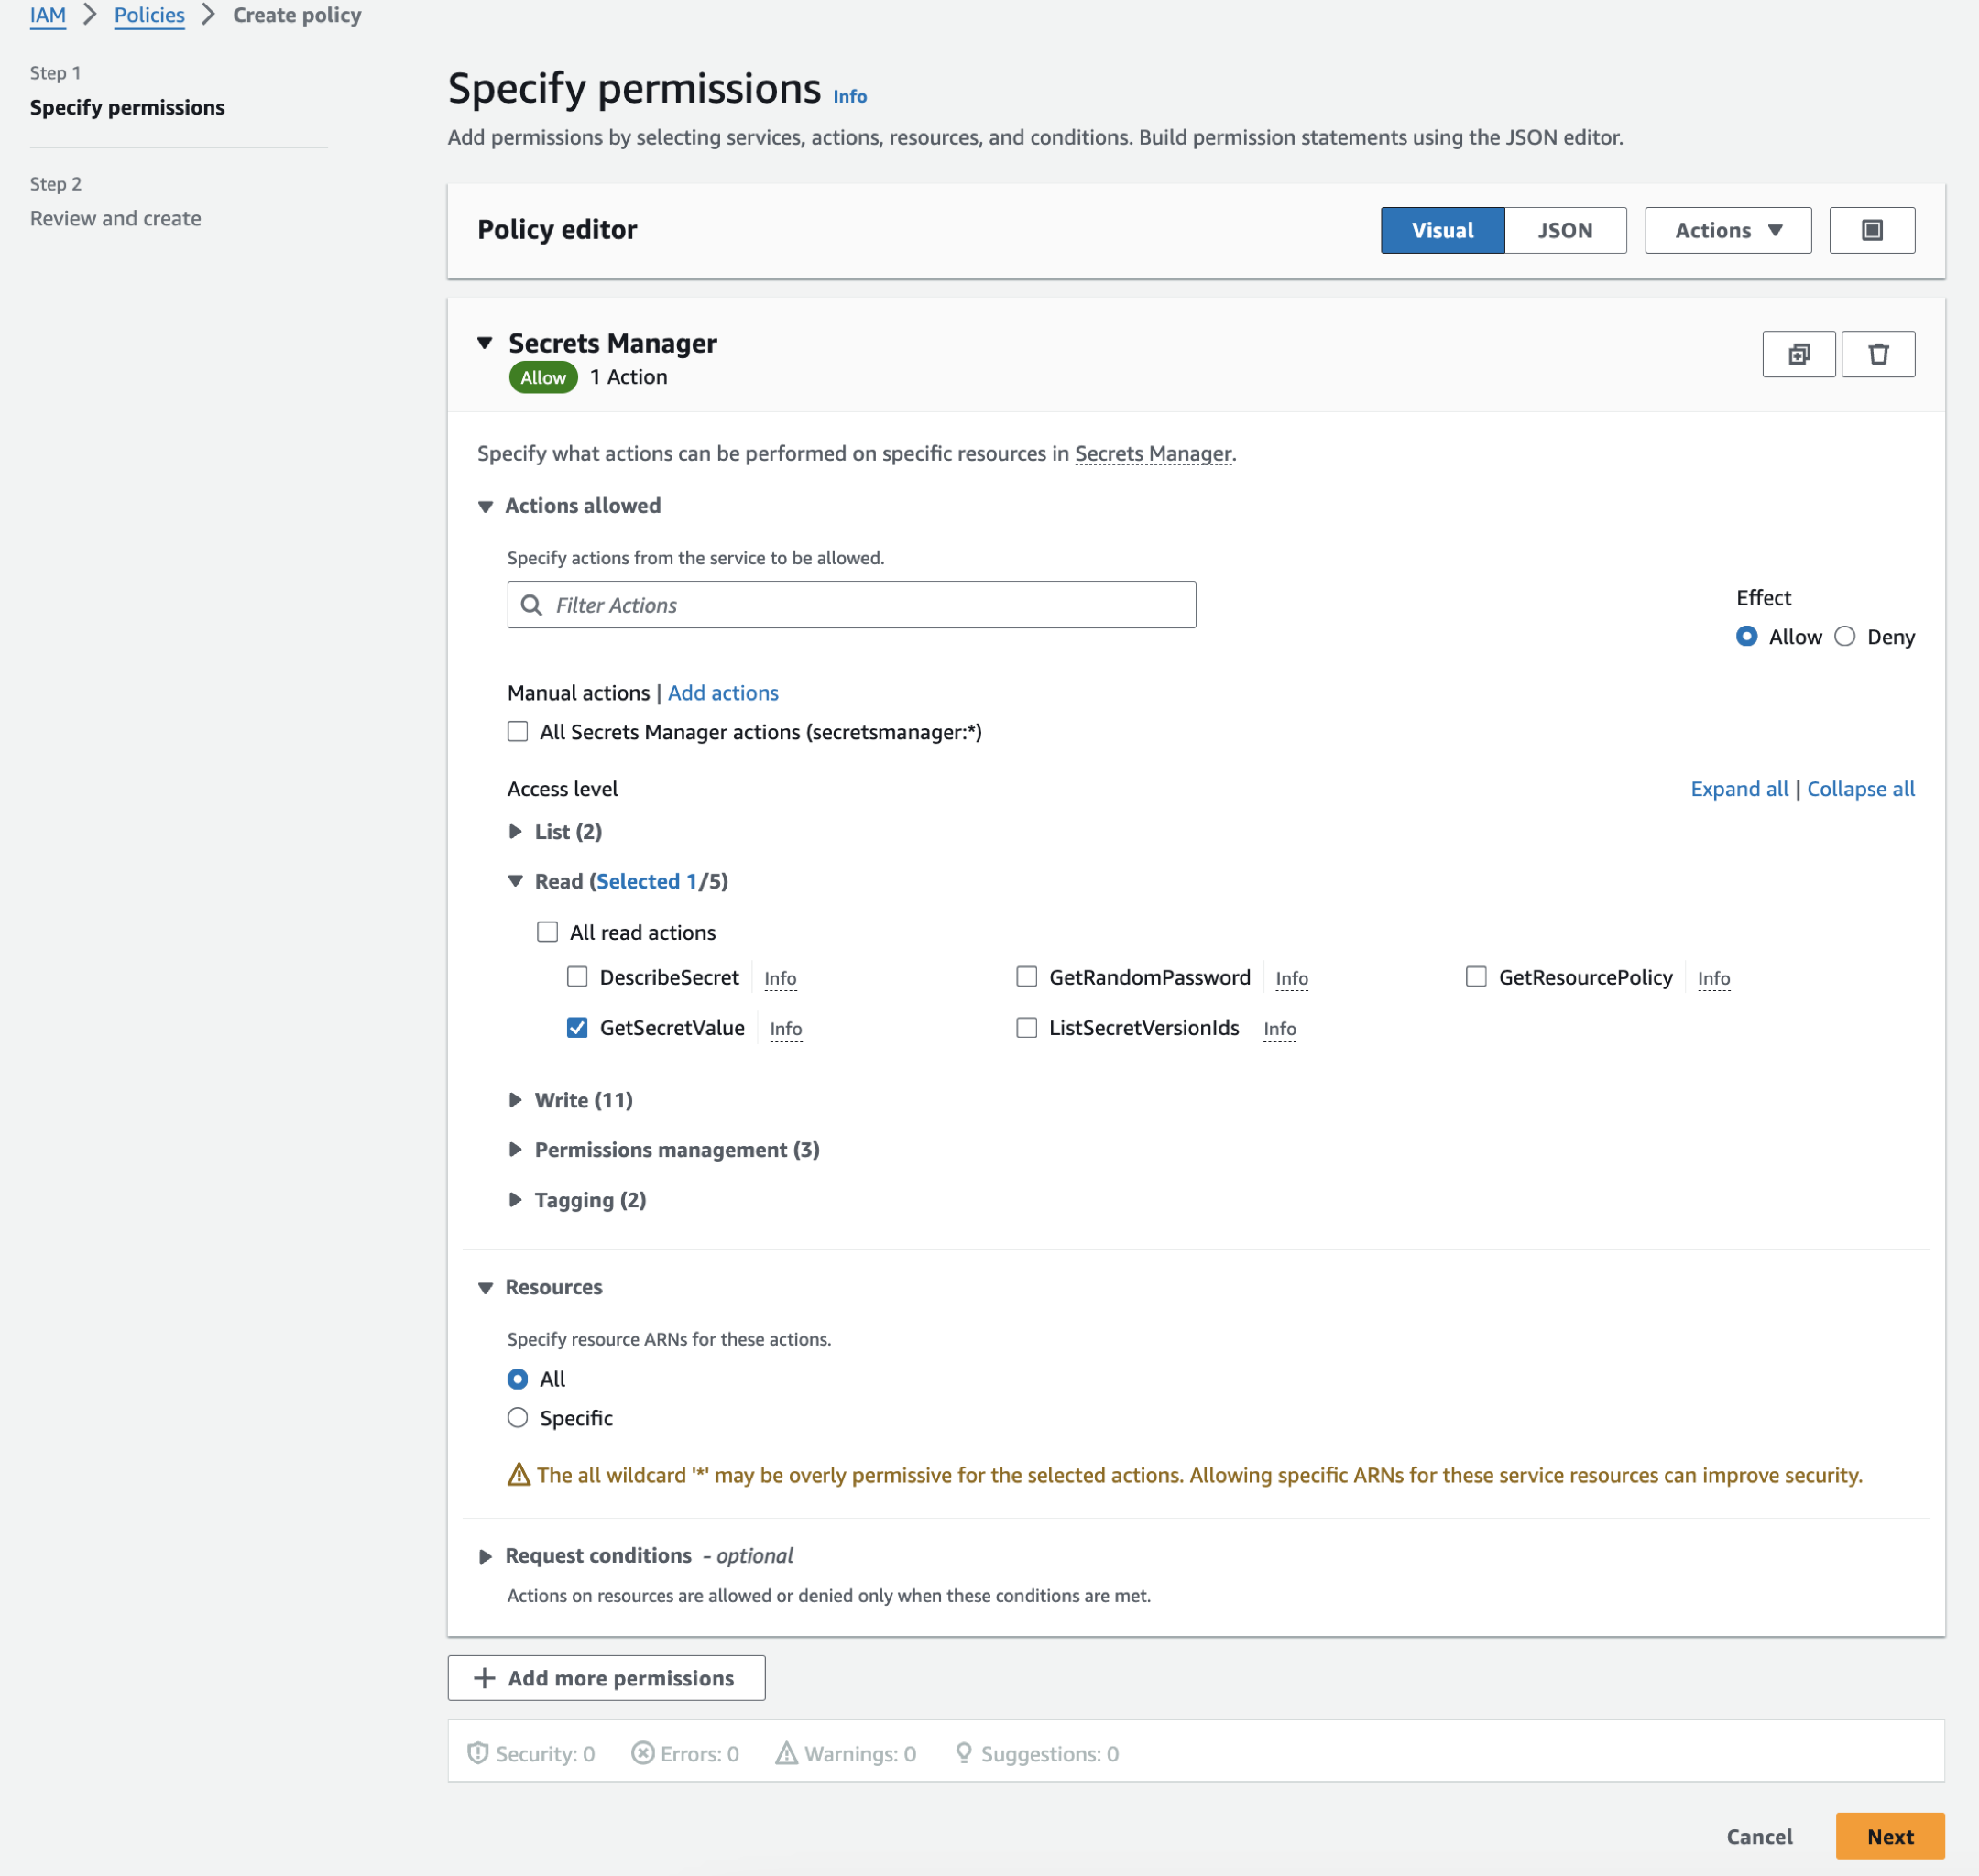
Click Create policy. The policy editor will open.
Under Select a service, type secrets in the search bar and select Secrets Manager. This will display actions relevant to the service.
Under Actions allowed, expand the Read list and select the checkbox for the action GetSecretValue.
Under Resources, select All.
Note
You can restrict the permissions by providing access to specific resources only:
Instead of All, select Specific.
Click Add ARNs to specify the resources by entering the resource’s region, ARN (Amazon Resource Name), and secret.
You can adjust the resource permissions anytime by editing this policy.
Click Next. The Review and create screen will open.
Under Policy details, in the Policy name field, provide a meaningful name.
Review the details, and click Create policy to create the policy. It will be added to the list of policies under your AWS account. Your policy JSON will look similar to the following:
{
  "Version": "2012-10-17",
  "Statement": [
    {
        "Sid": "VisualEditor0",
        "Effect": "Allow",
        "Action": "secretsmanager:GetSecretValue",
        "Resource": "*"
    }
  ]
}
Step 2: Create an AWS IAM Role to Assume
This step is performed in the AWS IAM console
Now that you’ve created an IAM policy for accessing AWS Secrets Manager, you need to create an AWS IAM role and attach the policy to it. Here and below, a substitute name read_secrets_role is used to refer to this role.
If you haven’t established a read_secrets_role yet, create one:
From the left-hand menu, under Access management, select Roles.
Click Create role. The role editor will open.
Leave AWS service as the Trusted entity type (default) and select EC2 as the Use case.
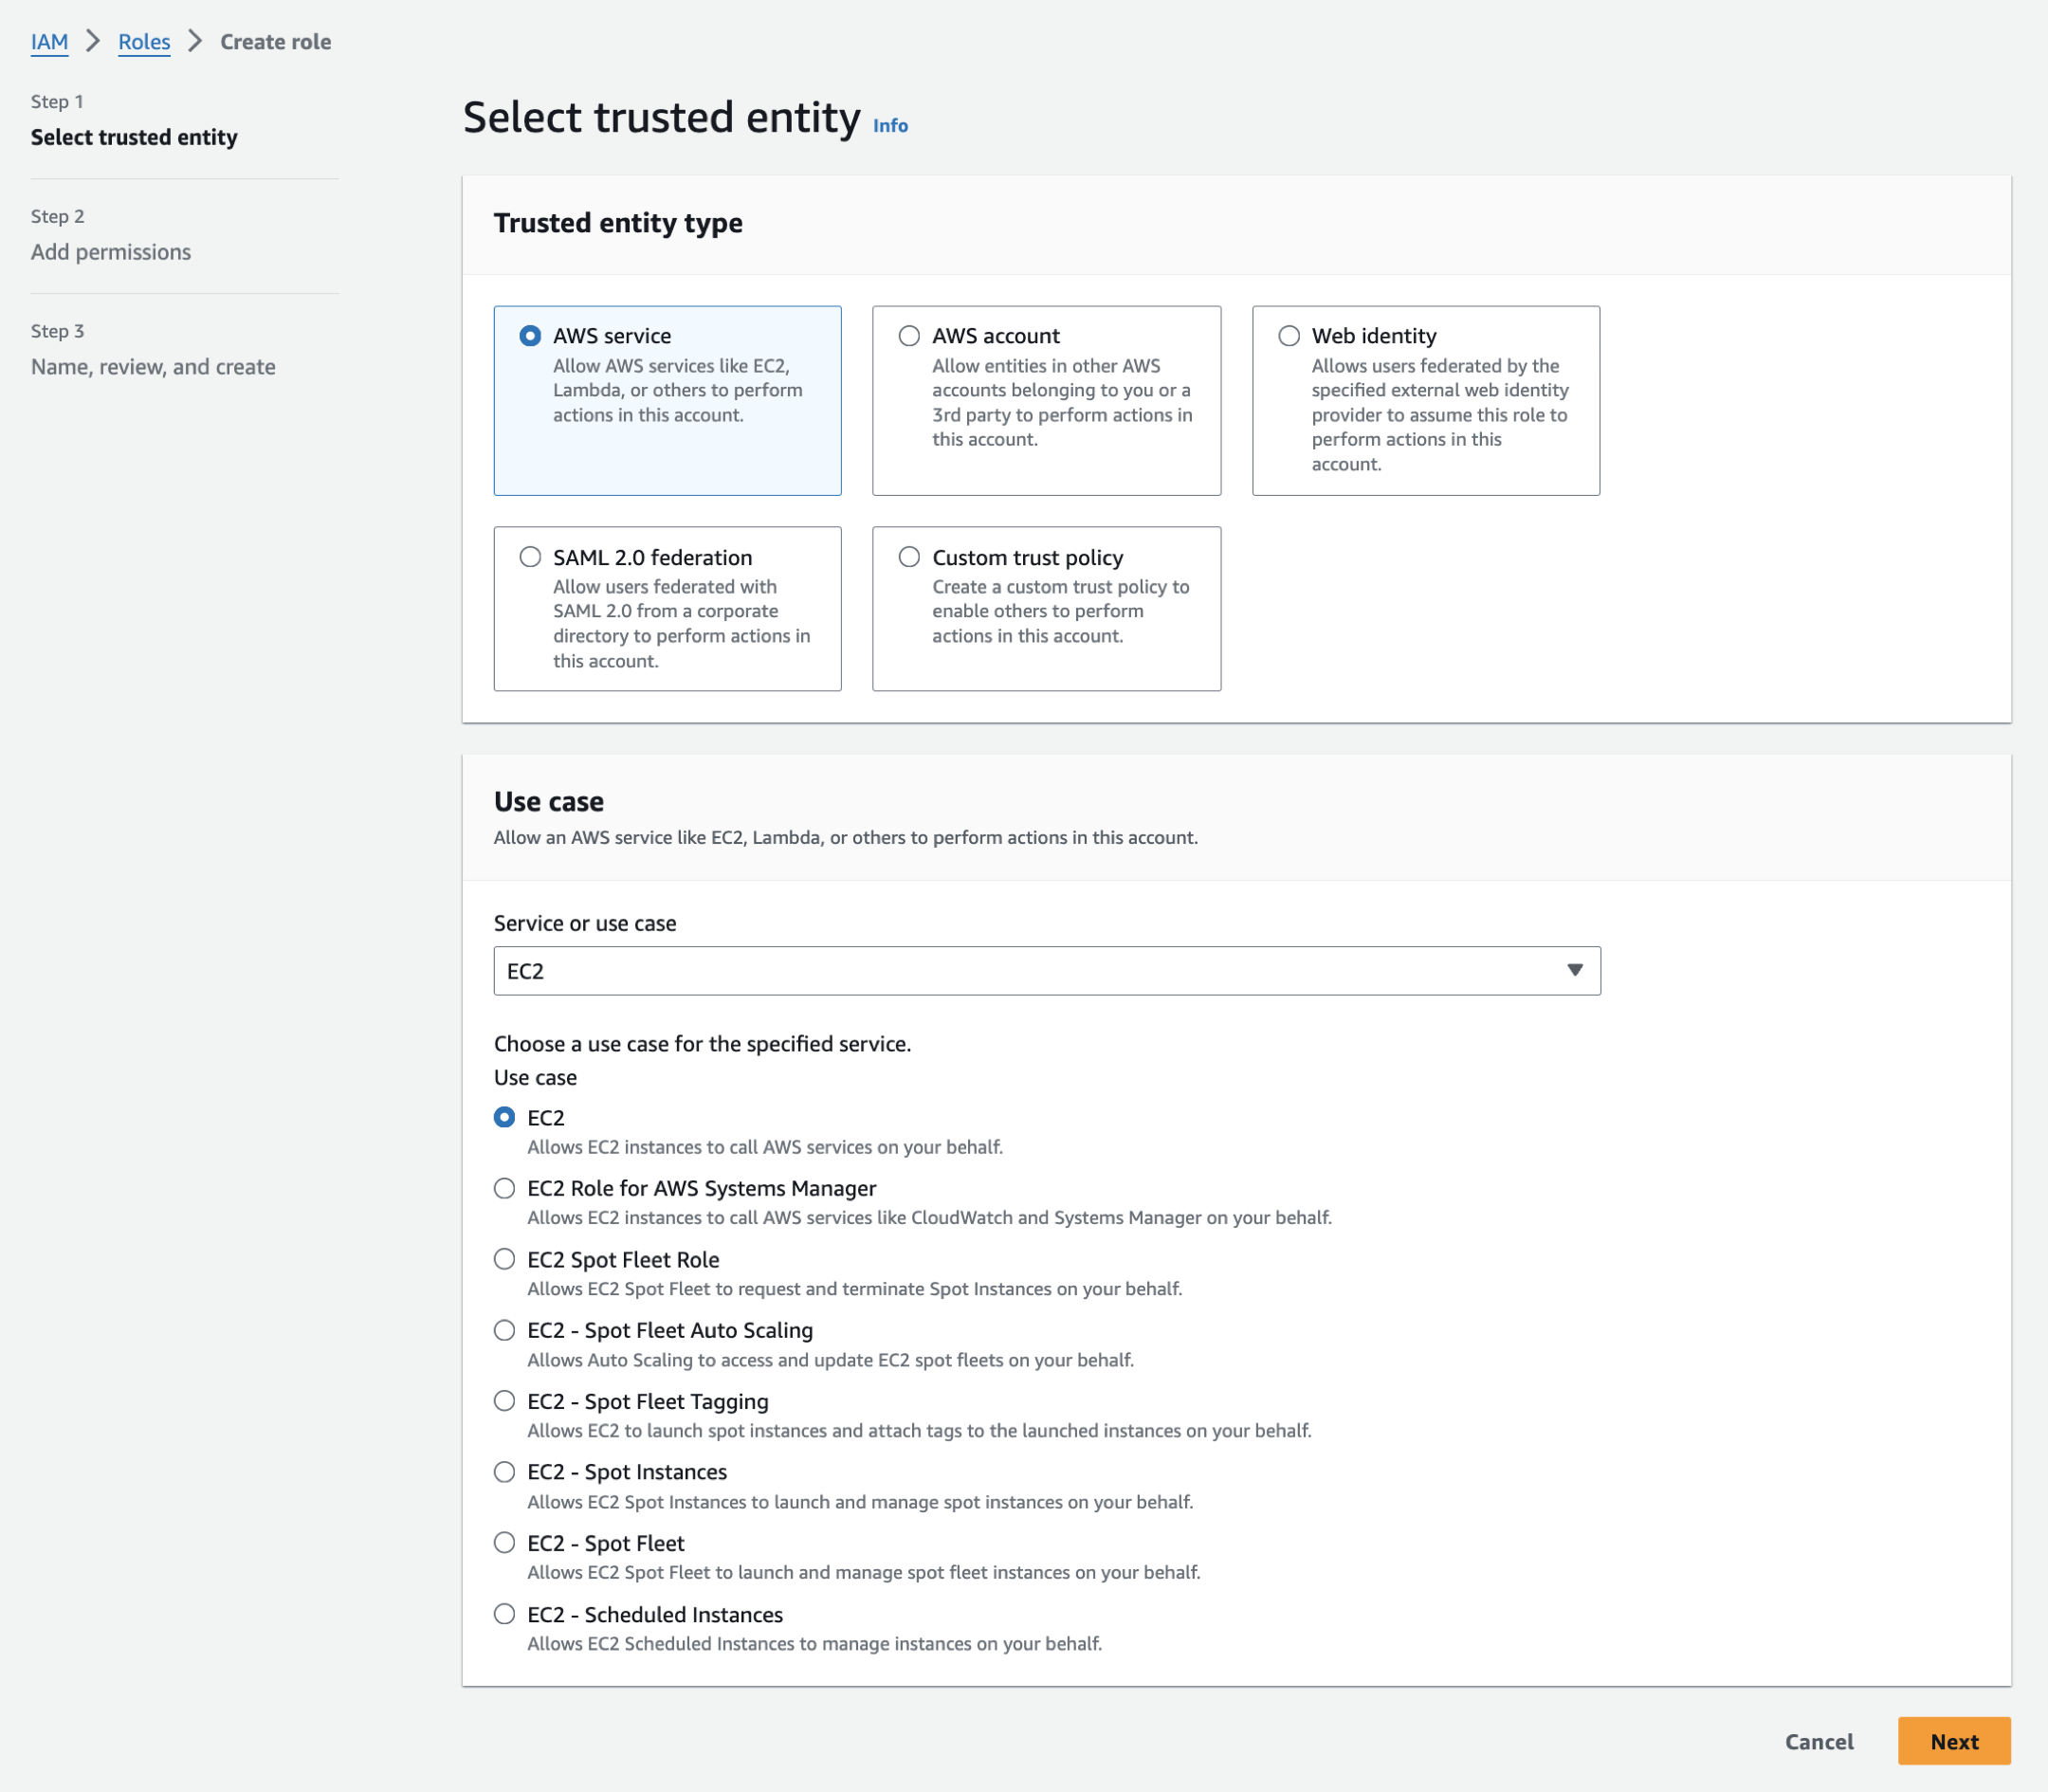
Click Next. The Add permissions screen will open.
Under Permissions policies, search for the policy you created to allow reading secrets from Secrets Manager. When found, select the checkbox of this policy in the policies table.
Click Next. The Name, review, and create screen will open.
In the Role name field, provide a meaningful name. We’ll use
read_secrets_roleas example.In the Description field, provide a description.
Review the role information and click Create role to create the role. It will be added to the list of roles under your AWS account. This role will be assumed by the instance profile to access Secrets Manager from Alation.
Open the properties of the
read_secrets_role. Under Summary, locate its ARN. Save the ARN for future reference.
Step 3: Get the ARN of the Alation Instance Role
This step is performed in Alation
For further configuration, you need the ARN of the role attached to your Alation instance. Here and below, a substitute name instance_role is used as the name of the IAM role attached to Alation’s EC2 instance.
Important
If you are an administrator of a customer-managed (on-premise) instance, ensure that your Alation instance has an IAM role attached. If not, you will need to attach it. Learn more in How to Assign an AWS IAM Role to the Alation Instance.
Alation Cloud Service instances already have an instance role attached.
To find out the ARN of the instance_role:
Log in to your Alation instance as a Server Admin.
Click the Admin Settings gear icon on top right to open the Admin Settings page.
Click Authentication to open the Authentication tab. Locate the section Authentication Configuration Methods for External Systems.
In 2024.1.4 and later, for Alation Cloud Service instances on the cloud-native architecture, find the See configurations for drop-down menu and ensure that Alation Cloud Service is selected.
Click Add Configuration, and then select AWS Secrets Manager as the method type. The Authentication Configuration Method page will open in a new browser tab.
Click on the Get Alation Role ARN button to fetch the role ARN.
In the Role ARN of Alation AWS Instance pop-up box, click Copy to clipboard to copy the ARN. Save the ARN for future reference.

Close the pop-up and then close the Authentication Configuration browser tab without saving.
Step 4: Configure the AssumeRole Action for the instance_role
This step is performed in the AWS IAM console
Note
Sub-step 4-1 in this Step is for customer-managed and Alation Cloud Service instances that haven’t been migrated to the cloud-native architecture. If you are an administrator of an Alation instance on the cloud-native architecture, skip 4-1 and start with Step 4-2: Define a Trust Relationship on the read_secrets_role.
To configure the AssumeRole action for the instance_role (the role attached to Alation’s Amazon EC2 instance):
Note
This step is for customer-managed (on-premise) instances and Alation Cloud Service instances that haven’t been migrated to the cloud-native architecture.
If you are an on-premise instance administrator, perform the configuration below.
If you are a cloud instance administrator, create a request for Alation Support to perform the configuration below on your instance.
If you are an administrator of an Alation instance on the cloud-native architecture, skip Step 4-1 and start with Step 4-2: Define a Trust Relationship on the read_secrets_role.
You’ll need:
The name of your
instance_role(Step 3: Get the ARN of the Alation Instance Role)The ARN of the
read_secrets_role(Step 2: Create an AWS IAM Role to Assume)
To add permissions to assume a role to the instance_role:
Log in to the AWS IAM management console.
From the left-hand menu, under Access management, select Roles and use search to find your
instance_role—the role attached to Alation’s instance profile.Open the properties of the
instance_role.Select the Permissions tab. Look at the policies attached to the role: check if the role already has a policy allowing the action
sts:AssumeRole. Such a policy includes lines like the following:{ "Version": "2012-10-17", "Statement": [ { "Sid": "VisualEditor0", "Effect": "Allow", "Action": "sts:AssumeRole", "Resource": "*" } ] }
If your
instance_rolealready has a policy allowing the actionsts:AssumeRole, click Edit for this policy to open its editor and continue to step 9.If your
instance_roledoesn’t have such a policy yet, attach it using the information in steps 5-8 below.
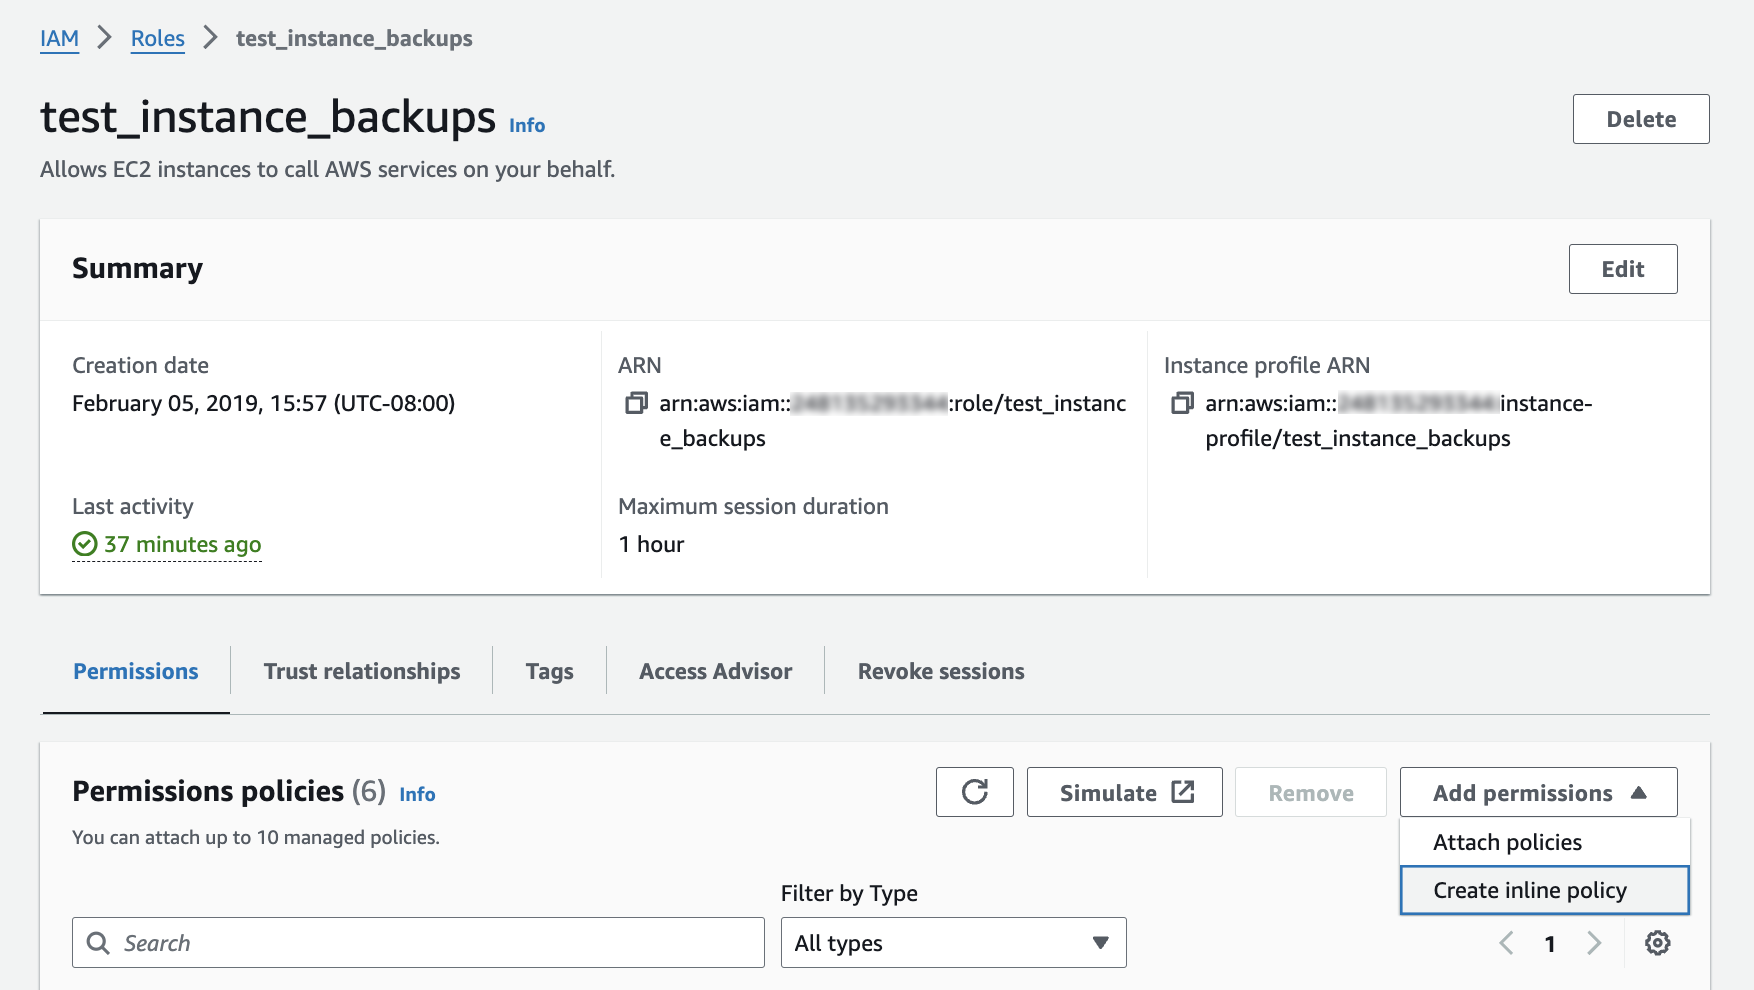
On the Permissions tab, in the section Permissions policies, click the Add permissions dropdown and select Create inline policy. The policy editor will open.
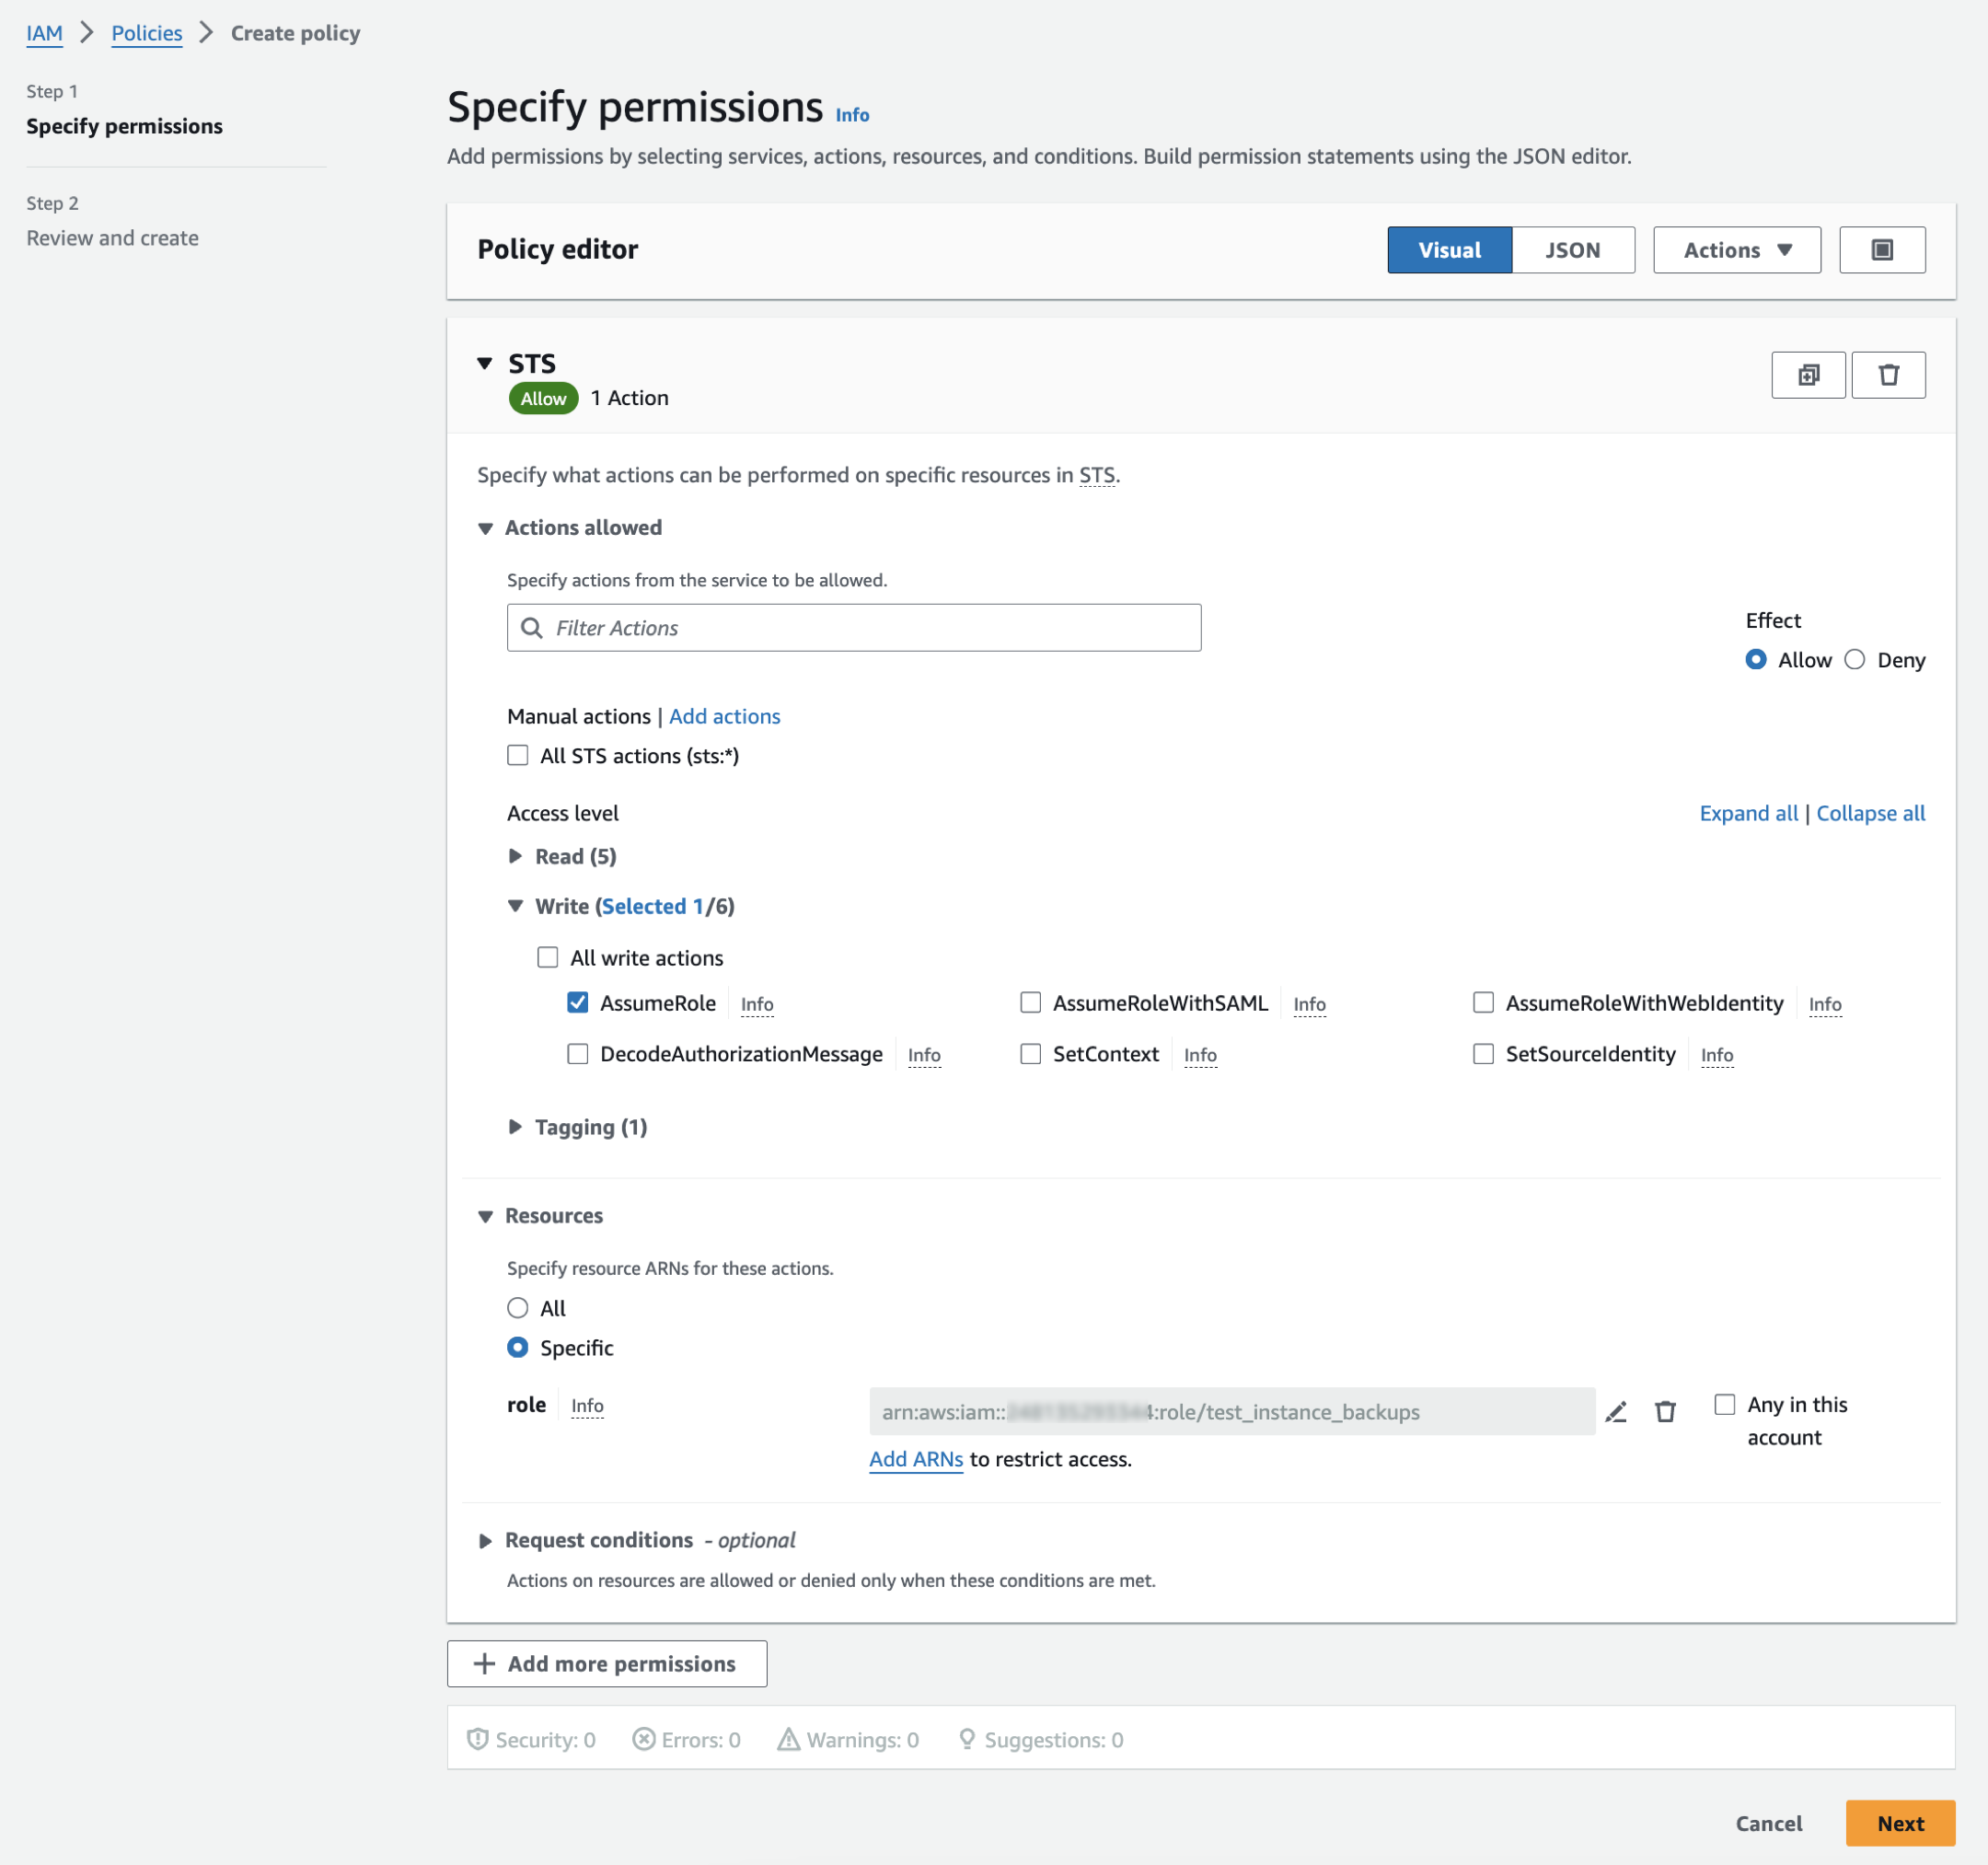
Under Select a service, in the search bar, type sts.
You will see a number of search results, including STS. Select STS as a service.
Under Actions allowed, expand the Write section and select the checkbox for
AssumeRole.Under Resources, ensure that the Specific radio button is selected and click Add ARNs. The Specify ARN(s) dialog will pop up.
Note
There are several options related to AWS accounts in the dialog: “This account”, “Any account”, “Other account”. You don’t have to start with selecting any of these options. They will update automatically after you’ve provided the role ARN.

In the Resource ARN field, paste the ARN of your
read_secrets_role. Ensure that the AWS account option and account ID have been auto-updated correctly and click Add ARNs on the bottom right of the dialog. You’ll be back on the policy editor page.In the Request conditions - optional section, click on Add another condition. The Add request condition dialog will open.
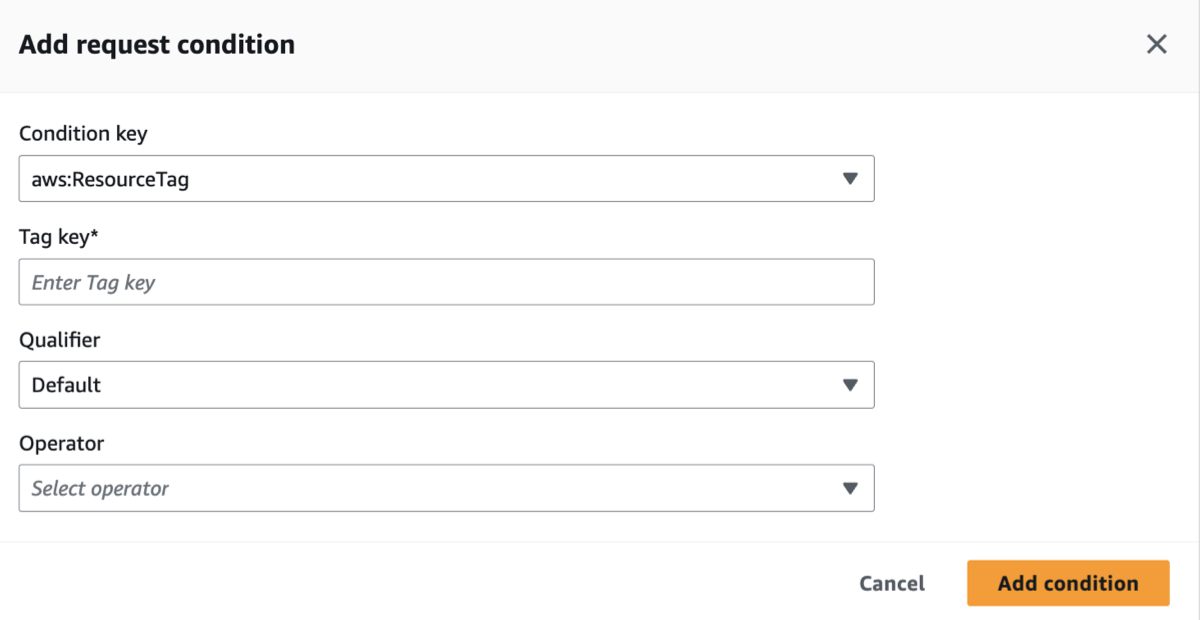
Click on the dropdown button for Condition key and from the list of condition keys, select aws:ResourceTag. A number of fields will appear in the dialog.
Provide the value
AlationStsAssumeRoleNamein the Tag key field.Click on the dropdown button for the Operator field.
From the dropdown select StringEquals.
Populate the Value field with the name of the
instance_role. You can extract the name from the ARN. For example, if a role ARN isarn:aws:iam::237136294455:role/test_instance_backups, then the role name is the text after:role/, ortest_instance_backups.In the dialog, click Add. After you’ve done the steps above, you should see a screen similar to the following:
Click Next. You’ll be asked to add a policy name and review its details. Add a meaningful name, review the details, and click Create policy to create the policy. Once done, you’ll see your policy listed in the Permission policies table on the Permissions tab.
Note
This step is for all Alation instance types.
You’ll need:
The name of the
read_secrets_role(Step 3: Get the ARN of the Alation Instance Role)The ARN of the
instance_role(Step 2: Create an AWS IAM Role to Assume)
Define a trust relationship on the read_secrets_role that will be assumed by the instance_role. This involves adding a principal and adding a condition, as follows:
In the IAM console, open the properties page of the
read_secrets_role.Click the Trust Relationships tab and then click Edit trust policy.
Click the Add button beside Add a principal.
Click the Principal type dropdown and select IAM Roles.
In the ARN field, enter the ARN of the
instance_role, and then click Add principal.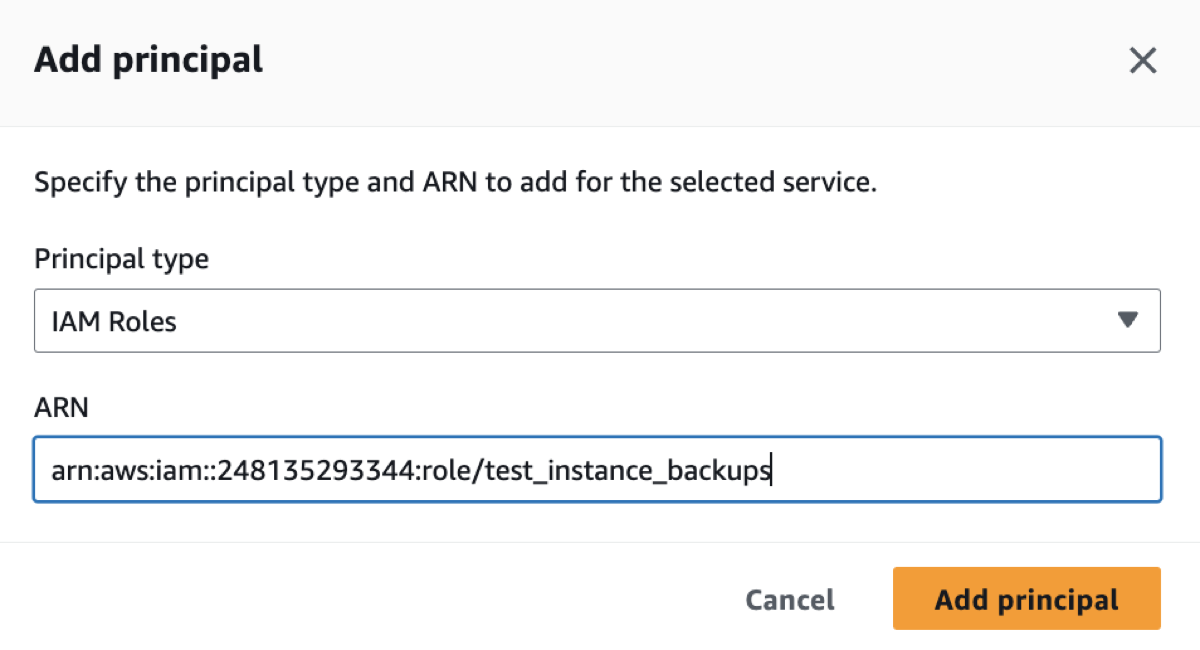
Click the Add button beside Add a condition.
In the dialog that appears, click the dropdown button under Condition key and type externalid in the search box that appears.
Select the result sts::ExternalId.
Click the dropdown button under Operator and select StringEquals from the choices offered.
Under Value, enter a unique ID. Amazon suggests using one external ID per AWS account, with a randomly generated external ID. Learn more in How to use an external ID in AWS documentation. Save this external ID for future reference.
Click Add condition. Your screen should look something like the following:
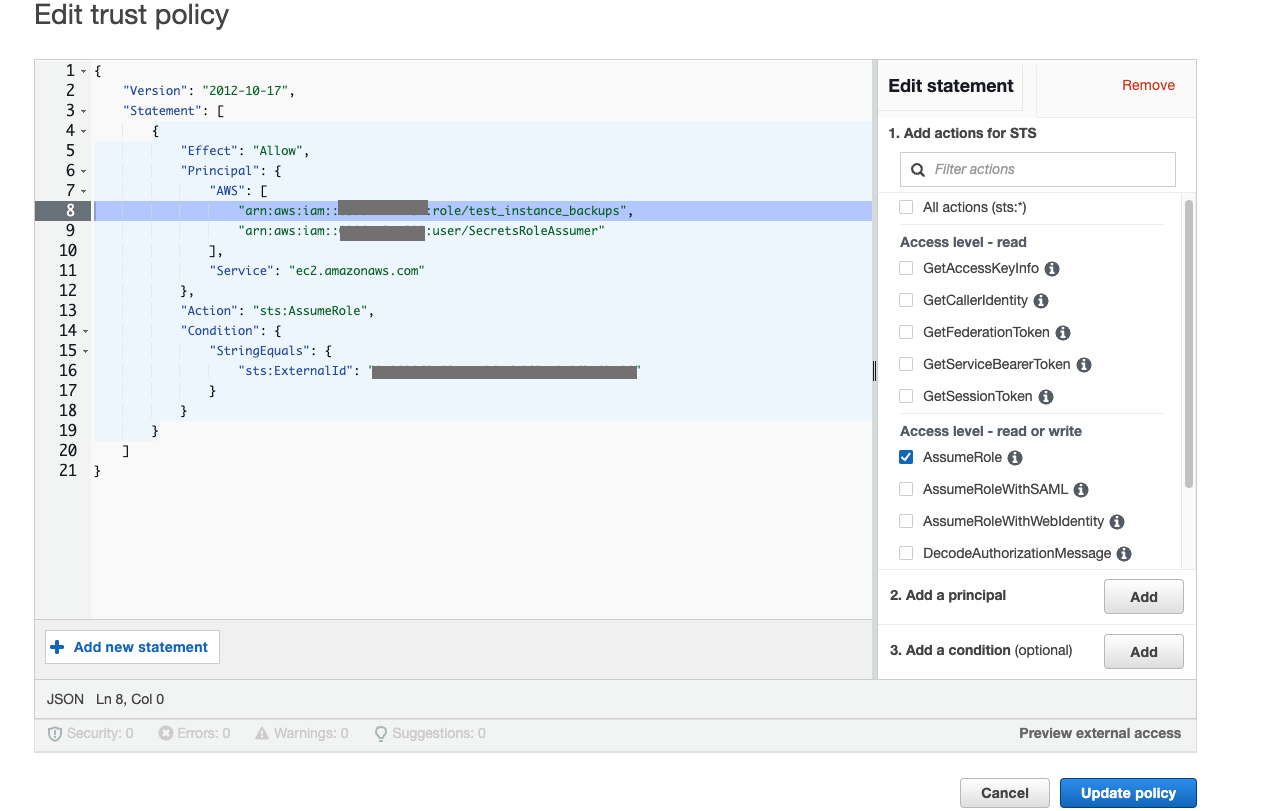
Click Update policy. You will see a confirmation that the trust policy has been successfully updated.
Note
This step is for all Alation instance types.
You’ll need:
The name of the
read_secrets_role(Step 3: Get the ARN of the Alation Instance Role)The ARN of the
instance_role(Step 2: Create an AWS IAM Role to Assume)
On the read_secrets_role, a resource tag must be defined with the tag name as AlationStsAssumeRoleName. The value for this tag must be the ARN of the instance role.
To create a resource tag for the read_secrets_role (the role to be assumed):
On the properties page of the
read_secrets_role, select the Tags tab.Click Add new tag to open the tag editor.
Note
If some tags already exist, you click on Manage tags first and then on Add new tag.
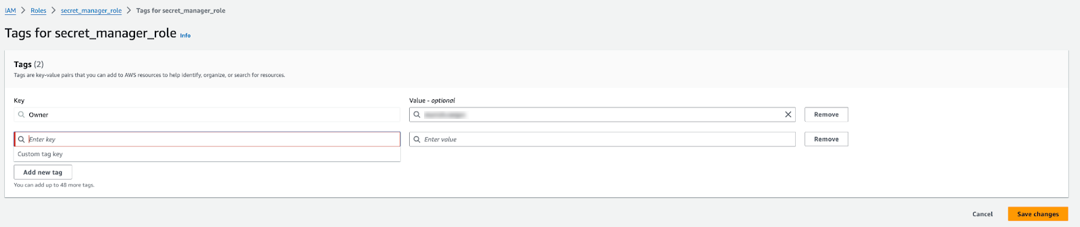
In the Key field, enter
AlationStsAssumeRoleNameas the tag key.In the Value field, enter the name of the
instance role. You can extract the role name from the role ARN. For example, if the ARN isarn:aws:iam::248135295566:role/test_instance_backups, then the role name is the text after:role/, ortest_instance_backups.Click Save changes to save the tag. It is now displayed in the Tags table on the Tags tab.
Save the value of the Maximum session length of the
read_secrets_rolelocated on the role properties page under the ARN. You will need it in the steps that follow. If you want to adjust this value before using the role in Alation, refer to Modifying a role maximum session duration (console) in AWS documentation.
Step 5: Create an Authentication Profile
This step is performed in Alation
You’ll need:
The ARN of the
read_secrets_role(Step 3: Get the ARN of the Alation Instance Role)The external ID you’ve specified as a condition on the
read_secrets_role(Step 4-2: Define a Trust Relationship on the read_secrets_role)The Maximum session length value of the
read_secrets_role(Step 4-3: Define Resource Tag on read_secrets_role)
To create an authentication profile for the Secrets Manager integration:
Log in to your Alation instance as a Server Admin.
Click the Admin Settings gear icon on top right to open the Admin Settings page.
Click Authentication to open the Authentication tab. Locate the section Authentication Configuration Methods for External Systems.
In 2024.1.4 and later, for Alation Cloud Service instances on the cloud-native architecture, find the See configurations for drop-down menu and ensure that Alation Cloud Service is selected.
Click Add Configuration, and then select AWS Secrets Manager as the method type. The Authentication Configuration Method page will open in a new browser tab.
In Config Name, enter a unique name for the configuration. Save it for future reference when configuring the data source.
Under Region, select the appropriate AWS region for the Secrets Manager service (the region under which your secrets are stored).
Under Authentication Type, select IAM Role (or the option iam_role on versions older than 2024.1.1). A number of fields will appear.
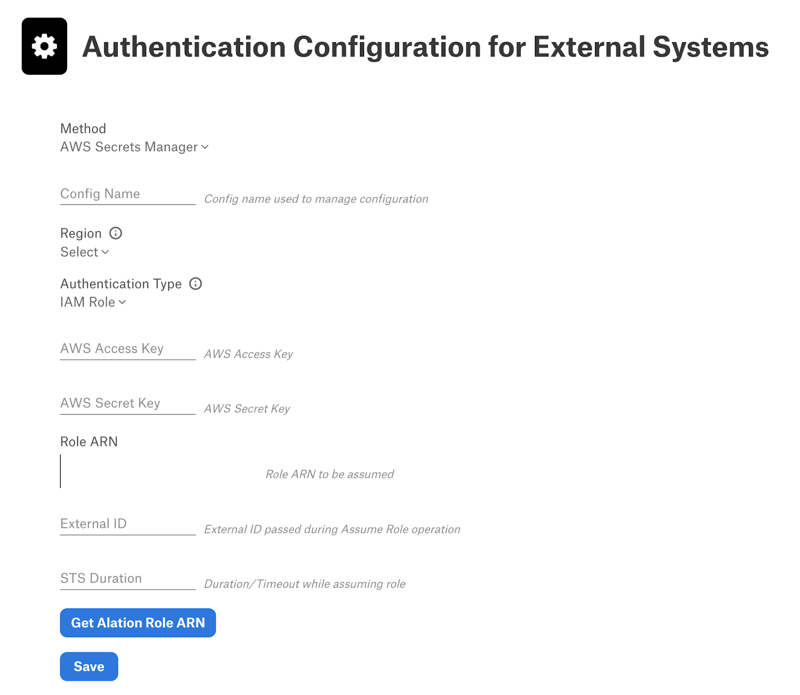
Leave the AWS Access Key and AWS Secret Key fields empty (they are not relevant to this configuration).
Under Role ARN, enter the ARN of the
read_secrets_role.Under External ID, enter the External ID you specified as a condition for the
read_secrets_role.Under STS Duration, enter a value in seconds greater than
900and less than the maximum session duration specified for yourread_secrets_role.Click Save. Alation attempts to create a connection, and if the connection is successful, the configuration is saved.
Now, you can use your integration with an OCF connector. See next: Configure Authentication with AWS Secrets Manager in Data Source Settings.