Azure Power BI Scanner OCF Connector: Install and Configure
Alation Cloud Service Applies to Alation Cloud Service instances of Alation
Customer Managed Applies to customer-managed instances of Alation
Follow these steps to perform the necessary configuration for the Azure Power BI Scanner connector on the Power BI side and in Alation.
Prerequisites
Firewall Configuration
Open outbound TCP port 443 on Azure Power BI server for Rest API communication.
Note: If the Azure Power BI server is connected using a proxy connection, open the inbound TCP port 3128.
Authentication Requirements
Azure app registration
Power BI application registration credentials
I. Azure Power BI Scanner Setup and Authentication
STEP 1: Register an Application in Azure Portal
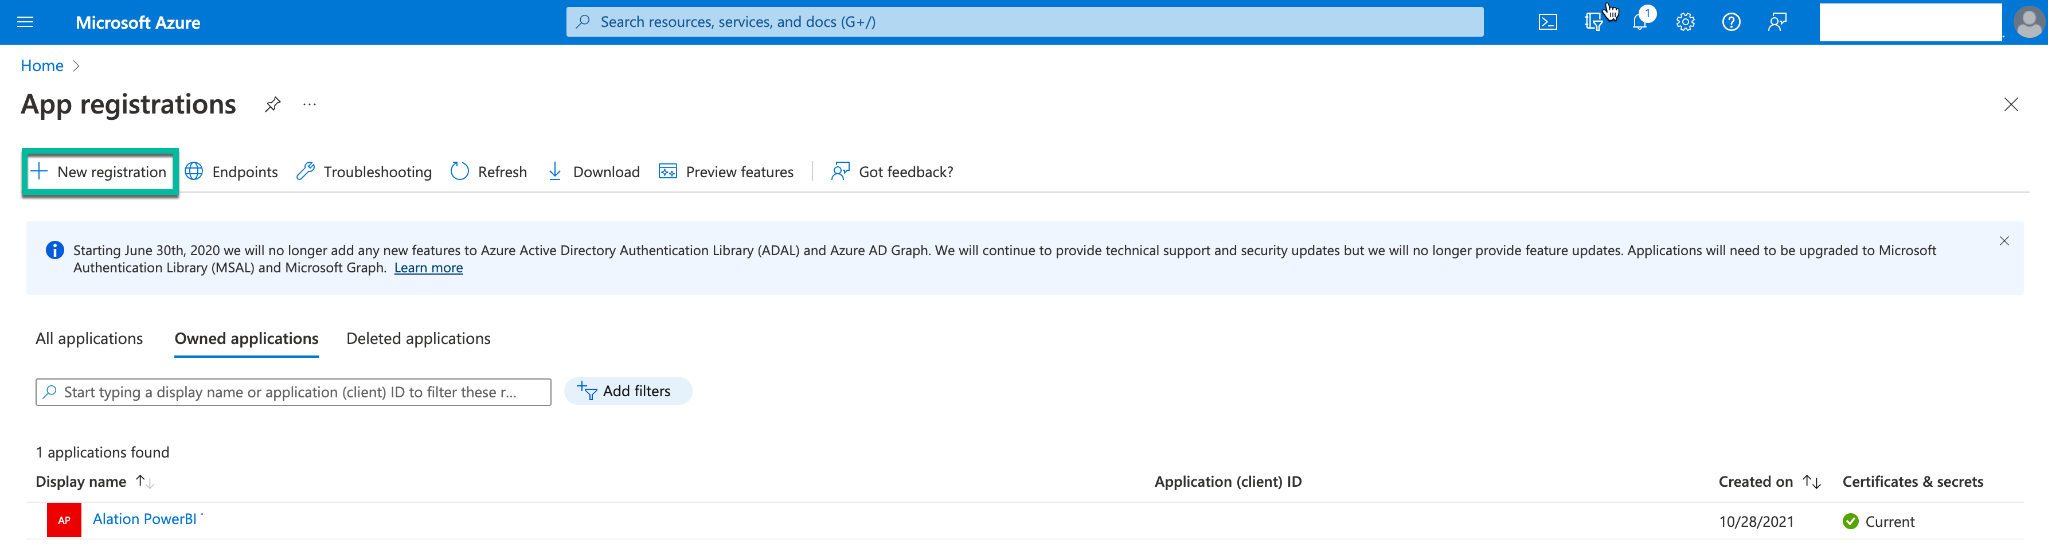
Navigate to App registrations in Microsoft Azure Portal.
Click New registration:
Provide the following information:
A name for the application
Select the account type Accounts in this organizational directory only (<Org Name> only - Single tenant)
The Power BI URL as Redirect URI -
https://api.powerbi.comorhttps://api.powerbigov.us- for Gov Cloud
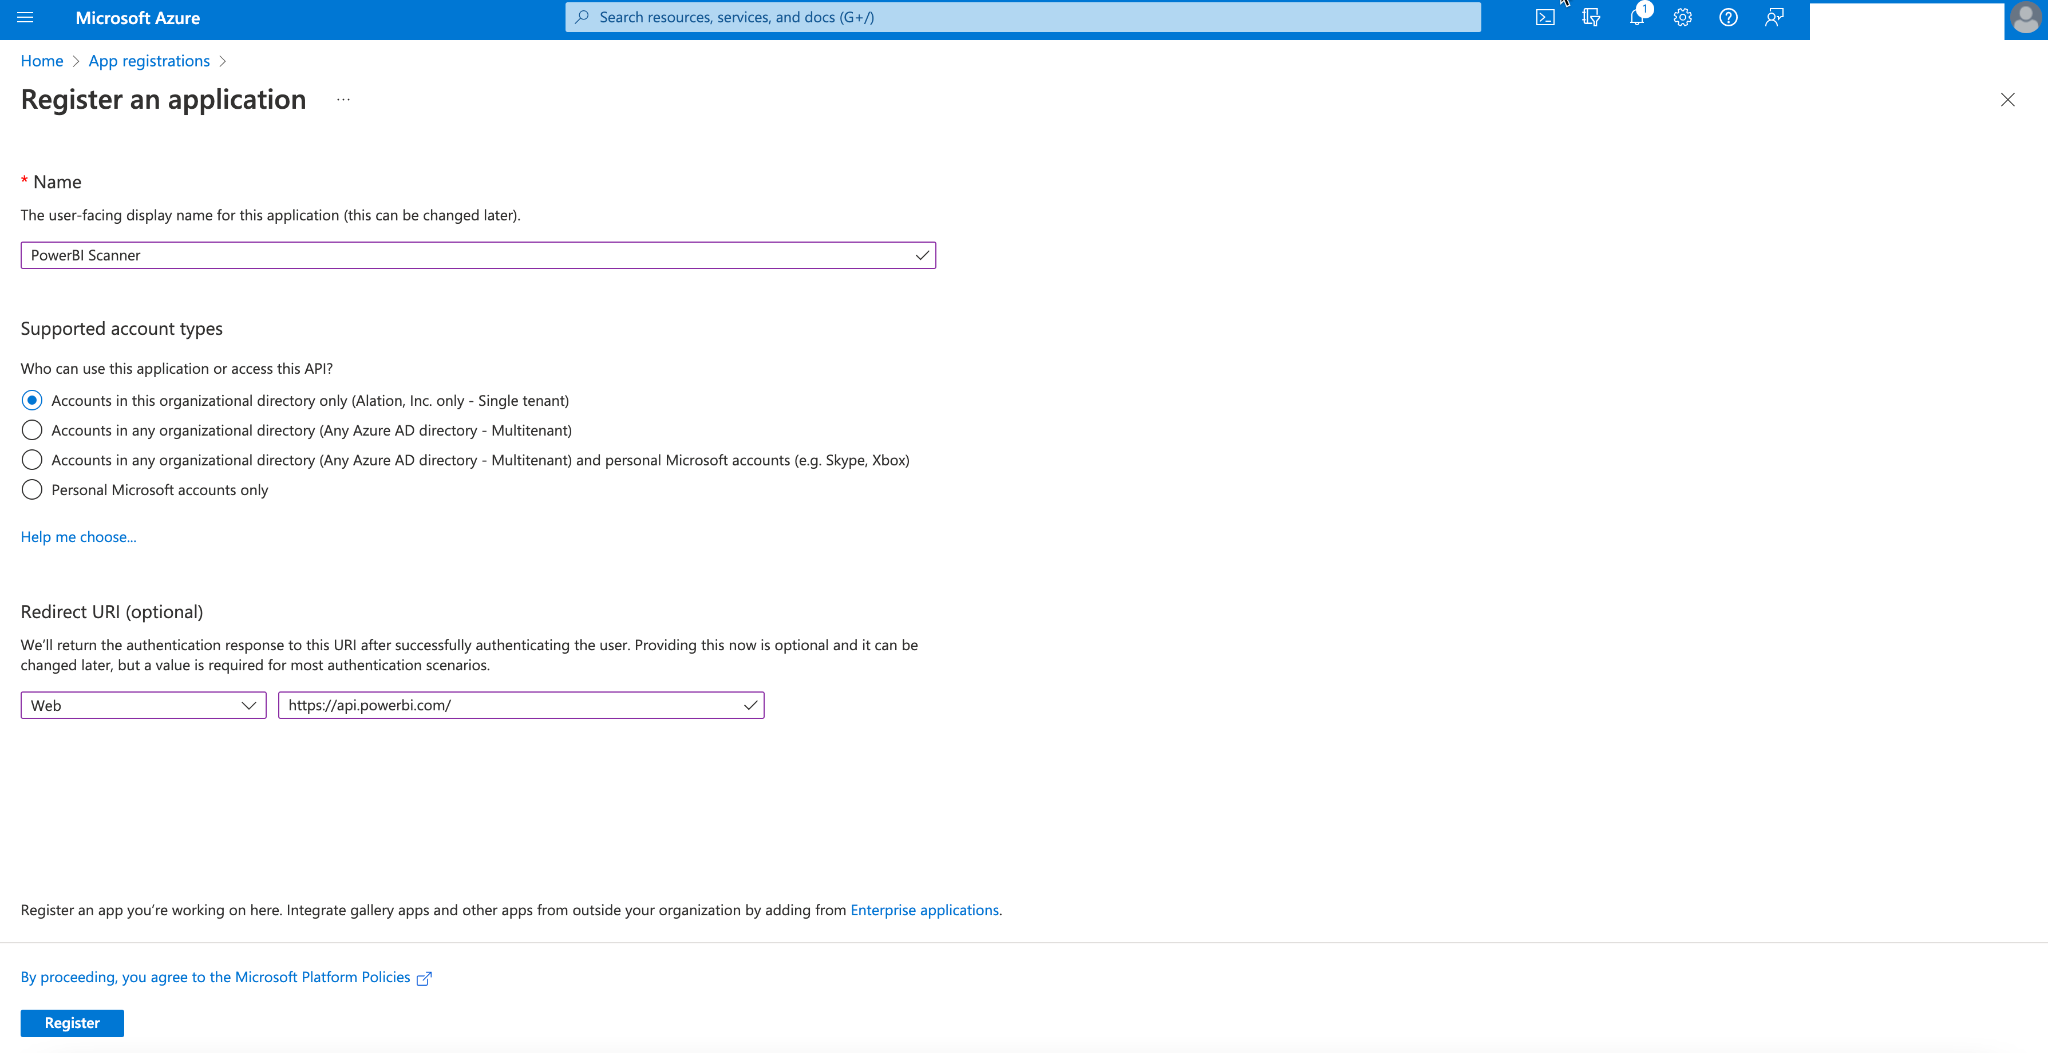
Click Register.
On the next screen, note down Application (client) ID and Directory (tenant) ID.
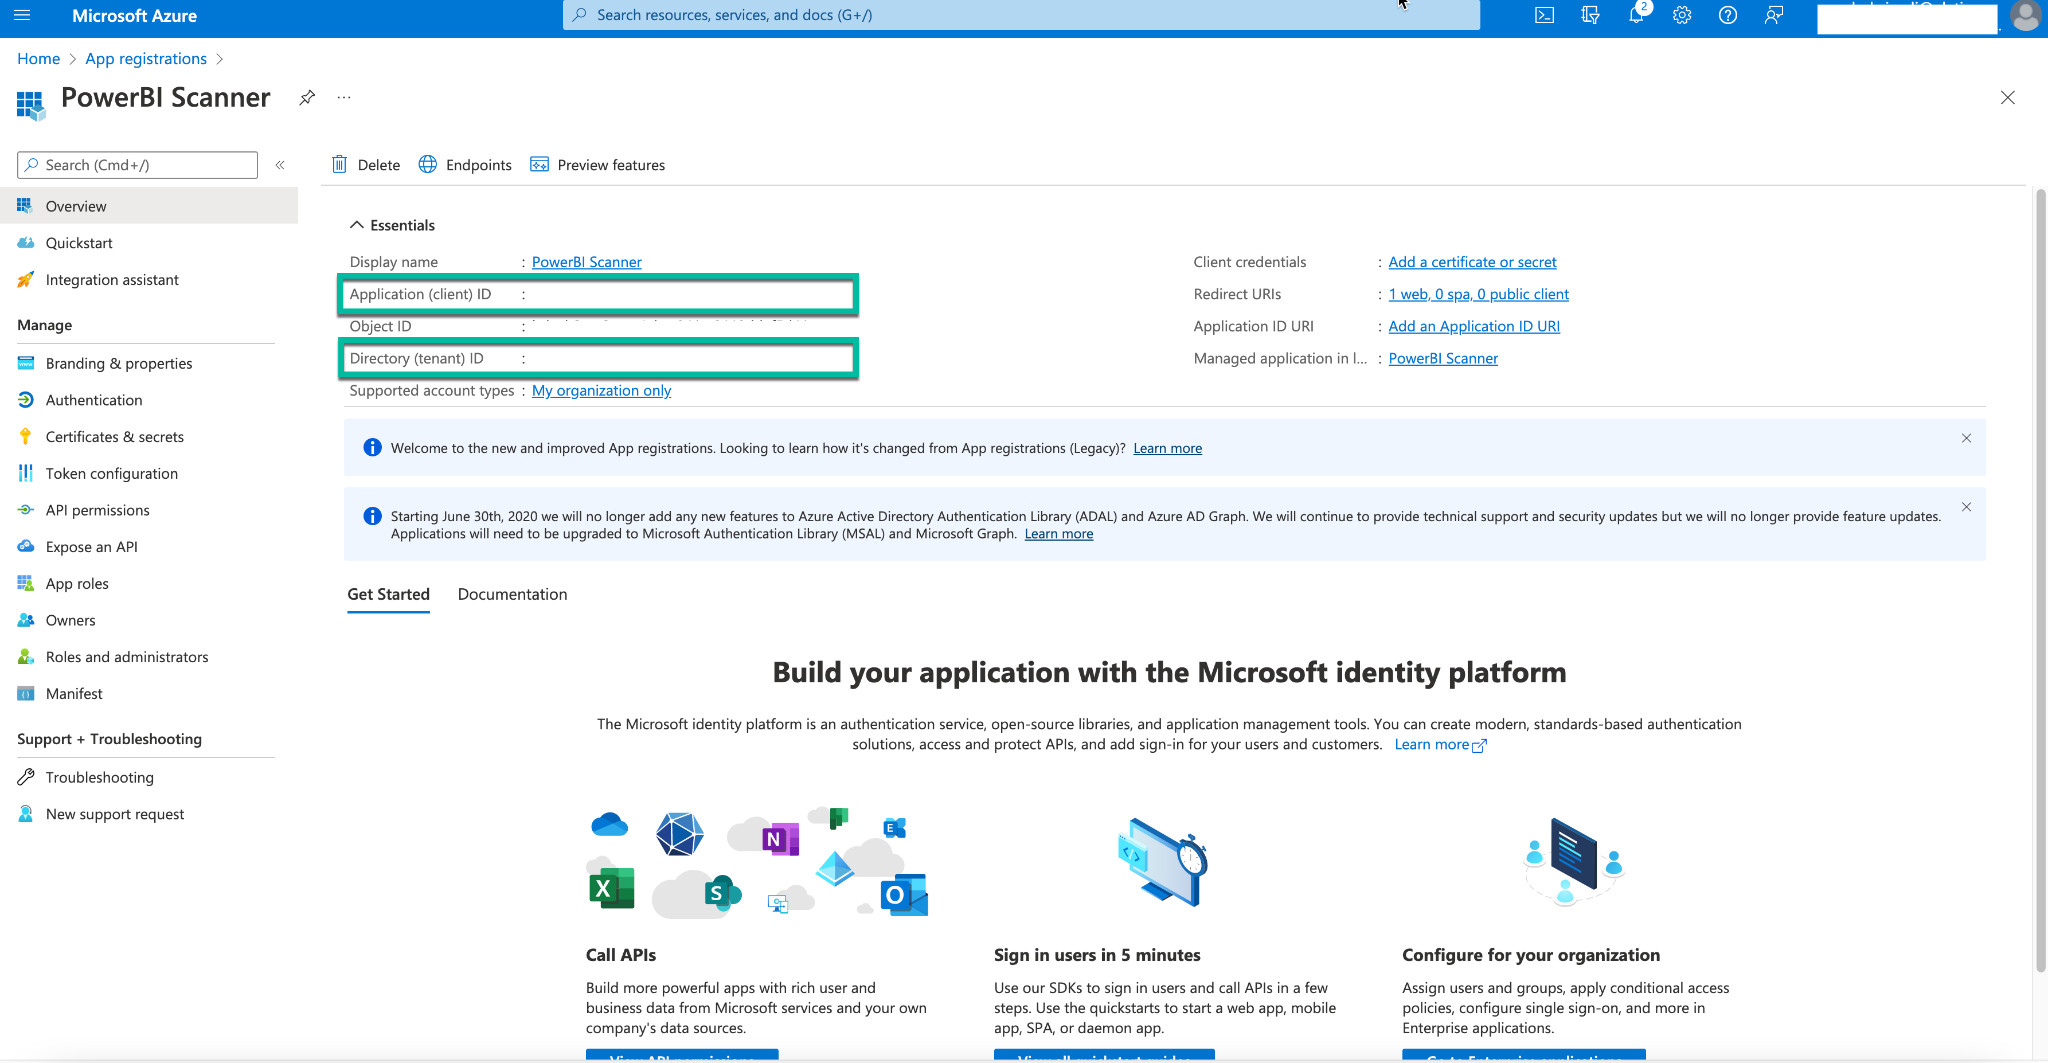
On the left pane, click Certificates & secrets to generate the Client Secret.
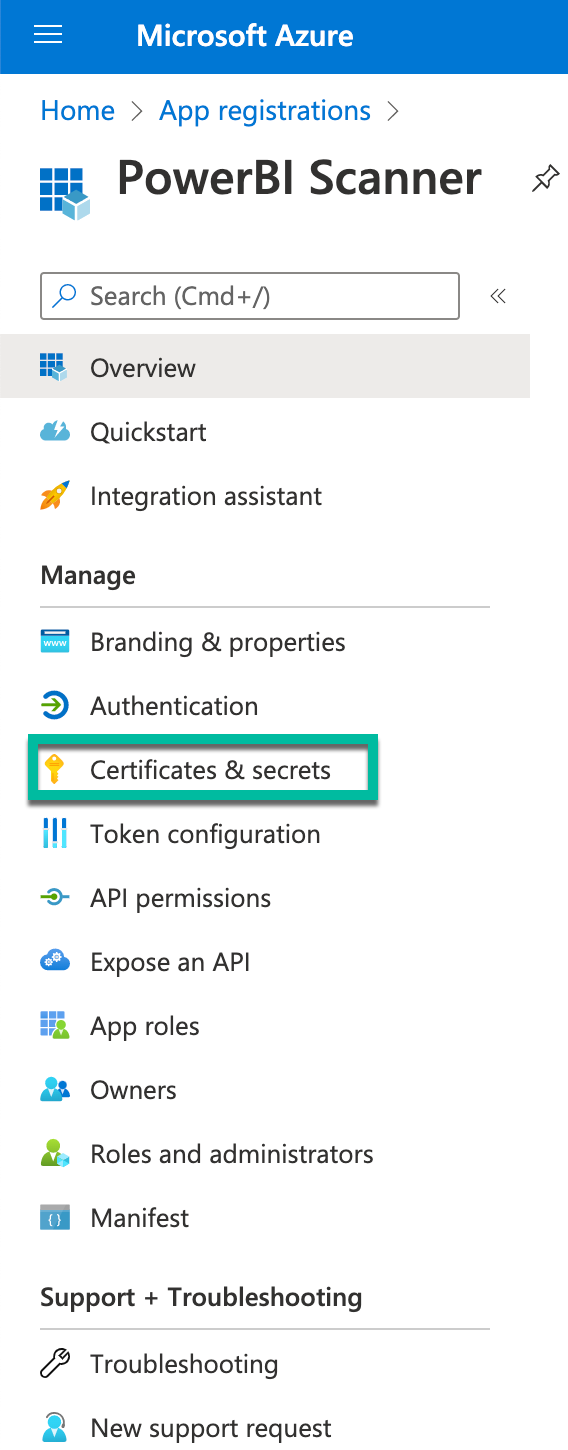
Click New client secret under the Client secrets section.
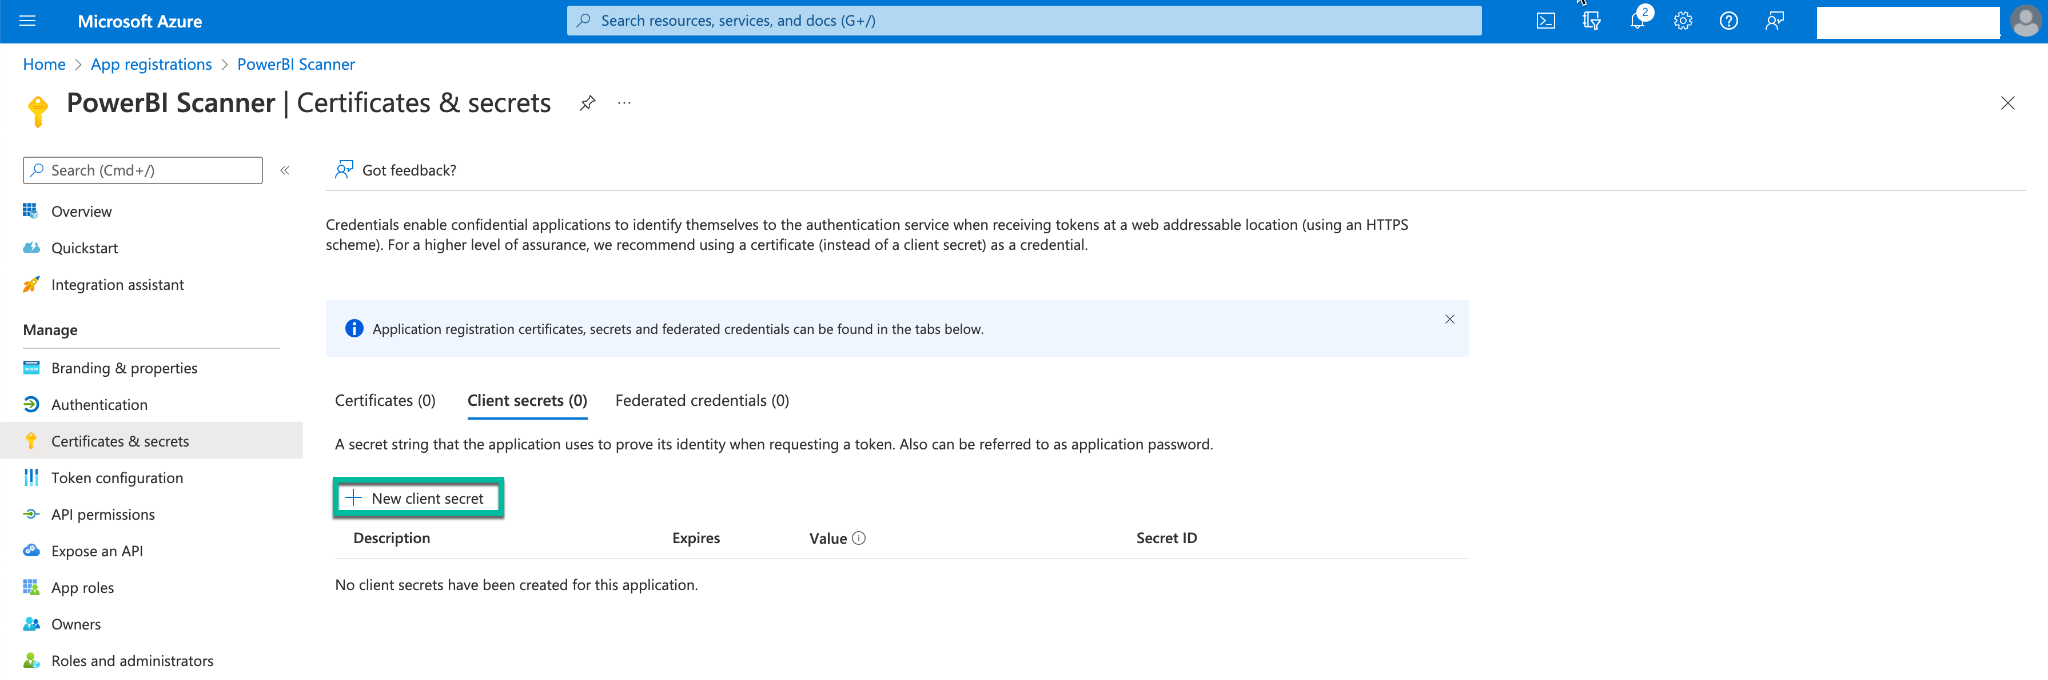
On the popup window, provide the Description for the client secret and click Add.
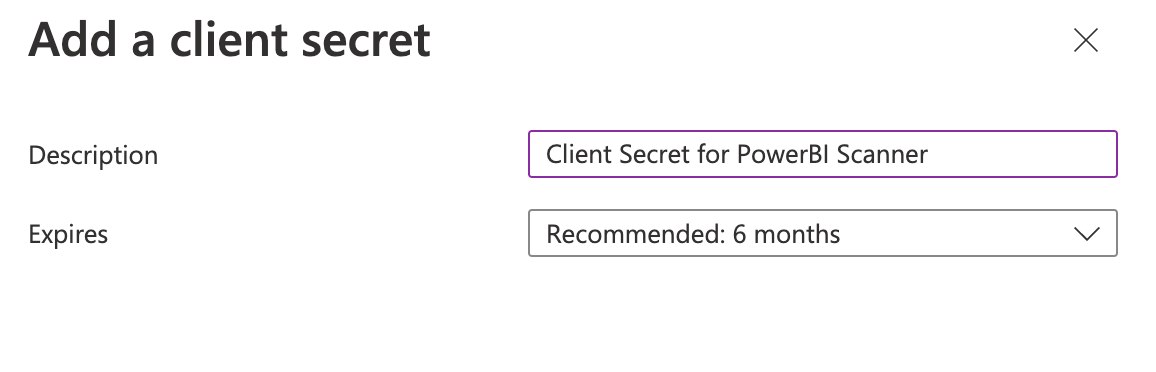
Note the Client Secret.
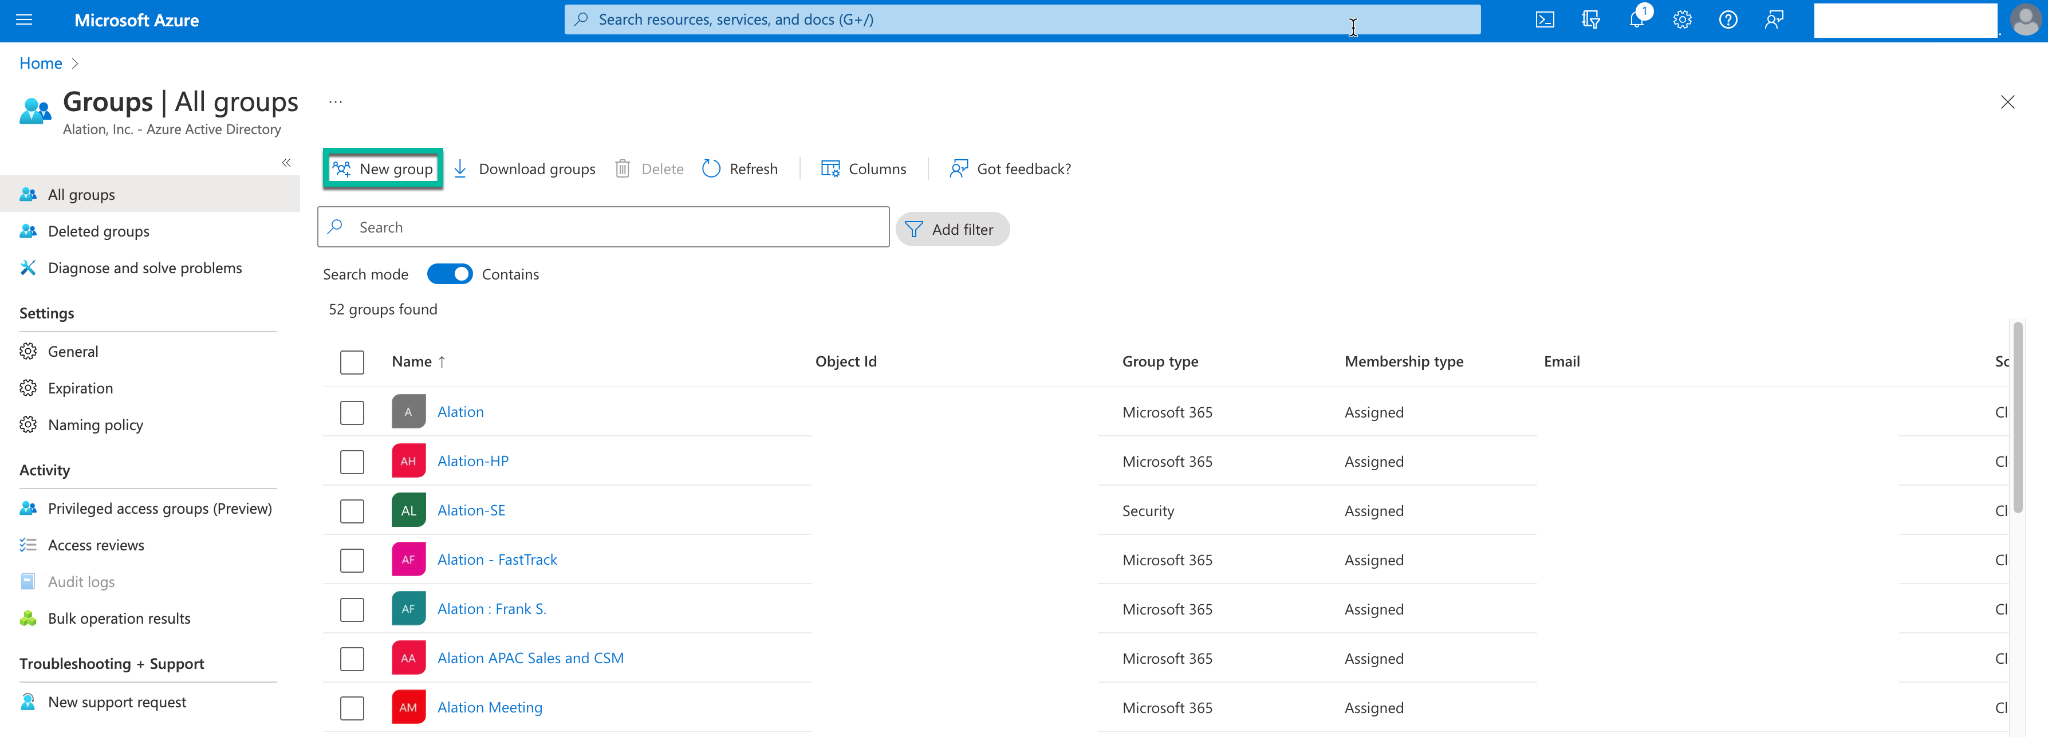
STEP 2: Create a Security Group for Azure Power BI Scanner
Navigate to the Groups management section of Azure Portal.
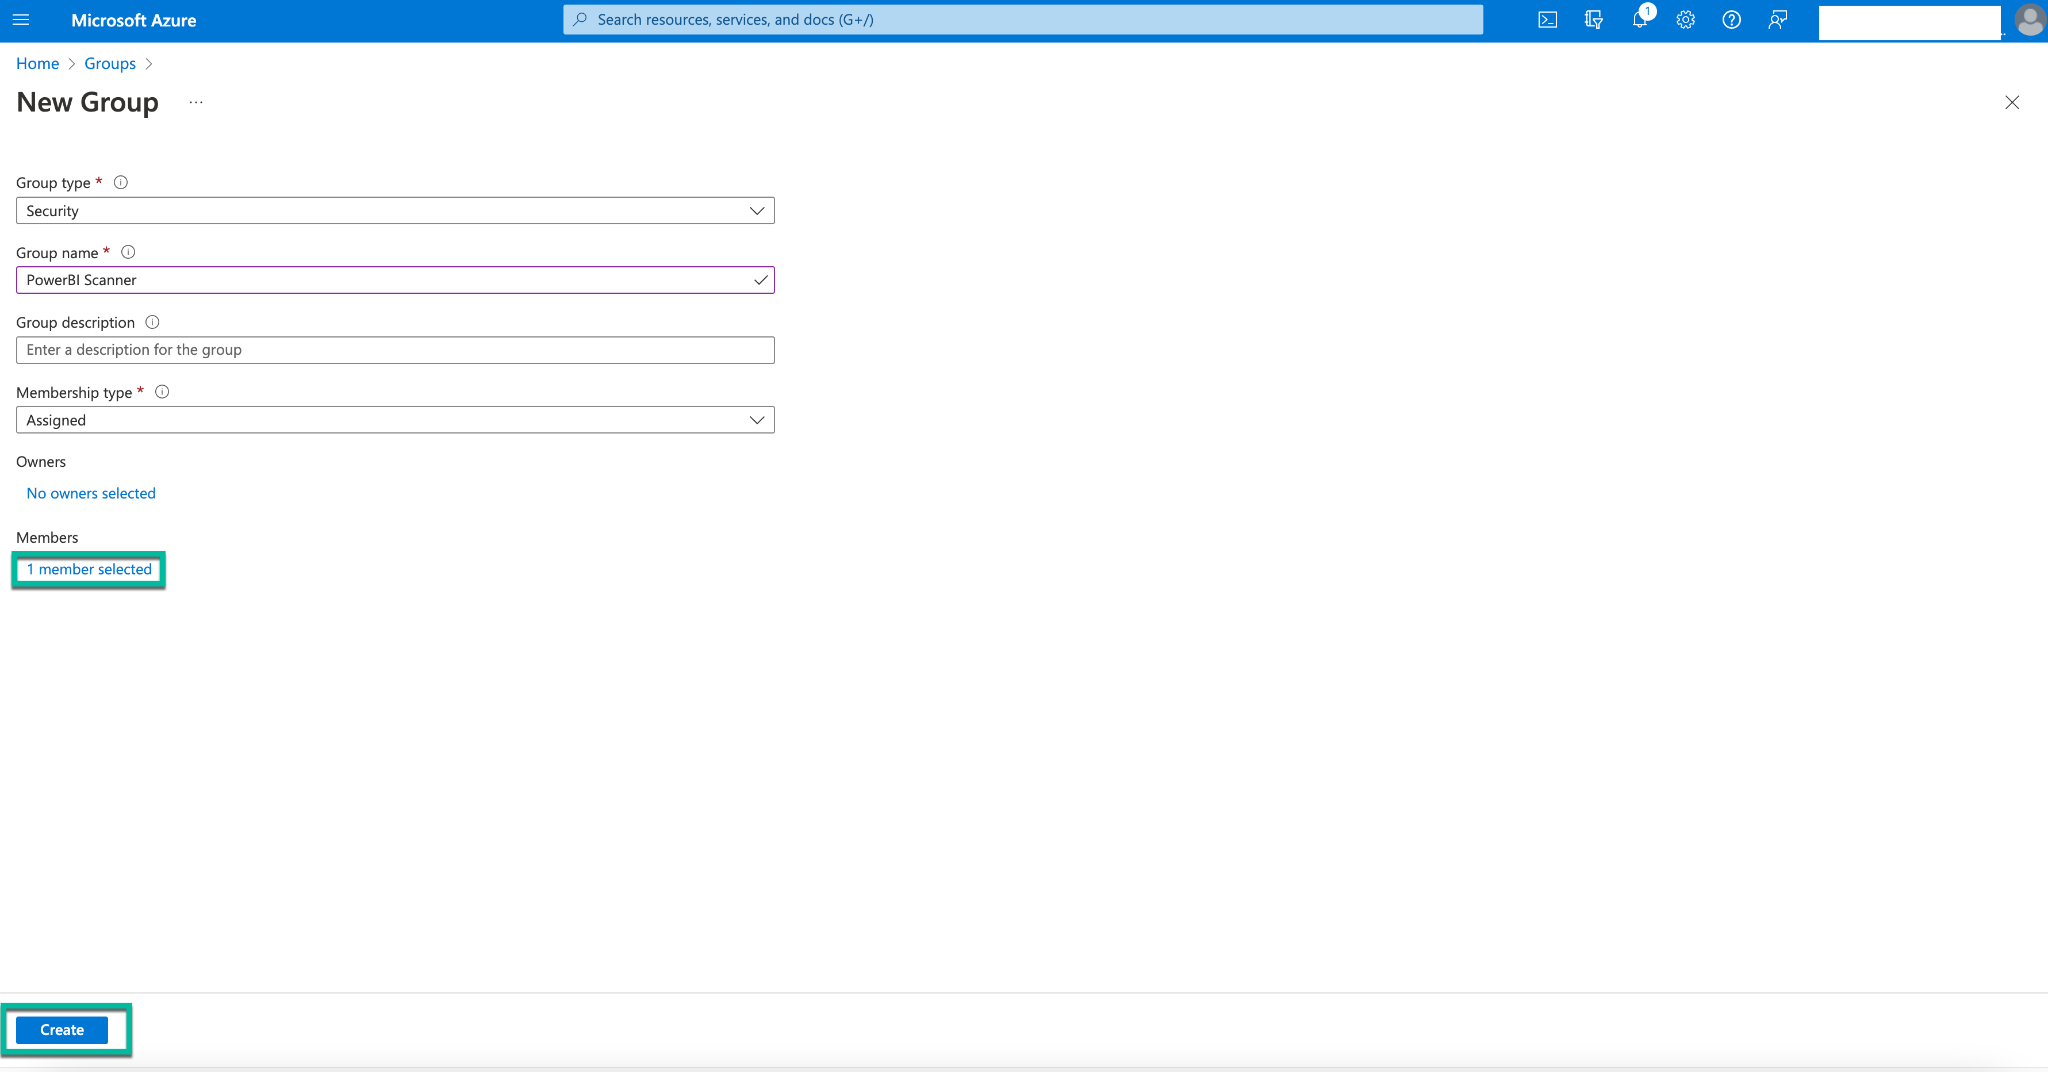
Click New group and enter the following details:
Select Security for Group Type.
Enter the Group Name and Group Description.
Under Members, add the app created in Step 1 as the member of the group.
Click Create.
STEP 3: Enable Azure Power BI Scanner Service Admin Settings
For an Azure application to be able to access the Power BI content and APIs, a Power BI admin needs to set Enable service principal access in the Power BI admin portal.
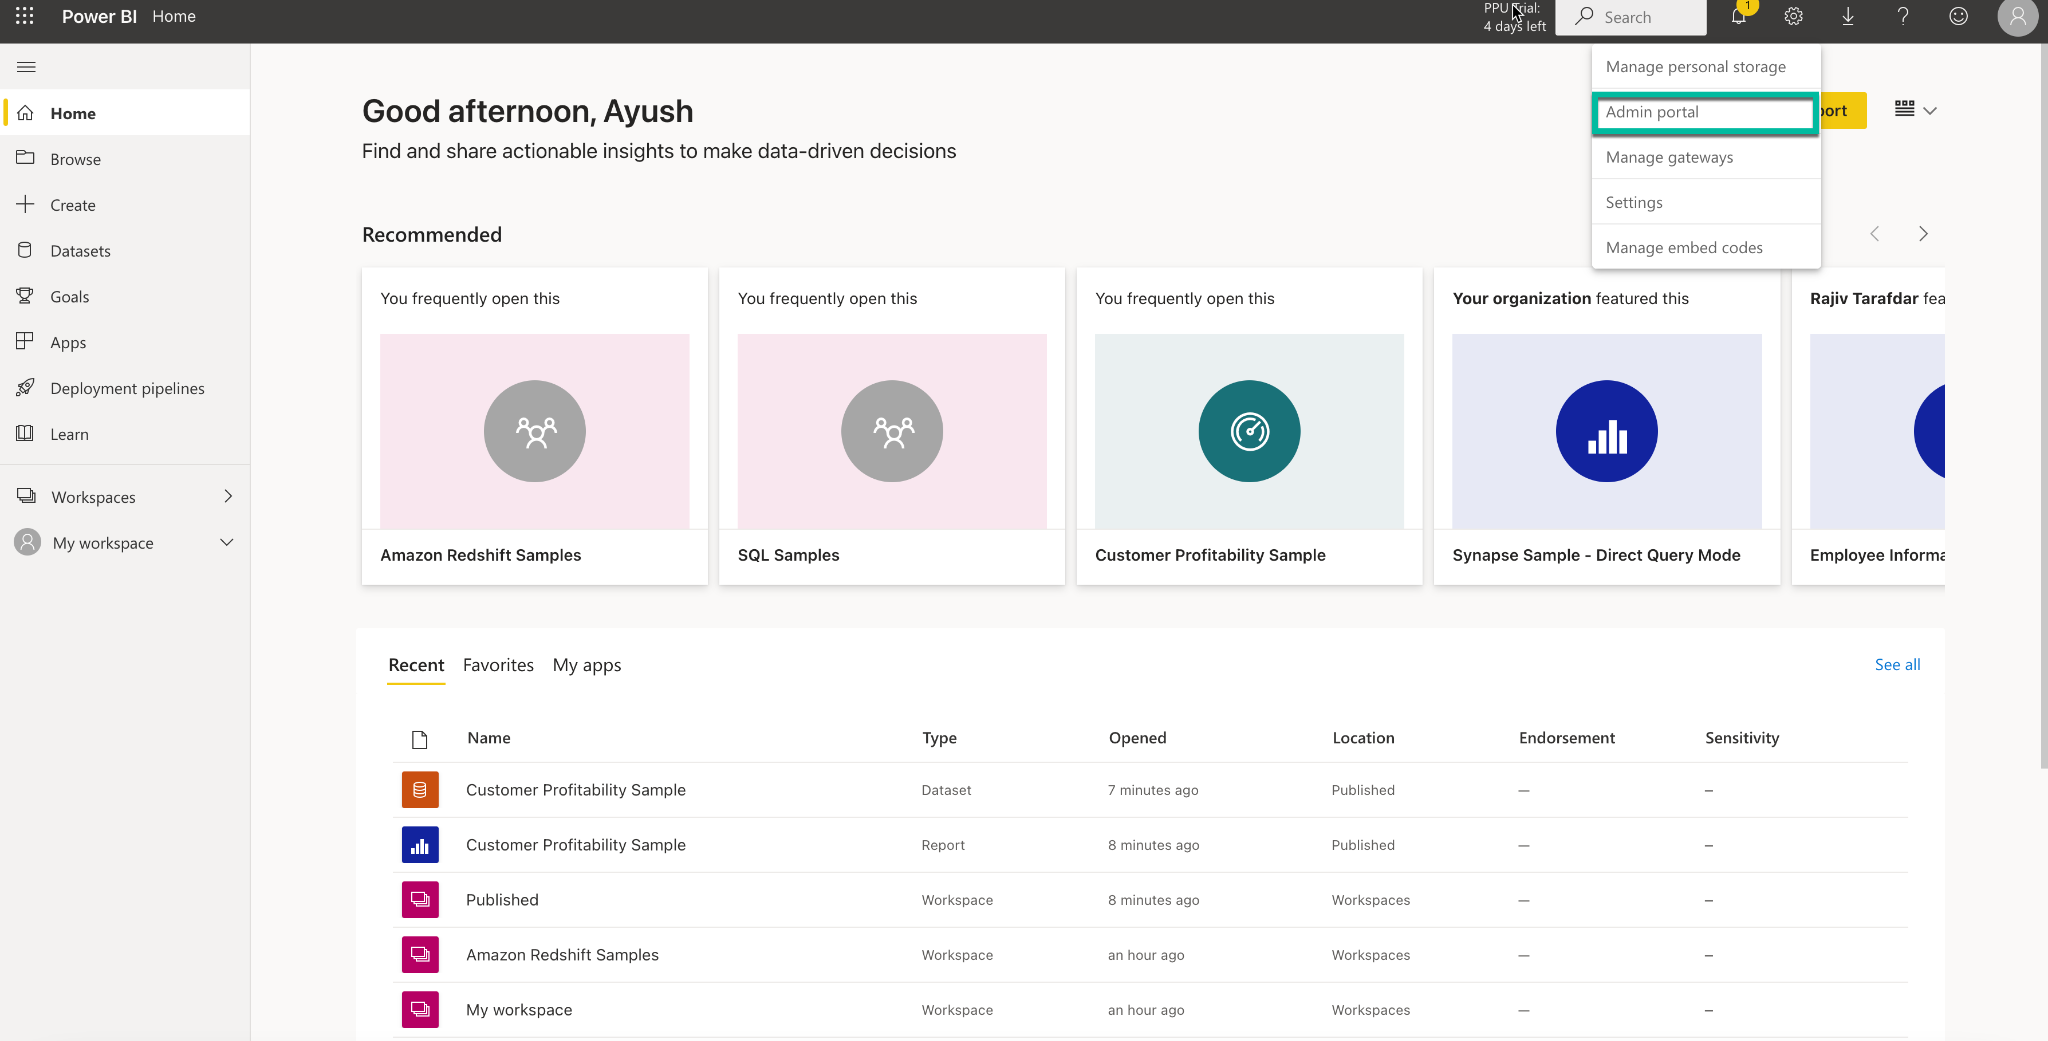
Login to Power BI.
From the Settings menu, select the Admin portal:
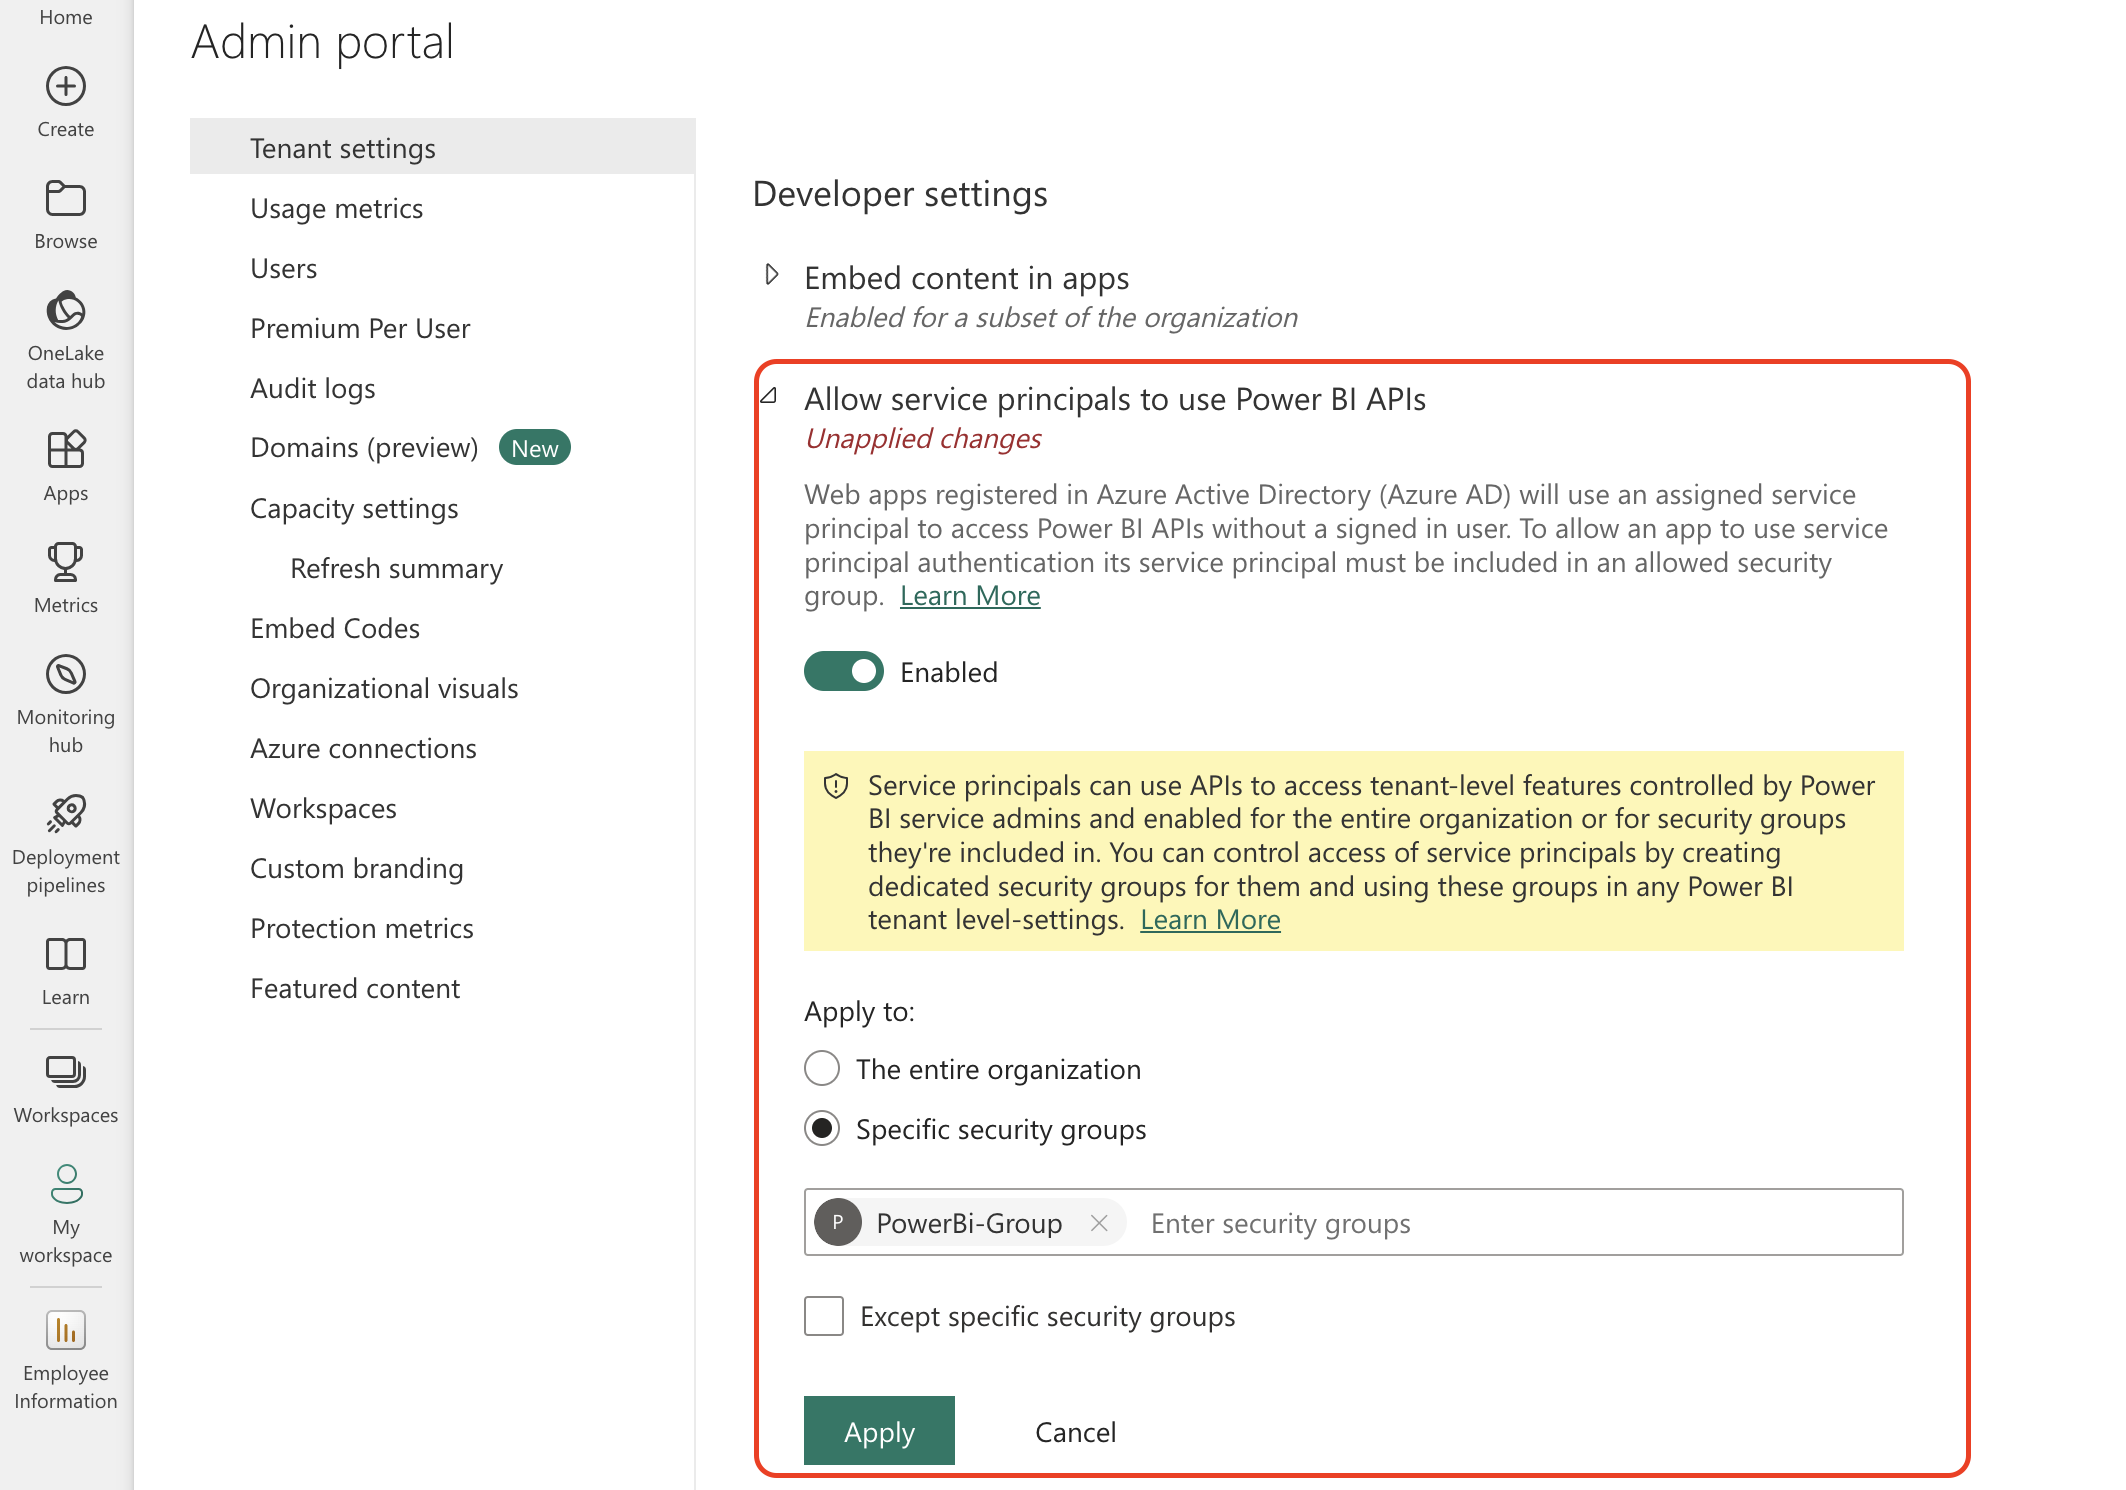
Navigate to Tenant Settings > Developer Settings and perform the following configuration:
Enable Allow service principals to use Power BI APIs
Select the Specific security groups and select the security group created in Step 2
Click Apply to apply the settings
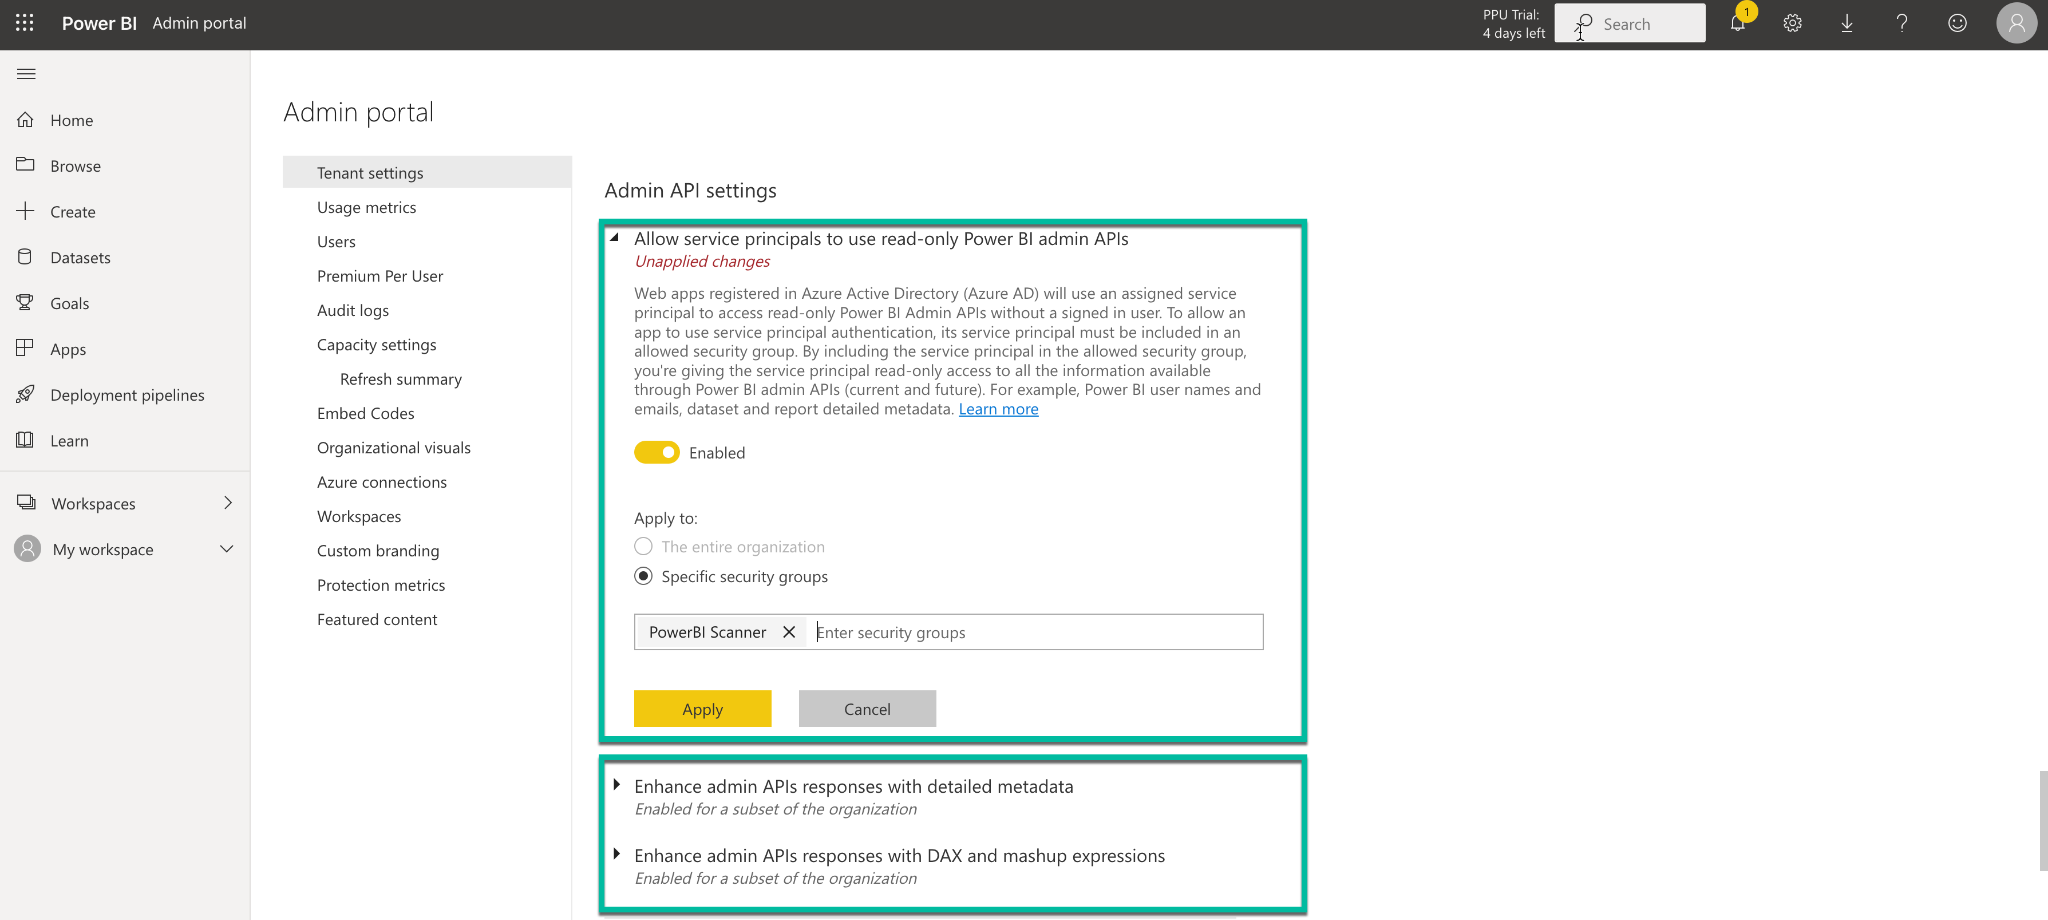
Navigate to Tenant Settings > Admin API Settings and perform the following configuration:
Enable Allow service principals to use read-only Power BI Admin APIs
Select the Specific security groups and select the security group created in Step 2
Click Apply to apply the settings
Similarly enable the following flags:
Enhance admin APIs responses with detailed metadata
Enhance admin APIs responses with DAX and mashup expressions
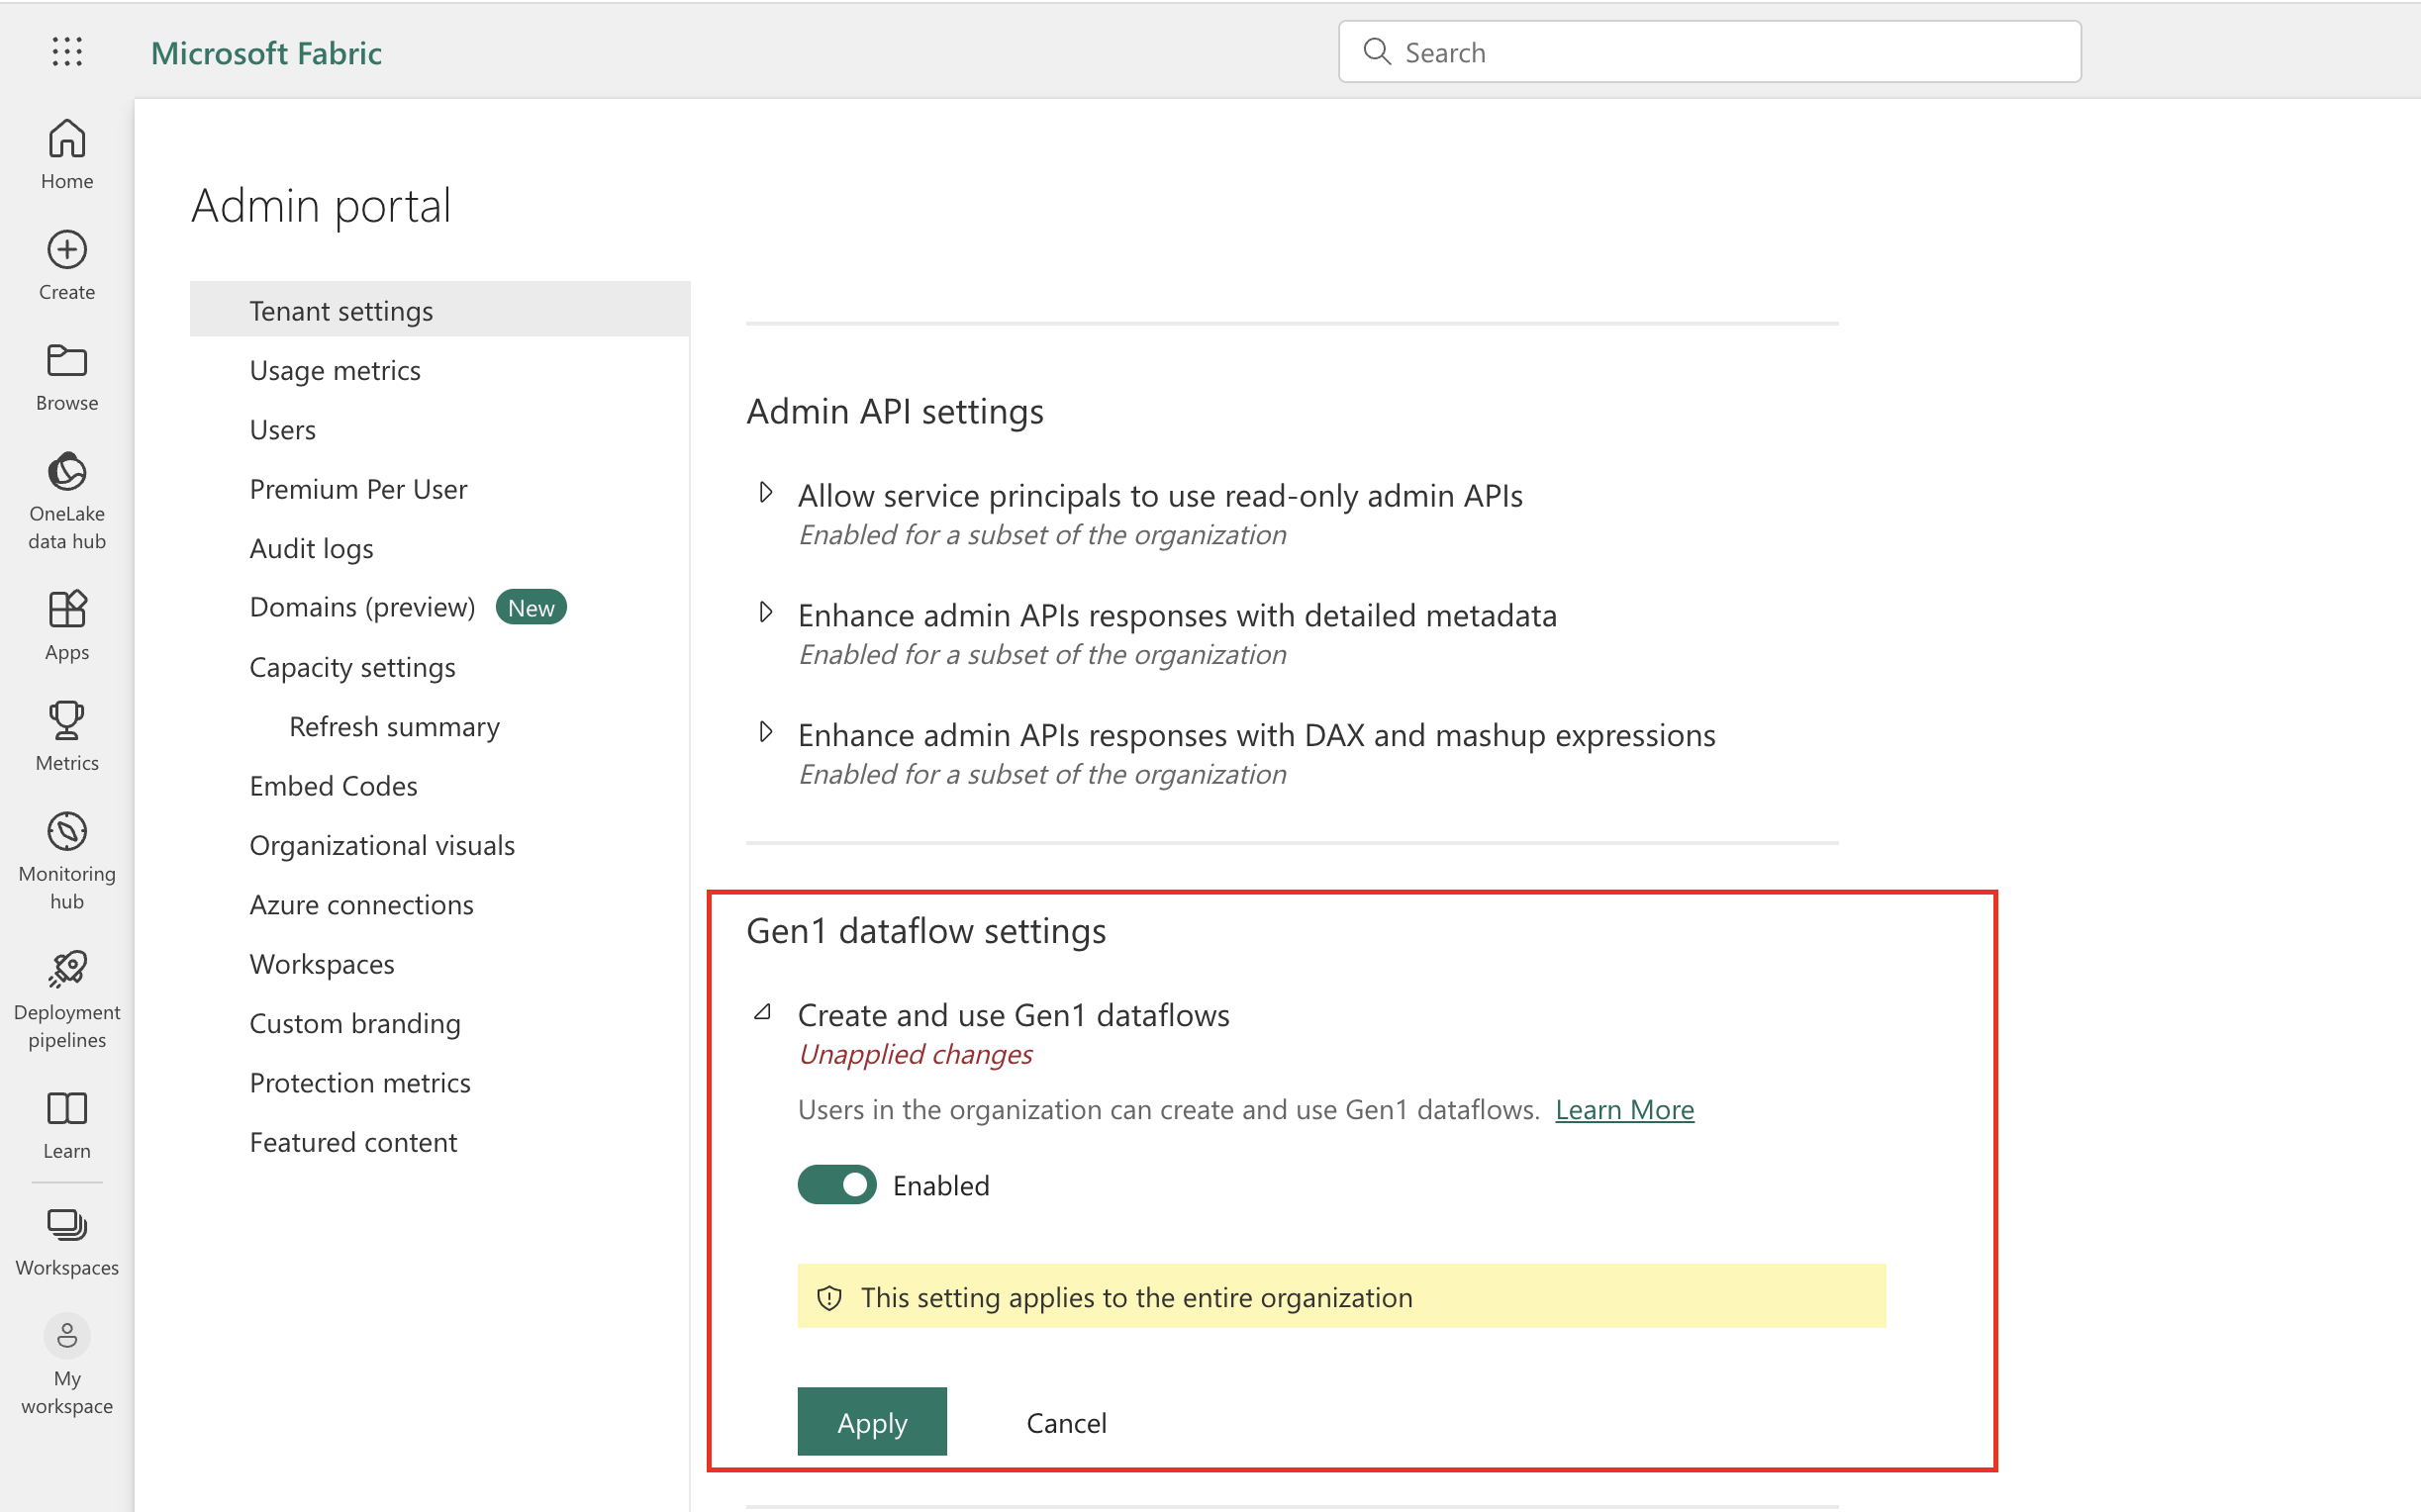
In Tenant Settings, navigate to Gen1 Dataflow Settings:
Enable Create and use Gen1 dataflows to extract the dataflow objects in Alation.
Click Apply to save the settings.
II. Alation Setup and Authentication
STEP 1: Install the Connector
Important
Installation of an OCF connector requires Alation Connector Manager to be installed as a prerequisite.
If this has not been done on your instance, install Alation Connector Manager using the steps in: Install Alation Connector Manager.
Make sure that the OCF connector Zip file that you received from Alation is available on your local machine.
Install the connector on the Connectors Dashboard page: refer to Manage Connector Dashboard.
STEP 2: Create and Configure a New BI Server Source
Add a New BI Server Source
This configuration requires the role of the Server Admin.
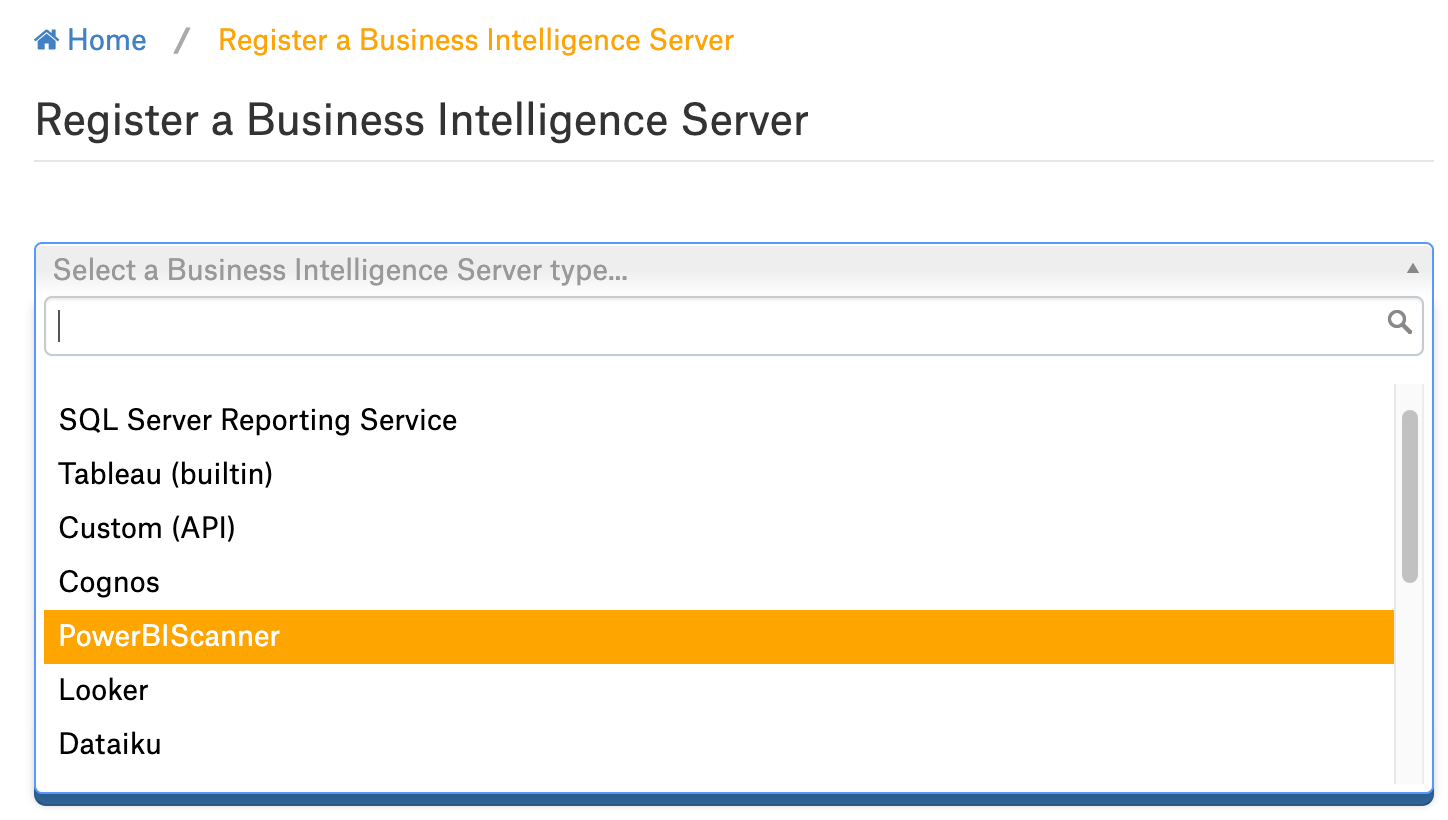
Log in to the Alation instance and add a new BI Server source: Apps > Sources > Add > BI Server. The Register a Business Intelligence Server screen will open.
On this screen, from the Select a Business Intelligence Server type list, select the PowerBIScanner connector name.
Note
The connector name appears in this list only after it is installed.
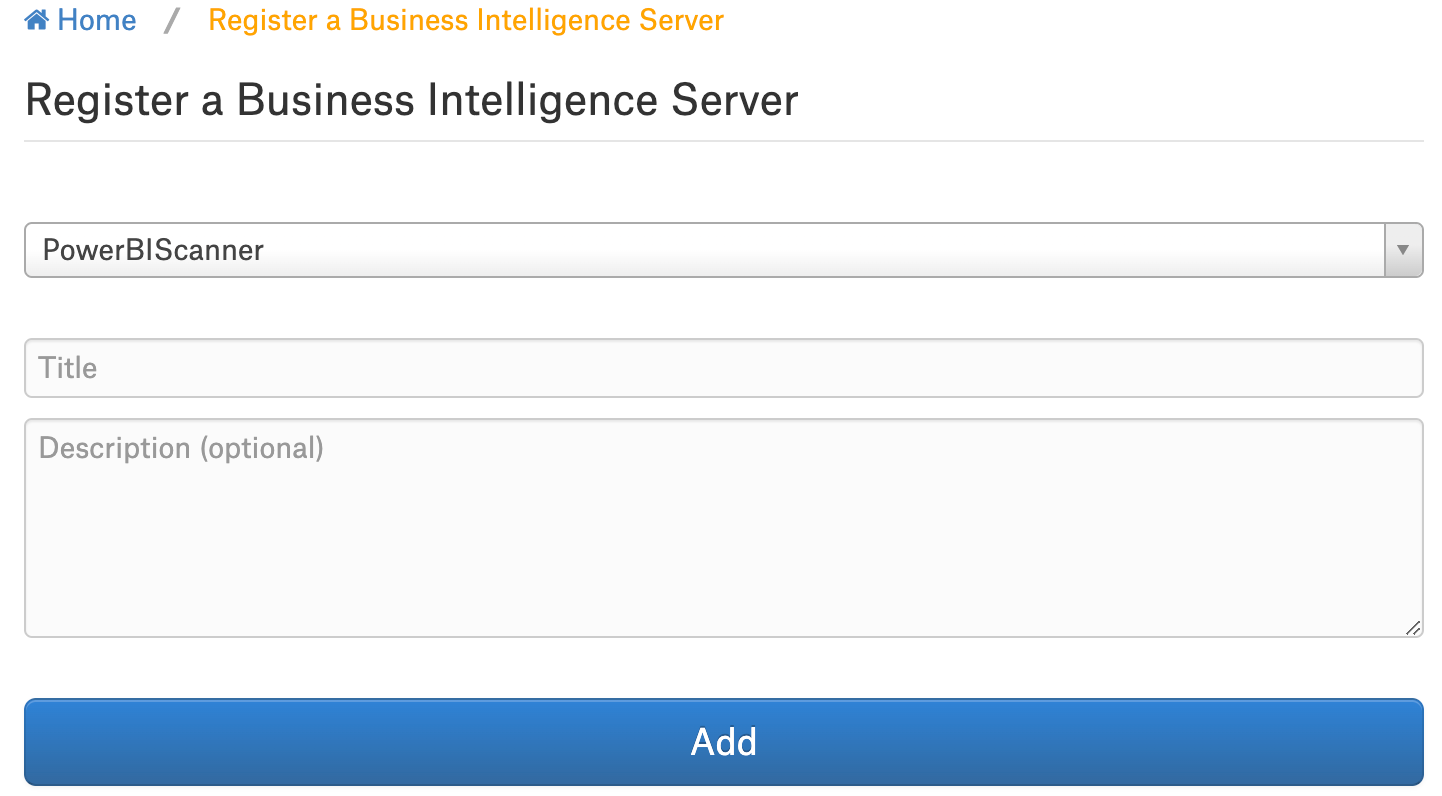
Provide the Title and a Description (optional) for your PowerBI Scanner data source.
Configure the Azure Power BI Scanner Source
Configure Access:
Applies from release 2023.3.5
On the Access tab, set the BI source visibility as follows:
Public BI Server—The BI source will be visible to all users of the catalog.
Private BI Server—The BI Source will be visible to users that have been assigned the BI Server Admin or Viewer role. It will be hidden for all other users.
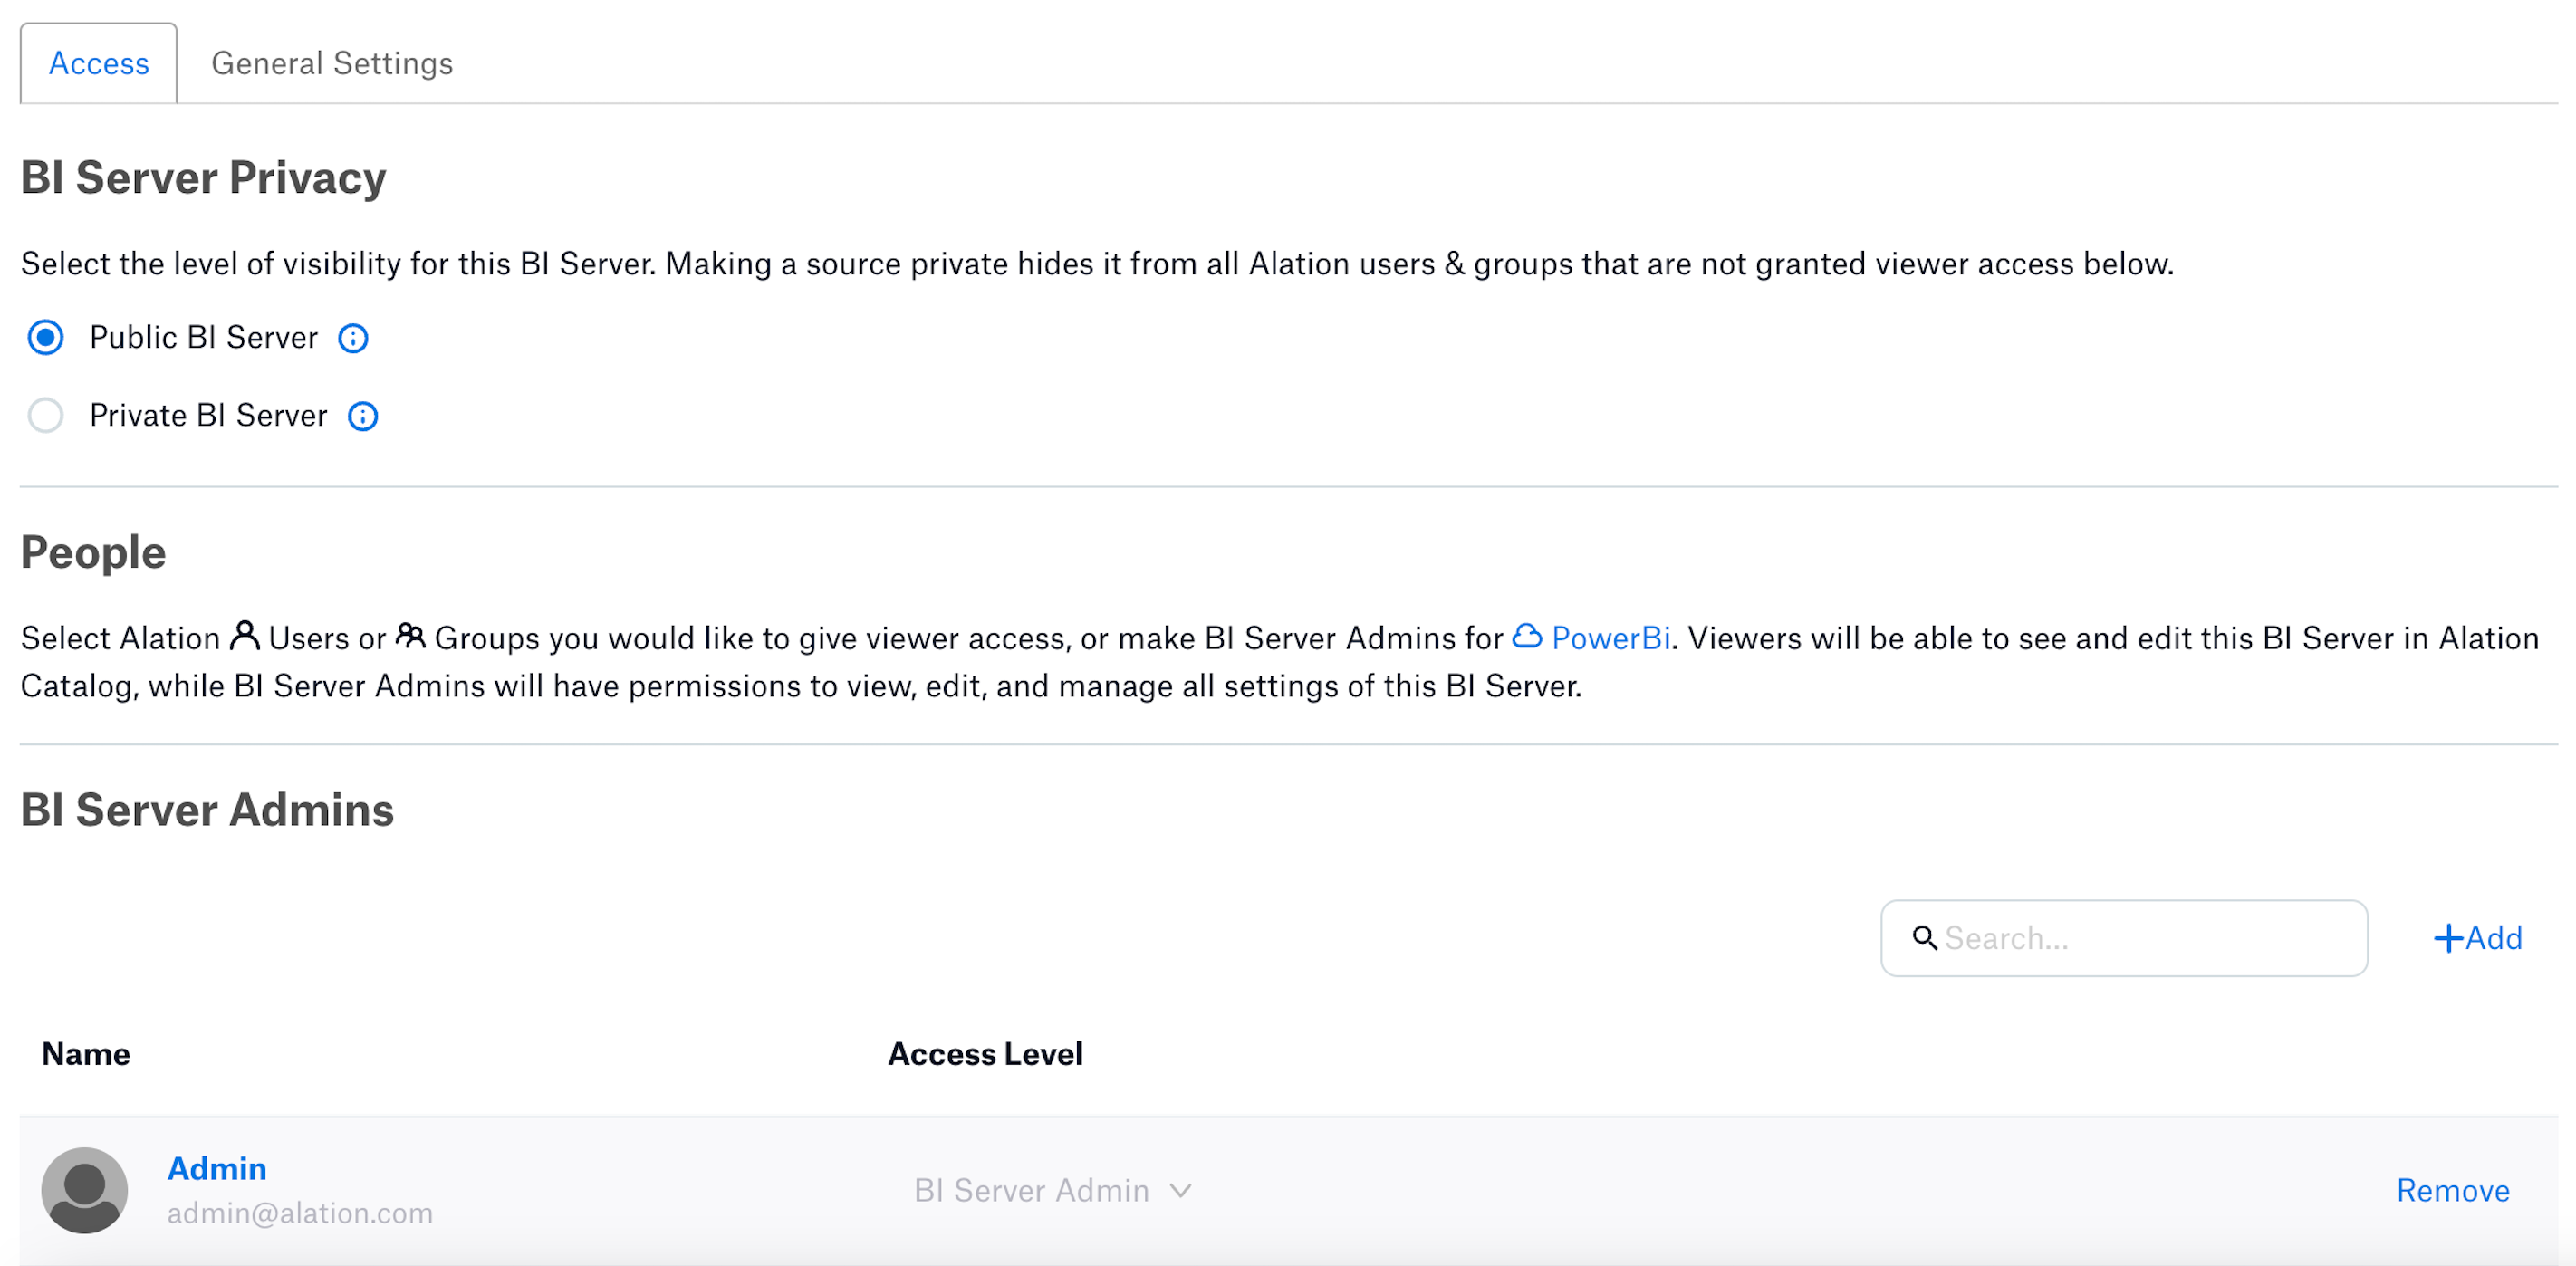
You can add more BI Admins or Viewers in the BI Server Admins section if required.
For more information, see Configure Access to OCF BI Sources
Perform the configuration on the General Settings tab.
Note
This section describes configuring settings for credentials and connection information stored in the Alation database. If your organization has configured Azure KeyVault or AWS Secrets Manager to hold such information, the user interface for the General Settings page will change to include the following icons to the right of most options:

By default, the database icon is selected, as shown. In the vault case, instead of the actual credential information, you enter the ID of the secret. See Configure Secrets for OCF Connector Settings for details.
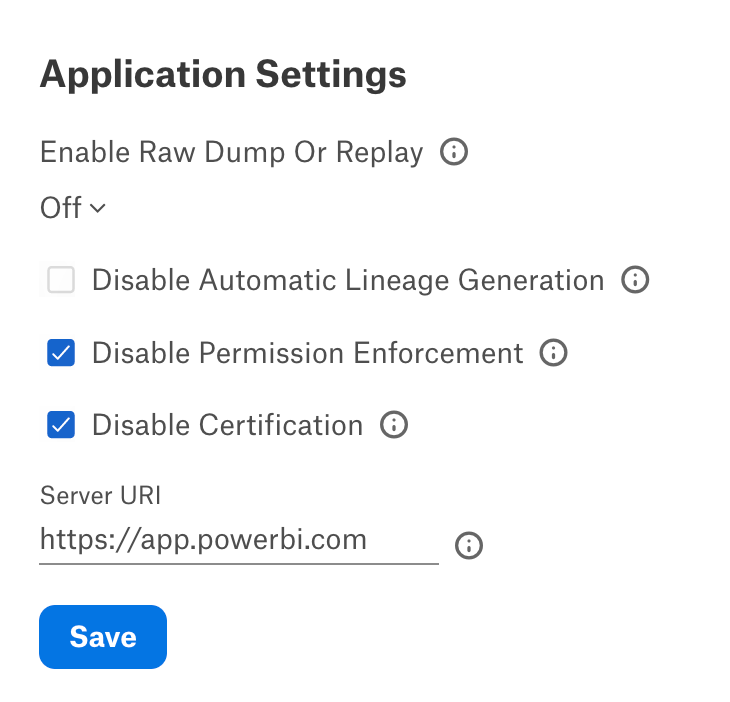
Specify Application Settings:
Parameter |
Description |
|---|---|
Enable Raw Dump or Replay |
The options in this drop list can be used to dump the extracted metadata into files in order to debug extraction issues before ingesting the metadata into Alation. This feature can be used during testing in case there are issues with MDE. It breaks extraction into two steps: first, the extracted metadata is dumped into files and can be viewed; and second, it can be ingested from the files into Alation. It is recommended to keep this feature enabled only if debugging is required.
|
Disable Automatic Lineage Generation |
Select the Disable Automatic Lineage Generation checkbox to skip the creation of automatic Lineage after extraction. When automatic Lineage generation is disabled, during extraction Alation does not calculate Lineage data for this BI source. For more information, see Disable Automatic Lineage Generation. |
Disable Permission Enforcement |
Leave this checkbox selected. Permission enforcement is not supported between Azure Power BI Scanner and Alation |
Disable Certification |
Leave this checkbox selected. Certification of BI objects in Azure Power BI Scanner from Alation is not supported. |
Server URI |
Enter the server URI used to access Azure Power BI Scanner. |
Click Save to save the information you have entered.
Specify Connector Settings:
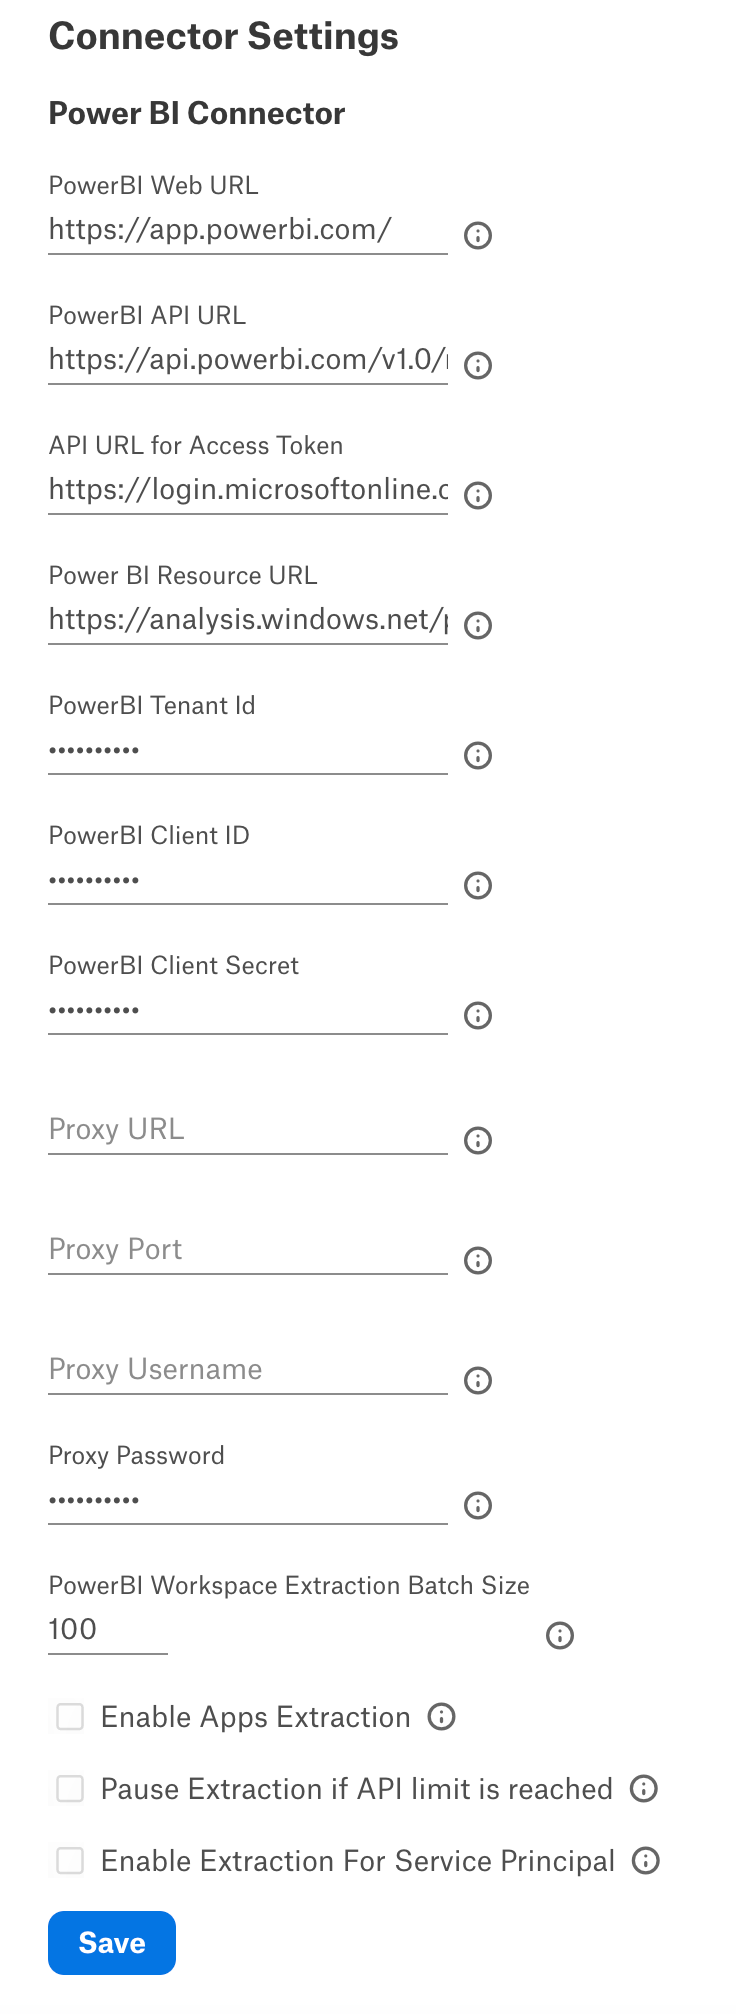
Parameter |
Description |
|---|---|
Power BI Web URL |
Specify the URL to access Power BI. The default values are:
|
Power BI API URL |
Specify the API URL to access Power BI APIs. The default values are:
|
API URL for Access Token |
Specify the API URL to generate the Access Token. The default value is
|
Power BI Resource URL |
Specify the Power BI Resource URL to grant access scope to Power BI APIs. The default values are:
|
Power BI Tenant ID |
Specify the Power BI tenant ID. |
Power BI Client ID |
Specify the Power BI client ID. |
Power BI Client Secret |
Specify the Power BI client secret. |
Proxy URL |
Specify the URL to access Power BI via proxy server. This is an optional field and should be used only if Azure Power BI Scanner is connected using proxy connection. |
Proxy Port |
Specify the proxy port number. This is an optional field and should be used only if Azure Power BI Scanner is connected using proxy connection. |
Proxy Username |
Specify the proxy server username. This is an optional field and should be used only if Azure Power BI Scanner is connected using proxy connection. |
Proxy Password |
Specify the proxy server password. This is an optional field and should be used only if Azure Power BI Scanner is connected using proxy connection. |
Power BI Workspace Extraction Batch Size |
Provide the workspace extraction batch size. Alation supports a maximum of 100 batches per extraction. Reducing this parameter will increase the number of API calls against the Azure Power BI Scanner to fetch the data, but decrease the size of data fetched during each call. |
Enable Apps Extraction |
Enable this checkbox to extract the apps from Azure Power BI Scanner. |
Enable Extraction For Service Principal |
Enable the check-box to enable service principal based extraction and listing of projects which the user has access to view. |
Log Level |
Select the log level to generate logs. The available options are INFO, DEBUG, WARN, TRACE, ERROR, FATAL, ALL. |
Pause Extraction if API limit is reached |
Enable this checkbox to pause the extraction if the API limit is reached. The extraction will be paused until the API limit is refreshed which will take a maximum of one hour time. If this checkbox is disabled, the extraction will complete if the API limit is reached. The metadata that was extracted before this time will be added to the Catalog. Extraction will not resume when the API limit is refreshed. |
Click Save.
Under Test Connection, click Test to validate network connectivity.

Under Extraction Settings, turn on Selective Extraction, if required. Selective extraction settings are used to apply a filter to include or exclude a list of projects.
7.1 Click Get List of Projects to first fetch the list of projects.
7.2 The status of the Get Projects action is logged in the** Job History** table at the bottom of the Settings page.
7.3 Once the folder synchronization is successful, a drop-down list of projects will become enabled. Select one or more projects to apply the filter.
7.4 Check if you are using the desired filter option. Available filter options are described below:
Filter Option
Description
Extract all Projects except
Extract metadata from all projects except from the Folders selected.
Extract only these Projects
Extract metadata from only the selected Projects.
7.5 Click Run Extraction Now to extract metadata. The status of the extraction action is also logged in the Job History table at the bottom of the page.
Note
Extraction of source description is supported from connector version 1.4.3.
Note
Extraction of dataflow objects is supported from connector version 2.0.1. See Dataflows for more details.
If you wish to automatically update the metadata in the Catalog, under Automated and Manual Extraction, turn on Enable Automated Extraction and select the day and time when metadata must be extracted. The metadata extraction will be automatically scheduled to run at the selected day and time.
Cross-System Lineage
You can configure cross-system lineage to generate lineage between this Azure Power BI Scanner BI source and an RDBMS data source supported by this connector for lineage. To generate cross-system lineage, configure the BI Connection Info field or the Additional datasource connections field on the RDBMS connector’s General Settings tab of the settings in the format Host_Name:Port_Number. Find more information in BI Connection Info.
Example: adb-8443049157651279.19.azuredatabricks.net:443
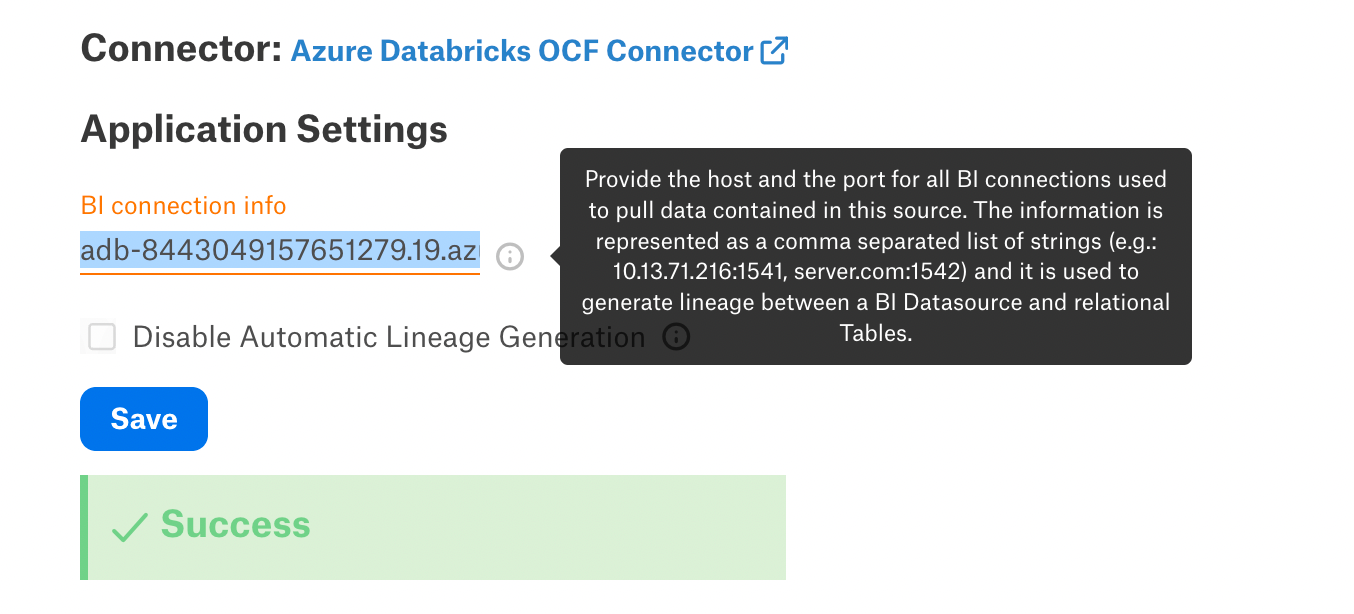
Note
This image is from a supported data source’s General Settings tab.
Troubleshooting
Refer to Troubleshooting.
Cross-System Lineage
If the cross-system Lineage is configured on the supported data source and Lineage graph does not display the Lineage, check the following:
Make sure that the data source on which the cross-system Lineage is configured is supported by this connector. See the Expressions Supported by Lineage table for the data sources supported by this connector.
Make sure that the BI Connection Info field has the value set in the format mentioned below:
hostname:port-numberMake sure that the Connection details in the Azure Power BI Scanner connector and the data source are in the same format.
catalog.schema.tablename or schema.tablename
Limitations
Lineage for PowerBI Dataflows is supported from Alation version 2023.3.3 onwards.
You must upgrade to Alation version 2023.3.2 or higher to use lineage for UC Databricks with connector version 2.1.0 or higher.
To use lineage with UC Databricks in Alation version 2023.3.2, enable the flag alation.resolution.DEV_bi_connector_returns_db_for_two_part_schema. (No flag is required from Alation version 2023.3.3 onwards for UC Datbricks Lineage with Power BI).
Lineage for paginated reports (RDL) is not supported. Paginated reports do not contain the dataset ID required to show lineage between a Power BI dataset and a Power BI paginated report.
Lineage between the datasource tables and the dataset is built through parsing the dataset expression which is a Power BI mQuery (Power Query). Alation gets this expression from the getScanResult API. See Expressions Supported by Lineage below for examples of supported expressions.
Power BI Scanner API (API used in Power BI Scanner Connector) does not return datasets with object-level security due to caching issue, because of which Alation will not show connections, fields, and lineage for those datasets. Caching happens after every successful dataset refresh and republish only if the following conditions are met
The Enhance Admin APIs responses with detailed metadata admin tenant setting is enabled. See Enable Tenant Settings for Metadata Scanning for details.
Scanner APIs must have a call atleast once in 90 days.
Migrating Logical Metadata
You can migrate the logical metadata from the Power BI instance connected using the older version of the Azure Power BI connector to the same Power BI instance connected using the Azure Power BI Scanner connector.
Prerequisites
Prepare the following to migrate the metadata:
The BI source that is configured with the old Power BI OCF Connector.
The Power BI migration script: create a ticket with Alation Support about receiving the Power BI migration script.
Make sure that the required Azure Power BI Scanner OCF connector has been installed on the Alation server. The installed OCF connector will be displayed on Admin Settings > Server Admin > Manage Connectors page.
Configure the same Power BI instance (as in step 1) as a new BI Server source with the Azure Power BI Scanner connector and run the extraction.
Scope
The following information will be migrated from the old Power BI connector to the Azure Power BI Scanner connector:
Data source ID - The data source ID will remain the same.
Logical metadata such as values of the custom fields, data quality flags, @-mentions in the custom fields, @-mentions in articles, object sets, people sets, pickers, multi-select pickers, the title and description, tags, top users, and fields shared through catalog sets.
Migration
Perform the following steps to migrate the metadata:
Copy the migration script that you received from Alation to the /tmp directory on the Alation host. If you use the example below, replace <ssh-user> with your username.
scp copy_powerbi_logical_data_to_scanner.py <ssh-user>@{alation-instance-ip}:/tmp
Use SSH to connect to the Alation host.
Enter the Alation shell:
sudo /etc/init.d/alation shell
Stage the migration scripts in the .. code-block:: Bash one_off_scripts directory.
sudo cp /tmp/<Migration_Script>.py /opt/alation/alation/opt/alation/django/rosemeta/one_off_scripts
Change user to alation:
sudo su alation
Navigate to the .. code-block:: Bash one_off_scripts directory.
cd opt/alation/django/rosemeta/one_off_scripts/
Find the SourceID of the connector. The SourceID of the datasource can be viewed in the browser URL when you view the datasource catalog page. In the below example, the SOURCE_ID would be 9.
Example:
htpps://qualified_domain_name/bi/v2/server/9/
Run the migration script with the below command.
python <Migration_Script>.py -s <Old Power BI Connector_SourceID> -t <New Azure Power BI Scanner Connector_SourceID>
Exit the shell:
exit
The migration status will not be stored in logs and will be displayed in the console only during the migration process.
Expressions Supported by Lineage
Lineage between tables and the dataset or dataflow will work only if the expression is in the formats given below:
Database Name |
Connection Type |
Sample Expression |
|---|---|---|
Azure Databricks |
Table |
"let\n    Source = Databricks.Contents(\"adb-8651250466505288.8.azuredatabricks.net\", \"sql/protocolv1/o/8651250466505288/
0622-214404-awash362\", [Database=null, BatchSize=null]),\n    SPARK_Database = Source{[Name=\"SPARK\",Kind=\"Database\"]}
[Data],\n    default_Schema = SPARK_Database{[Name=\"default\",Kind=\"Schema\"]}[Data],\n    diamonds_Table =
default_Schema{[Name=\"diamonds\",Kind=\"Table\"]}[Data]\nin\n    diamonds_Table";
|
AWS Databricks |
Table |
“let\n Source = Databricks.Catalogs(\"dbc-25e69bfd-44ed.cloud.databricks.com\", \"sql/protocolv1/o/7841352139603430/
0118-050057-4xra3flu\", [Database=null, BatchSize=null]),\n       hive_metastore_Database = Source{[Name=\"hive_metastore\",
Kind=\"Database\"]}[Data],\n           technology_Schema = hive_metastore_Database{[Name=\"default\",Kind=\"Schema\"]}[Data],
\n               strm_dems_Table = technology_Schema{[Name=\"student2\",Kind=\"Table\"]}[Data]\n          in\n
strm_dems_Table\n”;

“let\n    Source = DatabricksMultiCloud.Catalogs(\"dbc-25e69bfd-44ed.cloud.databricks.com\", \"sql/protocolv1/o/
7841352139603430/0210-085930-oexhpgse\", [Catalog=null, Database=null, EnableAutomaticProxyDiscovery=null]),\n
hive_metastore_Database = Source{[Name=\"hive_metastore\",Kind=\"Database\"]}[Data],\n    default_Schema = hive_metastore_
Database{[Name=\"default\",Kind=\"Schema\"]}[Data],\n    student2_Table = default_Schema{[Name=\"student2\",Kind=\"Table\"]}
[Data]\n in\n    student2_Table\n”;
|
Unity Databricks |
Table |
“let\n    Source = Databricks.Catalogs(\"adb-8443049157651279.19.azuredatabricks.net\", \"sql/protocolv1/o/
 900788168547414/1031-122656-8zrkv0jk\", [Catalog=\"default\", Database=null, EnableAutomaticProxyDiscovery=null]),\n
 hive_metastore_Database = Source{[Name=\"hive_metastore\",Kind=\"Database\"]}[Data],\n  default_Schema = hive_metastore_
 Database{[Name=\"default\",Kind=\"Schema\"]}[Data],\n    t1_Table = default_Schema{[Name=\"t1\",Kind=\"Table\"]}
 [Data]\nin\n    t1_Table”;
|
SQL Server |
Table |
"let\n    Source = Sql.Databases(\"ifac-sqlsrv.ceeyrlqdpprr.us-west-2.rds.amazonaws.com\"),\n    Sales = Source{[Name=\"Sales\
"]}[Data],\n    dbo_Customer_Orders = Sales{[Schema=\"dbo\",Item=\"Customer_Orders\"]}[Data]\nin\n    dbo_Customer_Orders";

"let\n    Source = Sql.Databases(\"tcp:ifac-sqlsrv.ceeyrlqdpprr.us-west-2.rds.amazonaws.com,1433\"),\n    AdventureWorks =
Source{[Name=\"AdventureWorks\"]}[Data],\n    Sales_vPersonDemographics =
AdventureWorks{[Schema=\"Sales\",Item=\"vPersonDemographics\"]}[Data]\nin\n    Sales_vPersonDemographics";

"let\n Source = Sql.Databases("tcp:sqlwrhlondonprod.b05aaf70da1f.database.windows.net"),\n LONDON = Source{[Name="london"]}
[Data],\n london_pbi_SHIFTREPORT_REACHSTAT_Allinone = LONDON{[Schema="london",Item="pbi_SHIFTREPORT_REACHSTAT_Allinone"]}
[Data],\n #"Filtered Rows" = Table.SelectRows(london_pbi_SHIFTREPORT_REACHSTAT_Allinone, each [P_sysdate] >= RangeStart and
[P_sysdate] <= RangeEnd)\nin\n #"Filtered Rows""
|
Query |
"let\n    Source = Sql.Database(\"ifac-sqlsrv.ceeyrlqdpprr.us-west-2.rds.amazonaws.com\", \"pubs\", [Query=\"select * from
jobs\"])\nin\n    Source";

"let\n    Source = Sql.Database(\"synapse-edw-d.sql.azuresynapse.net\", \"edwsyndsql\", [Query=\"SeLeCt#(lf)    s.f_name,#(lf)
t.f_name#(lf)from #(lf)    tmp.src_test s#(lf)inner JOIN  #(lf)    tmp.tgt_test t#(lf)ON  #(lf)    s.f_name = t.f_name\"])\nin
\n    Source";

"let\n    Source = Sql.Database(\"synapse-edw-d.sql.azuresynapse.net\", \"edwsyndsql\", [Query=\"select#(lf)    s.f_name,#(lf)
t.f_name#(lf)from #(lf)    tmp.src_test s#(lf)inner JOIN  #(lf)    tmp.tgt_test t#(lf)ON  #(lf)    s.f_name = t.f_name\"])\nin
\n    Source";

"let\n    Source = Sql.Database(\"10.13.12.200:1433\", \"test_database\", [Query=\"select * from
\"\"test_profilling_main.arcs.test\"\".\"\"arcstable\"\"\"])\nin\n   Source";
|
|
MySQL |
Table |
"let\n    Source = MySQL.Database(\"ifac-mysql.ceeyrlqdpprr.us-west-2.rds.amazonaws.com:3306\", \"employees\",
[ReturnSingleDatabase=true]),\n    employees_departments = Source{[Schema=\"employees\",Item=\"departments\"]}[Data]\nin\n
employees_departments";
|
Query |
"let\n    Source = MySQL.Database(\"ifac-mysql.ceeyrlqdpprr.us-west-2.rds.amazonaws.com:3306\", \"crm\", [ReturnSingleDatabase
=true, Query=\"select c.customerNumber , c.customername, c.city, c.country from customers c , orders o where
c.customernumber=o.customernumber\"])\nin\n    Source";
|
|
Azure SQL |
Table |
"let\n    Sql.Database(\"tf-testal-94619nimeshkuma-17.database.windows.net\", \"SqlServerAzDB_1\"),\n
schemaWithViews01_testView01 = Source{[Schema=\"schemaWithViews01\",Item=\"testView01\"]}[Data]\nin\n
schemaWithViews01_testView01";
|
Azure Synapse |
Table |
"let\n    Source = Sql.Database(\"synaptestal125371ayush24-ondemand.sql.azuresynapse.net\", \"master\"),\n
dbo_MSreplication_options = Source{[Schema=\"dbo\",Item=\"MSreplication_options\"]}[Data]\nin\n
dbo_MSreplication_options";
|
Oracle |
Table |
"let\n    Source = Oracle.Database(\"ifac-orcl.ceeyrlqdpprr.us-west-2.rds.amazonaws.com:1521/orcl\", [HierarchicalNavigation=
true]),\n    IFAC_ADMIN = Source{[Schema=\"IFAC_ADMIN\"]}[Data],\n    ORDER_ITEMS1 = IFAC_ADMIN{[Name=\"ORDER_ITEMS\"]}[Data]\
nin\n    ORDER_ITEMS1";
|
Postgres |
Table |
"let\n    Source = PostgreSQL.Database(\"ifac-pgsql.ceeyrlqdpprr.us-west-2.rds.amazonaws.com:5432\", \"postgres\"),\n
public_events = Source{[Schema=\"public\",Item=\"events\"]}[Data]\nin\n    public_events";
|
Amazon Redshift |
Table |
"let\n    Source = AmazonRedshift.Database(\"redshift-cluster-1.csjsqfswsudr.us-east-1.redshift.amazonaws.com:5439\", \"dev\",
[BatchSize=null]),\n    public = Source{[Name=\"public\"]}[Data],\n    category1 = public{[Name=\"category\"]}[Data]\nin\n
category1";
|
Snowflake |
Table |
"let\n    Source = Snowflake.Databases(\"alation_partner.us-east-1.snowflakecomputing.com\", \"LOAD_WH\", [Role=null,
CreateNavigationProperties=null, ConnectionTimeout=null, CommandTimeout=null]),\n    TABSFDC_Database =
Source{[Name=\"TABSFDC\",Kind=\"Database\"]}[Data],\n    PUBLIC_Schema = TABSFDC_Database{[Name=\"PUBLIC\",Kind=\"Schema\"]}
[Data],\n    ACCOUNT_Table = PUBLIC_Schema{[Name=\"ACCOUNT\",Kind=\"Table\"]}[Data]\nin\n    ACCOUNT_Table";
Non-Quoted Strings: "let\n Source = Snowflake.Databases(DS_CONN,DW_CONN,[Role=DS_ROLE]),\n ANALYTICS_DB_Database =
Source{[Name=DB_CONN,Kind=\"Database\"]}[Data],\n INSIGHT_REPORT_Schema = ANALYTICS_DB_Database{[Name=DSCH_CONN,Kind=\
"Schema\"]}[Data],\n CUSTOMER_DIM_G_AGREEMENT_DIM_G_VW_View =
INSIGHT_REPORT_Schema{[Name=\"CUSTOMER_DIM_G_AGREEMENT_DIM_G_GBI_RGG_VW\",Kind=\"View\"]}[Data],\n #\"Removed Other Columns
\" = Table.SelectColumns(CUSTOMER_DIM_G_AGREEMENT_DIM_G_VW_View,{\"CustomerKey\", \"CustomerCd\", \"CustomerDesc\",
\"MasterAgreementDesc\"})\nin\n #\"Removed Other Columns\"
|
Query |
"let\n    Source = Value.NativeQuery(Snowflake.Databases(\"hg51401.snowflakecomputing.com\",\"RESTAURANTS\"){[Name=\"FIVETRAN\
"]}[Data], \"select * from fivetran.restaurants_global_postsales.sc_new_monthly_churn\", null, [EnableFolding=true])\nin\n
Source";
|
|
Google BigQuery |
Table |
Extraction from a Table: "let\n Source = GoogleBigQuery.Database(), #\"eng-scene-228201\" = Source{[Name=\"eng-scene-228201\"]}[Data],
HR_Data_Schema = #\"eng-scene-228201\"{[Name=\"HR_Data\",Kind=\"Schema\"]}[Data], HR_Recruiting_Table = HR_Data_Schema{
[Name=\"HR_Recruiting\",Kind=\"Table\"]}[Data]
in
HR_Recruiting_Table";
Extraction From a View: “let\n Source =
GoogleBigQuery.Database(), #\"test-alation-database-1\" = Source{[Name=\"test-alation-database-1\"]}[Data], profiling_Schema =
#\"test-alation-database-1\"{[Name=\"profiling\",Kind=\"Schema\"]}[Data],\n gbq_profile_View = profiling_Schema{[Name=
\"gbq_profile\",Kind=\"View\"]}[Data]\n
in\n gbq_profile_View”;
GBQ has default hostname - www.googleapis.com |
Query |
"let\n    Source = Value.NativeQuery(GoogleBigQuery.Database(){[Name=\"test-alation-database-1\"]}[Data], \"select * from
`test-alation-database-1.CAPITALDATASET.columnprofiler`\", null, [EnableFolding=true])\nin\n  Source";
|
|
Teradata |
Table |
"let\n    Source = Teradata.Database(\"10.13.25.7\", [HierarchicalNavigation=true]),\n    test_query_ingestion =
 Source{[Schema=\"test_query_ingestion\"]}[Data],\n    test2 = test_query_ingestion{[Name=\"test1\"]}[Data]\nin\n    test2";
|
Query |
"let\n    Source = Teradata.Database(\"10.13.25.7\", [HierarchicalNavigation=true, Query=\"SELECT * from test_query_ingestion.
test1 t1 left join test_query_ingestion.test2 t2 on 1=1\"])\nin\n    Source";
|
Parameterised Expressions Supported by Lineage
Azure Power BI Scanner connector supports the parameterised expressions mentioned in the below table for Lineage:
Note
All the parameterised expressions mentioned in the below table works with all the supported datasources mentioned in Expressions Supported by Lineage.
Types of Parameterised Expressions |
Example Parameters used in Dataset Expression |
|---|---|
Name of the parameterised expression Example: BQEnv |
let
Source = GoogleBigQuery.Database(),
#"test-alation-database-1" = Source{[Name=BQEnv]}[Data],
PowerBiSchema_Schema = #"test-alation-database-1"{[Name="PowerBiSchema",Kind="Schema"]}[Data],
joinedTable_Table = PowerBiSchema_Schema{[Name="joinedTable",Kind="Table"]}[Data]
in
joinedTable_Table
|
Parameterised expression preceding with # Example: #”BQEnv” |
let
Source = GoogleBigQuery.Database(),
#"test-alation-database-1" = Source{[Name=#"BQEnv"]}[Data],
PowerBiSchema_Schema = #"test-alation-database-1"{[Name="PowerBiSchema",Kind="Schema"]}[Data],
joinedTable_Table = PowerBiSchema_Schema{[Name="joinedTable",Kind="Table"]}[Data]
in
joinedTable_Table
|
Parameterised expression used with skip character & Example: “”&BQEnv&”” |
let
Source = GoogleBigQuery.Database(),
#"test-alation-database-1" = Source{[Name=""&BQEnv&""]}[Data],
PowerBiSchema_Schema = #"test-alation-database-1"{[Name="PowerBiSchema",Kind="Schema"]}[Data],
joinedTable_Table = PowerBiSchema_Schema{[Name="joinedTable",Kind="Table"]}[Data]
in
joinedTable_Table
|