Install the Alation Agent
Alation Cloud Service Applies to Alation Cloud Service instances of Alation
Installing the Alation Agent (Agent) involves the following steps:
These steps are described in detail below. You will be switching back and forth between Alation and the Agent’s host machine to complete the installation. You’ll use information provided in Alation to run commands on the Agent machine, and you’ll sometimes copy the output of those commands back into Alation.
You can install multiple Agents, each on its own machine, and connect them all with Alation Cloud Service. This may be needed if you have data sources in different geographical locations, network segments, or security zones.
Step 1: Prepare for the Installation
Before you can install the Agent, you must:
Make sure you have the Server Admin role in Alation.
Get access to the Customer Portal. In Customer Portal you can:
Select Agents from top menu to see links to Agent installation packages.
Select Connectors to see the list of OCF connector packages you can download to install in Agent.
Provision a Linux host to install the Agent on.
Check the System Requirements for the required hardware and software.
The Agent’s host can be a physical or virtual machine. A virtual machine can be set up in a shared server environment, as long as the system requirements are met.
The Agent machine should be located appropriately within your network so that it can access the relevant data sources.
Don’t run other software on the Agent machine—only the Agent should be installed.
Ensure that outbound port 443 is open.
If you are using an HTTP CONNECT proxy, the proxy needs to allow resolving the DNS address within your Alation Cloud instance that is available for the Agent. You will find this address in Step 3: Preflight Check. If your proxy server is a TLS middlebox, additional steps are required. Contact Alation Support for more information.
Optionally, contact Alation Support to request the Auth Service plugin. The Auth Service plugin enables the Agent to integrate directly with AWS Secrets Manager, so your data source credentials never leave your network. For information about how this integration works, see Integration with AWS Secrets Manager for Data Source Authentication Using OCF Connector.
To use this feature, you must meet the following requirements:
You must be an Alation Cloud Service customer on the cloud-native architecture.
You must have Alation Cloud Service version 2024.1.4 or later.
You must be using Alation Agent version 1.7.2.4360 or later on an Amazon EC2 instance.
You must install the Auth Service Plugin on the Agent.
You must have a supporting OCF connector installed on the Agent. To find out if a specific connector supports this feature, see the documentation for the specific connector in the Open Connector Framework section.
Note
You can use the Native Data Sources API to migrate a data source from an OCF connector that’s not on an Alation Agent to an OCF connector that is on an Alation Agent.
Step 2: Navigate to the Agent Dashboard
First ensure you have completed the prerequisites in the prior step. You must have the Server Admin role in Alation to complete the remaining steps.
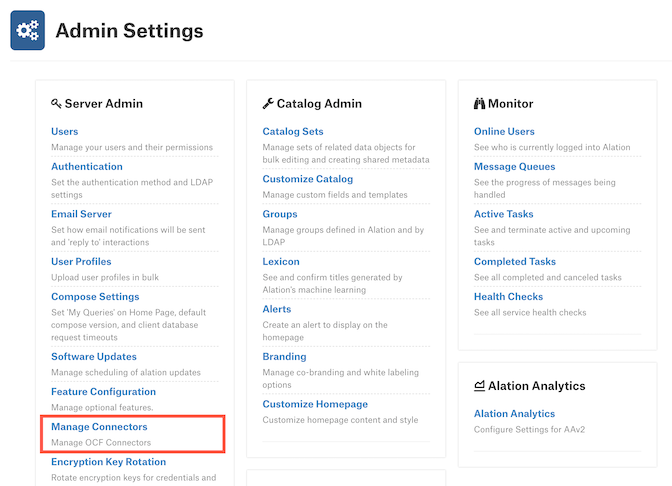
In Alation, click on the Settings gear icon in the top right corner. This opens the Admin Settings page.

Under the Server Admin section, click Manage Connectors.
Click the Agents tab. The Agents Dashboard appears.
Click the Add New Agent button.
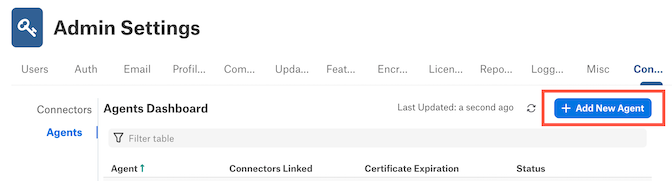
The Add New Agent dialog will appear.
Step 3: Preflight Check (Optional)
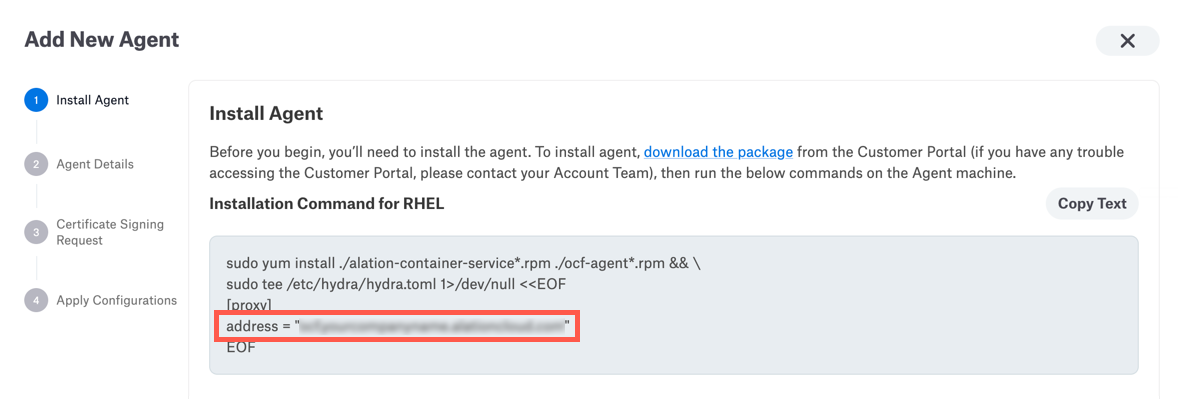
Check that the Agent host machine can resolve the DNS that is available for the Agent from your Alation Cloud instance. You can find the address on the first screen of the Add New Agent dialog.
You will need to make sure you have SSH credentials to the Agent machine and that it has outbound access to the open internet. If you do not want the Agent to have outbound access to the open internet, you may use a proxy server. In that case you will need to whitelist the Alation Cloud address on your proxy server to allow the Agent machine outbound access to Alation Cloud Service.
Then you can use a tool such as dig or nslookup to see if you can reach your Alation Cloud instance address. For example:
dig <your-alation-cloud-domain>
If your Alation Cloud instance is reachable, the output of the dig command should include something like this:
;; ANSWER SECTION:
<your-alation-cloud-domain>. 60 IN A <alation-cloud-IP>
If your Alation Cloud instance is not reachable, you will need to configure your network to correctly resolve the DNS.
Step 4: Download and Run Installation Script
You’re now ready to download the software package and run the installation script.
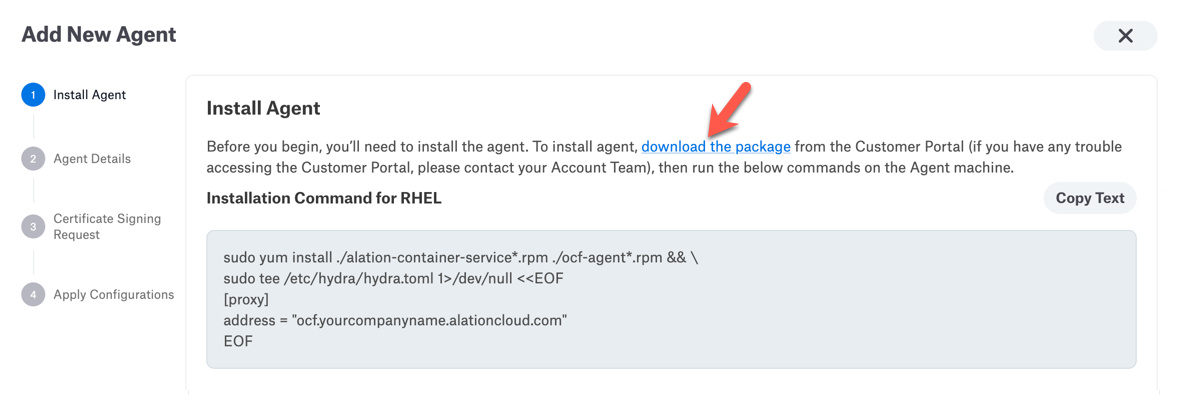
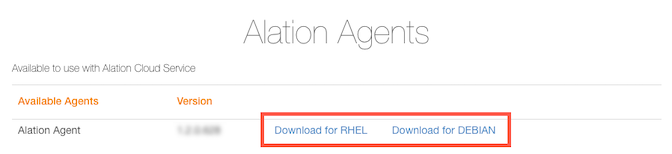
In the Add New Agent dialog, click the link to the Alation Customer Portal.
In the Alation Customer Portal, select the latest available version for the desired operating system:
RHEL for Red Hat-based systems
DEBIAN for Debian-based systems
The Agent will download to your computer as a tar.gz file named ocf-agent-<agent-version>-<operating-system>.tar.gz.
If needed, transfer the downloaded file to the Agent’s host machine. For example, if you downloaded the Agent file to a Unix-based machine, you could transfer the file using the
scpcommand in Terminal:scp /local/path/to/ocf-agent-<agent-version>-<operating-system>.tar.gz <ssh-user>@<server-address>:/remote/path/to/ocf-agent
On the Agent’s host machine, extract the .tar.gz file. Example:
tar -xf ocf-agent-<agent-version>-<operating-system>.tar.gz
The Agent installation files are extracted into an ocf-agent directory.
Change into the ocf-agent directory.
cd ocf-agent
In Alation, copy the relevant installation command from the Install Agent screen.
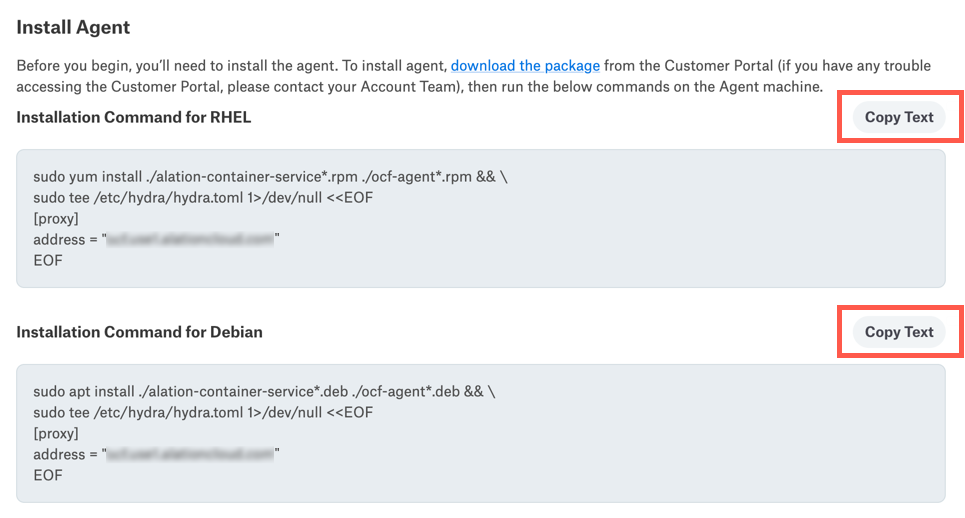
In the terminal on the Agent’s host machine, make sure you are in the ocf-agent directory, then paste and run the installation command. This will install and configure the Agent.
(Optional) If your network routes outgoing traffic through an HTTP CONNECT proxy, see the Advanced Configuration section below.
In Alation, click the Next button.
You have now installed and configured the Agent on a machine inside your network. Next you’ll need to name the Agent in Alation.
Advanced Configuration
If your network routes outgoing traffic through an HTTP CONNECT proxy, you need to:
Add the Alation Cloud Service connectivity endpoint to your proxy server’s allow list.
Add the proxy’s address to the Agent configuration file.
Proxy Allow List
You will need to add the Alation Cloud Service connectivity endpoint to your proxy server’s allow list so the Agent can reach your Alation Cloud Service instance.
The Alation Cloud Service endpoint is shown on the
addressline of the Agent installation command. This is the same address that should be in your Agent configuration file at /etc/hydra/hydra.toml.
Add Proxy Address to Agent Config
This is done on the Agent’s host machine. The steps depend on whether your proxy requires authentication.
No Authentication
For proxies that don’t require authentication, edit /etc/hydra/hydra.toml to add the following line:
web_proxy = "<proxy-address>:<proxy-port>"
Basic Authentication
Starting with Agent version 1.2.1.1168, you can route the Agent through proxies that require basic authentication. Edit /etc/hydra/hydra.toml to add the following line:
web_proxy = "<username>:<password>@<proxy-address>:<proxy-port>"
Replace the parts in angle brackets with the appropriate information for your proxy. Don’t include the angle brackets. Do include the quotes. The proxy address can be a domain name or an IP address. If no port is provided, the Agent defaults to port 3128.
Here’s an example with basic authentication:
web_proxy = "jane:securepassword@company.proxy.com:3128"
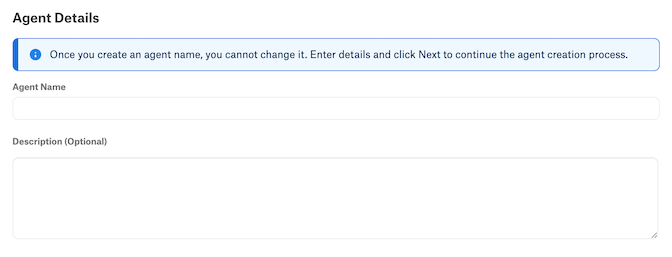
Step 5: Name Your Agent
In Alation, enter a name for the Agent. This name can’t be changed, so choose carefully.
Note
The Agent’s name is used to identify connectors that you install on this Agent. When you install a new connector or add a new data source and link it to your Agent, you’ll see the Agent name added to the end of the connector name.
(Optional) Enter a description of the Agent. This appears on the Agent’s detail page. The description can’t be changed later.
Click the Next button, then confirm the name you chose.
Now that you’ve named the Agent, it’s time to establish the secure connection between your Alation Cloud instance and the Agent.
Note
After starting the Add Agent workflow you can always close the Add New Agent dialog. You can pick it back up again at a later time by returning to the Agent Dashboard and clicking on the Complete Setup link.
Step 6: Generate Encryption Certificates
Alation uses signed certificates to encrypt the communication between Alation and the Agent.
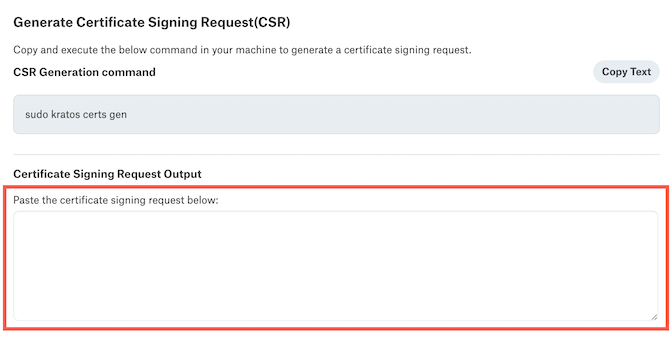
On the Generate Certificate Signing Request (CSR) screen, copy the provided command and run it on the Agent’s host machine.
sudo kratos certs gen
The command will generate a certificate signing request. Example output:
-----BEGIN CERTIFICATE REQUEST-----
<your certificate signing request>
-----END CERTIFICATE REQUEST-----
Copy the certificate signing request from the Agent machine, including the dashes.
In Alation, paste the certificate signing request into the provided box under Certificate Signing Request Output. Then click the Next button.
Alation will generate two signed certificates—one for the Agent and one root certificate. Copy the provided certificate installation command.
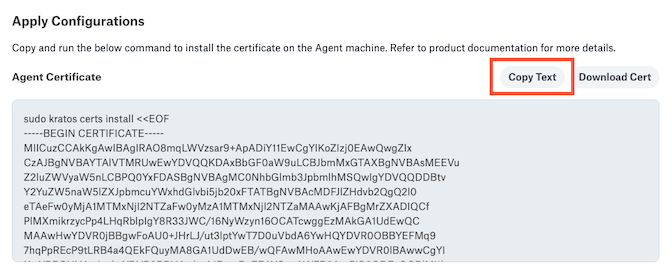
On the Agent’s host machine, paste the copied certificate command and run it. This installs the certificate.
Warning
The certificates will automatically expire after one year.
Restart the Agent by copying the provided command and running it on the Agent’s host machine.
sudo systemctl restart hydra
When the Agent has finished restarting, click the Finish button in Alation. Check that your Agent has a status of Connected in the Agent Dashboard. If it doesn’t, check the Troubleshooting page.
If the installation was successful, you can now install connectors on your Agent.
Step 7: Install the Auth Service Plugin (Optional)
If you would like to enable the Alation Agent to integrate directly with AWS Secrets Manager when authenticating requests to your data source, you can install the Auth Service plugin. See Configure an Alation Agent to Access Secrets Manager for help configuring AWS and the Agent.
To use this feature, you must meet the following requirements:
You must be an Alation Cloud Service customer on the cloud-native architecture.
You must have Alation Cloud Service version 2024.1.4 or later.
You must be using Alation Agent version 1.7.2.4360 or later on an Amazon EC2 instance.
You must install the Auth Service Plugin on the Agent.
You must have a supporting OCF connector installed on the Agent. To find out if a specific connector supports this feature, see the documentation for the specific connector in the Open Connector Framework section.
Note
You can use the Native Data Sources API to migrate a data source from an OCF connector that’s not on an Alation Agent to an OCF connector that is on an Alation Agent.
Note
If you have migrated the Alation Agent to rootless mode, don’t use sudo when running the commands below.
To install or update the Auth Service plugin on an Alation Agent:
If you don’t have the latest plugin yet, contact Alation Support to request it. The plugin is a Docker image named auth-service-docker-image-<plugin-version>tar.gz.
If needed, transfer the downloaded file to the Agent’s host machine. For example, if you downloaded the plugin file to a Unix-based machine, you could transfer the file using the
scpcommand in Terminal:scp /local/path/to/auth-service-docker-image-<plugin-version>.tar.gz <ssh-user>@<server-address>:/remote/path/to/agent
On the Agent’s host machine, unzip the .tar.gz file. Example:
gzip -d auth-service-docker-image-<plugin-version>.tar.gz
Install or update the plugin. To install the plugin from scratch, use this command:
sudo kratos addons install auth ./auth-service-docker-image-<plugin-version>.tar
To update the plugin, use this command:
sudo kratos addons update auth ./auth-service-docker-image-<plugin-version>.tar
Restart the Agent:
sudo systemctl restart hydra
Check that the plugin is running. It may take about two minutes for the plugin to start up.
sudo docker ps
In the output of this command, you should see
authlisted underIMAGE, and underSTATUSit should indicate that the plugin isUp. For example:CONTAINER ID IMAGE COMMAND CREATED STATUS PORTS NAMES 00d929b2582b auth "java -Dlog4j.config…" 11 seconds ago Up 10 seconds 0.0.0.0:11001->11001/tcp, :::11001->11001/tcp auth f80e23b27e2a application_gateway "/opt/cag" 11 seconds ago Up 10 seconds (health: starting) cag c8c16128644e proxy "/opt/reverseProxy" 12 seconds ago Up 11 seconds (health: starting) proxy 8c3d5cfeb3fd connector_21 "/opt/entrypoint.sh …" 12 seconds ago Up 12 seconds (health: starting) 127.0.0.1:10021->10021/tcp connector21 c8814bcadc3c agent "/opt/agent" 13 seconds ago Up 12 seconds (health: starting) 127.0.0.1:8080->8080/tcp agent
The Auth Service plugin has now been installed. To troubleshoot the Agent or Auth Service plugin, see Troubleshoot the Agent.