Manage Scheduled Queries
Alation Cloud Service Applies to Alation Cloud Service instances of Alation
Customer Managed Applies to customer-managed instances of Alation
Applies from 2023.1
Server Admins can view and manage all scheduled queries using the Scheduled Query Dashboard. The dashboard empowers Server Admins to balance system resources consumed by scheduled queries and manage “ghost” queries whose owners have left the company. From the dashboard, you can:
View the current schedule and other details.
Change the schedule.
Cancel the next run.
Disable the schedule.
Change the access level for the query and assign a new owner.
The ability to schedule queries and use the Scheduled Queries dashboard can be enabled or disabled by a Server Admin. See Enable or Disable Query Scheduling for instructions.
Open the Scheduled Query Dashboard
Only Server Admins have access to the Scheduled Query Dashboard. To open the Scheduled Query Dashboard:
Click the Settings gear icon in the top right corner of Alation. The Admin Settings page opens.
In the Monitor section, select Scheduled Query Dashboard.
Note
If scheduled queries have been disabled, the dashboard will not open. See Enable or Disable Query Scheduling for help enabling this feature.
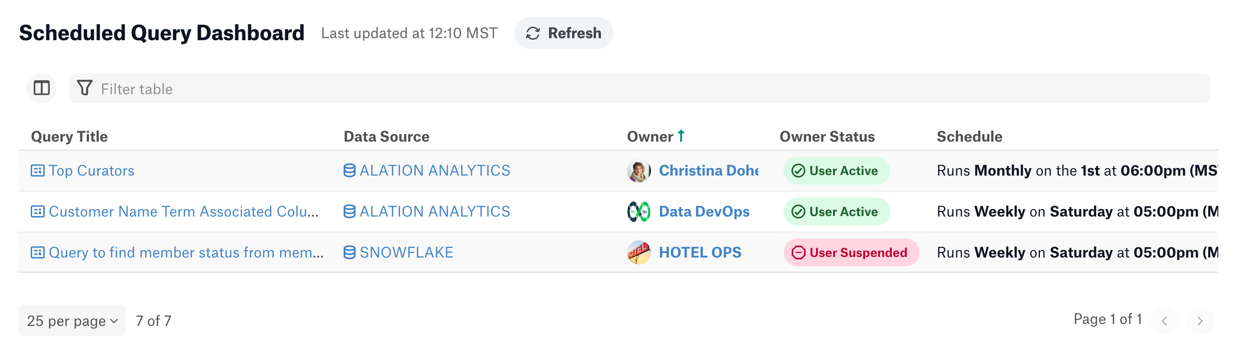
Dashboard Overview
The Scheduled Query Dashboard contains several columns with details about all scheduled queries in Alation. The column order can be changed. You may need to scroll the dashboard to the right to see all the columns.
The columns are:
Query Title—The curated name of the query. Click the link to go to the query catalog page.
Data Source—The data source that the query will run against. Click the link to go to the data source catalog page.
Owner—The owner of the query. Click the link to go to the owner’s user profile.
Owner Status—Query owner’s account status, which can be either User Suspended or User Active.
Schedule—Summary of the query’s current schedule.
Next Run—Time at which the query will next run.
Status—The current status of the query’s schedule.
Ready—The query ran successfully on its last scheduled run, and it’s ready to run at the next scheduled time.
Note
If you canceled the next run, the schedule status is still Ready. It will simply skip one scheduled run and execute on the next one.
Running—The query is currently running.
Disabled—The query’s schedule is currently disabled.
(…)—Action menu where you can change the schedule, cancel the next run, enable or disable the schedule, and change who has access to the query.
Dashboard Controls
Refresh
You can refresh the information in the dashboard at any time by clicking the Refresh button at the top of the dashboard. The dashboard won’t show any changes until you refresh.
Filter
To filter for a specific query, enter a search term in the Filter table field at the top of the dashboard. The dashboard automatically filters down to queries whose title matches the search terms.
Sort
To sort, hover the mouse over the column headings. Arrows will appear next to headings you can sort by. Click a heading to sort by that heading. By default, the dashboard is sorted by query title.
Arrange Columns
To rearrange or remove the dashboard’s columns, click the Column Organization button  just below the dashboard title. To remove a column, clear the checkmark next to its name. To rearrange the columns, click and drag the column name up or down.
Paginate
If you have a lot of scheduled queries, use the pagination controls at the bottom of the dashboard to show additional queries.
Change the Schedule
You can change a query’s schedule from the dashboard. For the schedule to take effect, it must be enabled. See Enable or Disable the Schedule below.
To change a query’s current schedule:
Find the desired query in the dashboard, then click the three dots (…) on the far right side of the dashboard.
Select Change Schedule Settings. The Scheduled Settings dialog opens.
Choose whether you want to use the simple or advanced scheduler:
Simple Scheduler—You can choose to run the query:
Hourly at a chosen minute within the hour
Daily at a chosen time of day
Weekly on a chosen day of the week and time of day
Monthly on a chosen date and time
Advanced Scheduler—You can define a complex schedule using a cron expression. See Cron Expressions for help writing a cron expression. Once you’ve entered an expression, click Preview Schedule to see a plain English explanation of the expression.
Important
A query schedule that’s too frequent may impact system performance. We recommend that the time between the query’s runs should be at least double the query’s average execution time.
Click Save when you’re done. An email will automatically be sent to the query owner to notify them of this change.
Cancel the Next Run
You can cancel the next scheduled run of the query without changing its overall schedule. It will resume running on schedule after skipping the next run. If the query is currently running, the current run will be canceled instead. If the query’s schedule is disabled, you can’t cancel the next run.
To cancel a query’s next scheduled run:
Find the desired query in the dashboard, then click the three dots (…) on the far right side of the dashboard.
Select Cancel Next Run. A confirmation message appears.
Click the Cancel Next Run button to confirm. The Next Run column is updated to show when the query will now run next. An email will automatically be sent to the query owner to notify them of this change.
Enable or Disable the Schedule
You can enable and disable a query’s schedule from the dashboard.
Find the desired query in the dashboard, then click the three dots (…) on the far right side of the dashboard.
If the query is currently enabled:
Click Disable Schedule. A confirmation message appears.
Click the Turn off Schedule button to confirm.
If the query is currently disabled:
Click Enable Schedule. A confirmation message appears.
Click the Turn on Schedule button to confirm. An email will automatically be sent to the query owner to notify them of this change.
Change Query Access
As users come and go, you may need to change a query’s owner or update who can access the query. Before you change access settings on a query, make sure you understand the query access levels.
To change a query’s owner or other access settings:
Find the desired query in the dashboard, then click the three dots (…) on the far right side of the dashboard.
Select Change Permission. The Sharing & Access dialog appears.
See Change Access to a Query for more details about changing access levels.