Configuration in Okta
Alation Cloud Service Applies to Alation Cloud Service instances of Alation
Customer Managed Applies to customer-managed instances of Alation
Use the recommendations below to configure External OAuth for a Snowflake data source with Okta as the identity provider (IdP).
Prerequisite
The instructions below assume that the required OAuth authorization server (the External OAuth Authorization Server) and the corresponding security integration have already been created and are in use for authentication on Snowflake. See Configure Okta for External OAuth in Snowflake documentation for information on how to create an External OAuth Authorization Server in Okta and the required security integration in Snowflake
Use the steps below to create an OAuth client application for Alation and to collect the required authentication for the configuration in Alation:
Register a Client Application
You must be an Okta administrator to register client applications.
Note
The steps in this section serve as an example of configuring an OAuth client in Okta. You have the flexibility to adapt the configuration to your specific use case and in accordance with your organization’s policies. These steps are meant to demonstrate how you can move through the configuration flow and collect the information for the configuration in Alation.
To register a client application for Alation:
Log in to Okta.
Go to Applications.
Create a new app integration:
Select OIDC - OpenID Connect as the Sign-in method.
Note
For more details on creating OAuth application integrations in Okta, refer to Create OIDC app integrations in Okta documentation.
Select Web Application as the application type.
Note
Selecting Web App allows for both the authorization code grant type and providing the required client secret to Alation. This is not the case for the Native App type or for the SPA (Single Page Application) type.
On the application settings page, provide the following information:
App integration name—Provide a name for the app. The name will be visible to users establishing individual connections. We recommend indicating that this app is used with Alation, for example:
ALATION_EXTERNAL_OAUTH_CLIENT.Under General Settings > Grant type, select the checkboxes Authorization Code and Refresh Token.
Under General Settings > Sign-in redirect URIs, add the value
https://<your_Alation_URL>/api/datasource_auth/oauth/callback/. Example: ``https://mycatalog.test.com/api/datasource_auth/oauth/callback/Ensure the URI ends with the trailing slash
/.If you are using an “HTTP” connection, it can be specified in the URI without having to change any TLS settings.
Under General Settings > Assignments, choose an option that is required by your organization’s policies, for example: Limit access to selected groups. Depending on your choice, you may have to provide additional information before you can save the app.
Click Save in the app editor to save your information and to create the app. You’ll land on your application’s properties page.
Under General Settings > Refresh Token, ensure that the radio button Use persistent token is selected.
For the General Settings section of the properties, click Edit.
Under LOGIN, locate the field Initiate login URI. Provide your Alation instance URL in the required format and save. Example:
https://<your_Alation_URL>/api/datasource_auth/oauth/callback/Under General > USER CONSENT, ensure that the Require consent checkbox is selected.
Assign the users who will need to access Snowflake via Compose to Alation’s client app.
Next, collect the authentication information for Alation.
Collect the Authentication Information
To complete the Alation configuration, you will need to provide the following authentication information from Okta, which we recommend you store securely in a list:
Client ID
Client secret
OAuth 2.0 endpoints
Default scope
Username field/claim
To collect the values:
On Alation’s client app properties page, under General > Client Credentials, locate the Client ID property. Copy it to your list.
Under General > CLIENT SECRETS, locate the current client secret and copy it to your list.
Obtain the authorization endpoint and token endpoint URLs from the authorization server metadata file. For details, see Create an OAuth Authorization Server in Snowflake documentation. To locate the file:
In the Okta admin interface, in the left-hand menu, select Security, and then select API.
Locate the authorization server that you created for Snowflake and open its properties page by clicking on its name.
Locate the field Metadata URI and copy the URI you find in this field.
Paste the URI into a new browser tab to view the authorization server metadata file.
Locate the values for the parameters
authorization_endpointandtoken_endpoint. They will look similar to the following:"authorization_endpoint":"https://my-dev-instance.oktapreview.com/oauth2/aus464i2xvbt34tTU0h9/v1/authorize""token_endpoint":"https://my-dev-instance.oktapreview.com/oauth2/aus464i2xvbt34tTU0h9/v1/token"
Copy these values and add them to your list.
Obtain the available scope values from the authorization server configuration. To view the scopes:
On the authorization server properties page, select the Scopes tab. The available scopes will be listed under this tab.
Copy the scope you want to use as the default with Alation and add it to your list. For example:
SESSION:ROLE-ANY.Note
Consider adding
SESSION:ROLE-ANYas a scope to avoid adding a scope entry for each role. You can create a policy to allow all users’ use of this scope. This allows users to connect to Snowflake with any role they are assigned in Snowflake and also enable role switching in Compose with theUSE ROLEstatement.In the security integration created for this Okta Authorization Server, to enable role switching, set the
EXTERNAL_OAUTH_ANY_ROLE_MODEfield toENABLE.
Obtain the Username Field/Claim value from the Snowflake security integration. Refer to Create a Security Integration for Okta in Snowflake documentation. To obtain the value:
In Snowflake, retrieve the security integration properties using the
DESC SECURITY INTEGRATIONcommand.Locate the property
EXTERNAL_OAUTH_TOKEN_USER_MAPPING_CLAIM.Copy the parameter and its value and add them to your list.
Next, configure OAuth via Okta for your Snowflake data source.
Configure OAuth via Okta for Your Snowflake Data Source
Perform this configuration in Alation after completing these steps:
To enable OAuth in Compose for a Snowflake data source:
In Alation, open the data source Settings page.
Go to the Compose tab.
Locate the OAuth Connection block and select the checkbox Enable OAuth 2.0 in Compose. This reveals the parameters for OAuth setup.
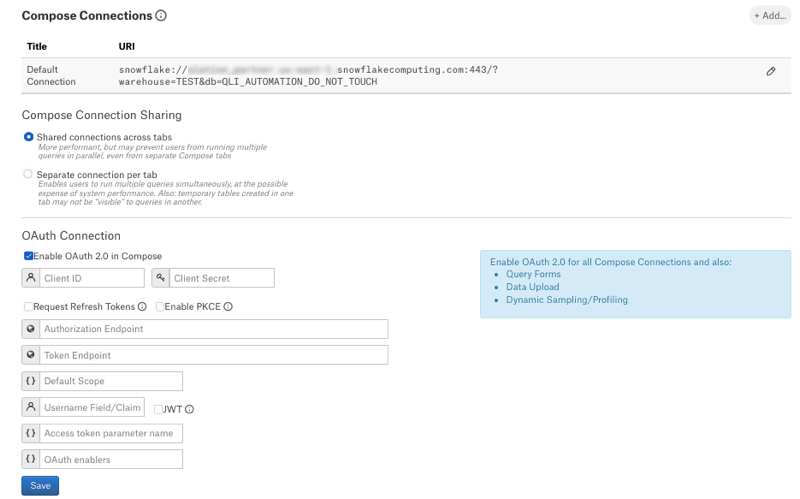
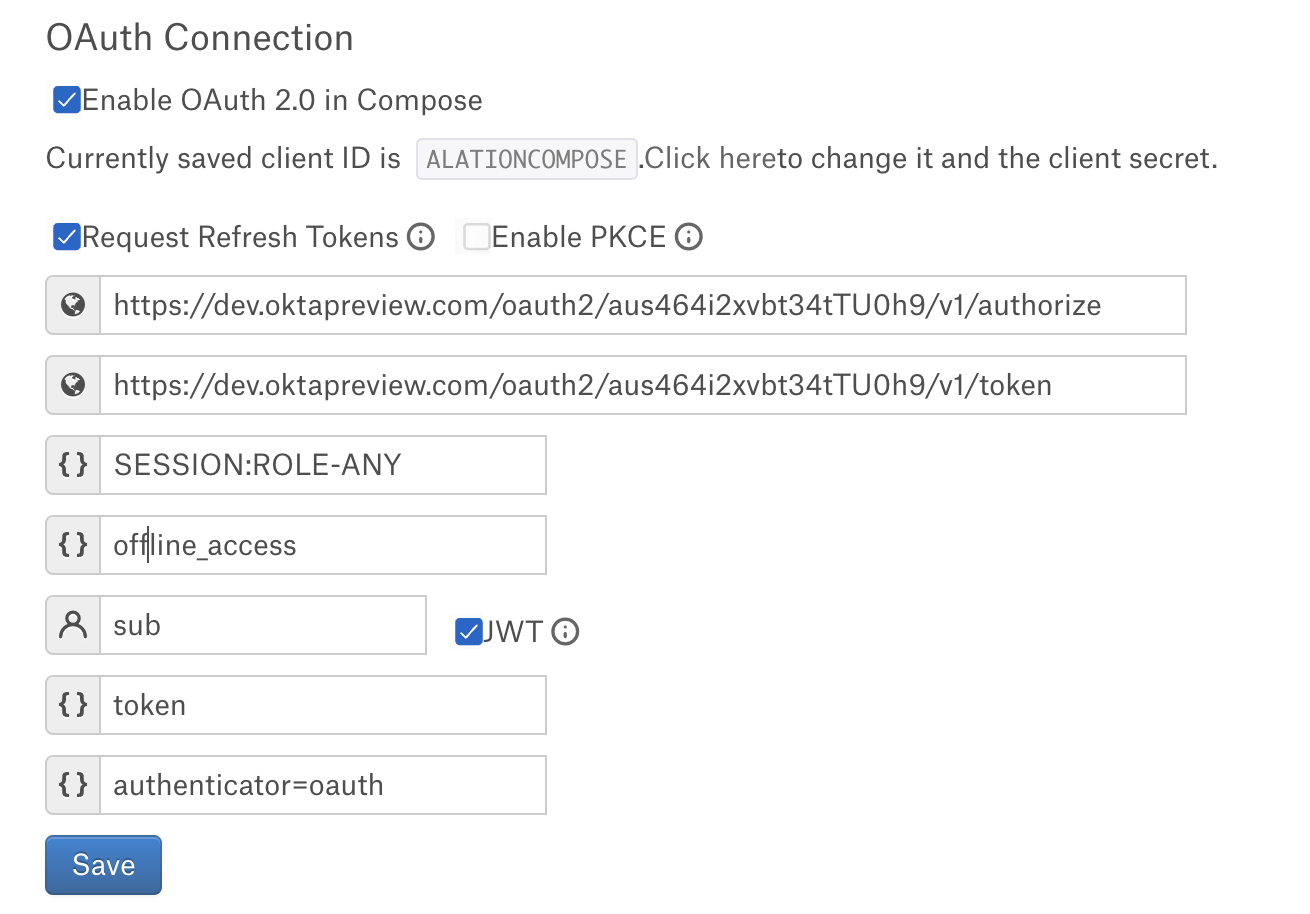
Specify the OAuth connection information:
Property
Value
Client ID
Use the client ID of the app registration you created for Alation’s OAuth client.
Client Secret
Use the client secret of the OAuth client.
Request Refresh Tokens
Select this checkbox.
Enable PKCE
Leave this checkbox clear if PKCE was not configured. Select it if you configured PKCE on the Snowflake integration.
Authorization Endpoint
Provide the value of the
authorization_endpointparameter you obtained from the authorization server metadata file.Example:
https://my-dev-instance.oktapreview.com/oauth2/aus464i2xvbt34tTU0h9/v1/authorizeToken Request Endpoint
Provide the value of the
token_endpointparameter you obtained from the authorization server metadata file.Example:
https://my-dev-instance.oktapreview.com/oauth2/aus464i2xvbt34tTU0h9/v1/tokenDefault Scope
Provide the default scope. Example:
SESSION:ROLE-ANY.Refresh Scope
Use the value
offline_access.Username Field/Claim
Use the value of the property
EXTERNAL_OAUTH_TOKEN_USER_MAPPING_CLAIMof the Snowflake security integration. Example:sub.JWT
Select this checkbox.
Access token parameter name
Use the value
token.OAuth enablers
Use the value
authenticator=oauth.Click Save.
Edit the default Compose connection to use OAuth or add a new OAuth-enabled Compose connection. To make a connection string OAuth-enabled, add the query parameter
authenticator=oauthto the connection URI with the&symbol as the separator.Example:
snowflake://alation_test.us-east-1.snowflakecomputing.com:443/?warehouse=DEMO_WH&db=TEST&authenticator=oauthTest the configuration in Compose by connecting to your Snowflake data source and running a query. For more details, see Working with Data Source Connections.