OCF Connector for Amazon Athena: Install and Configure
Alation Cloud Service Applies to Alation Cloud Service instances of Alation
Customer Managed Applies to customer-managed instances of Alation
Network Connectivity
Port 443 must be open and port 444 may need to be open too (see MDE Works But Profiling And Compose Time Out). Any load balancers and proxy servers must be configured to forward traffic over these ports to the Alation instance.
Authentication
The OCF connector for Amazon Athena supports several authentication methods:
Basic Authentication
Basic authentication requires an AWS IAM user and the access key ID and secret access key for this user.
To use basic authentication, create an AWS IAM user account and generate and save an access key ID and a secret access key.
Grant the IAM user the required permissions (see Permissions for IAM User Account below).
Note
If you choose to use an existing IAM account instead of creating a new one, note that the billing for queries run by Alation during MDE and profiling and the billing for queries run by this account in Amazon Athena and in Compose will be combined.
Permissions for IAM User Account
We recommend using the following AWS managed policy:
AmazonAthenaFullAccess
This policy:
Creates a default athena-examples bucket
Grants the user access:
To all Athena actions
To most Glue actions (such as
CREATE DATABASE)To the default Amazon S3 results bucket with query results
"arn:aws:s3:::aws-athena-query-results-*"
You may need to edit the inline policies as prescribed by your company’s AWS access rules.
If granting the AmazonAthenaFullAccess policy is not allowed, grant the required permissions separately:
S3 permissions allowing the following actions on the S3 buckets with data sets you want to catalog:
s3:GetBucketLocation
s3:GetObject
s3:ListBucket
s3:ListBucketMultipartUploads
s3:ListMultipartUploadParts
s3:AbortMultipartUpload
s3:PutObjectA Glue policy allowing the action
GetCatalogImportStatusAn Athena policy allowing the List and Read actions.
STS Authentication with an IAM User
STS Authentication with an IAM user requires an IAM user account and an AWS role.
To use this type of authentication:
Create an IAM user and assign it the required permissions as it’s described in Basic Authentication.
Perform the configuration described in Create an IAM Role for STS Authentication below.
Create an IAM Role for STS Authentication
To set up STS authentication with an IAM user:
In the AWS IAM service, create an IAM policy (for example,
<read_resources_policy>) that grants access to the AWS resources you are going to catalog. We recommend using theAmazonAthenaFullAccessmanaged policy as<read_resources_policy>. You may need to edit the inline policies as prescribed by your company’s AWS access rules.Create an IAM role (for example,
<read_resources_role>) selecting the Type of Trusted Entity to be AWS Service and Use Case to be EC2. To this role, attach the policy (<read_resources_policy>orAmazonAthenaFullAccess). This role will be assumed by the service account when performing MDE, profiling, and QLI from your Athena data source.Save the ARN of the role
<read_resources_role>. It is required for the next configuration steps in AWS and during the configuration in Alation.Create an IAM policy (for example,
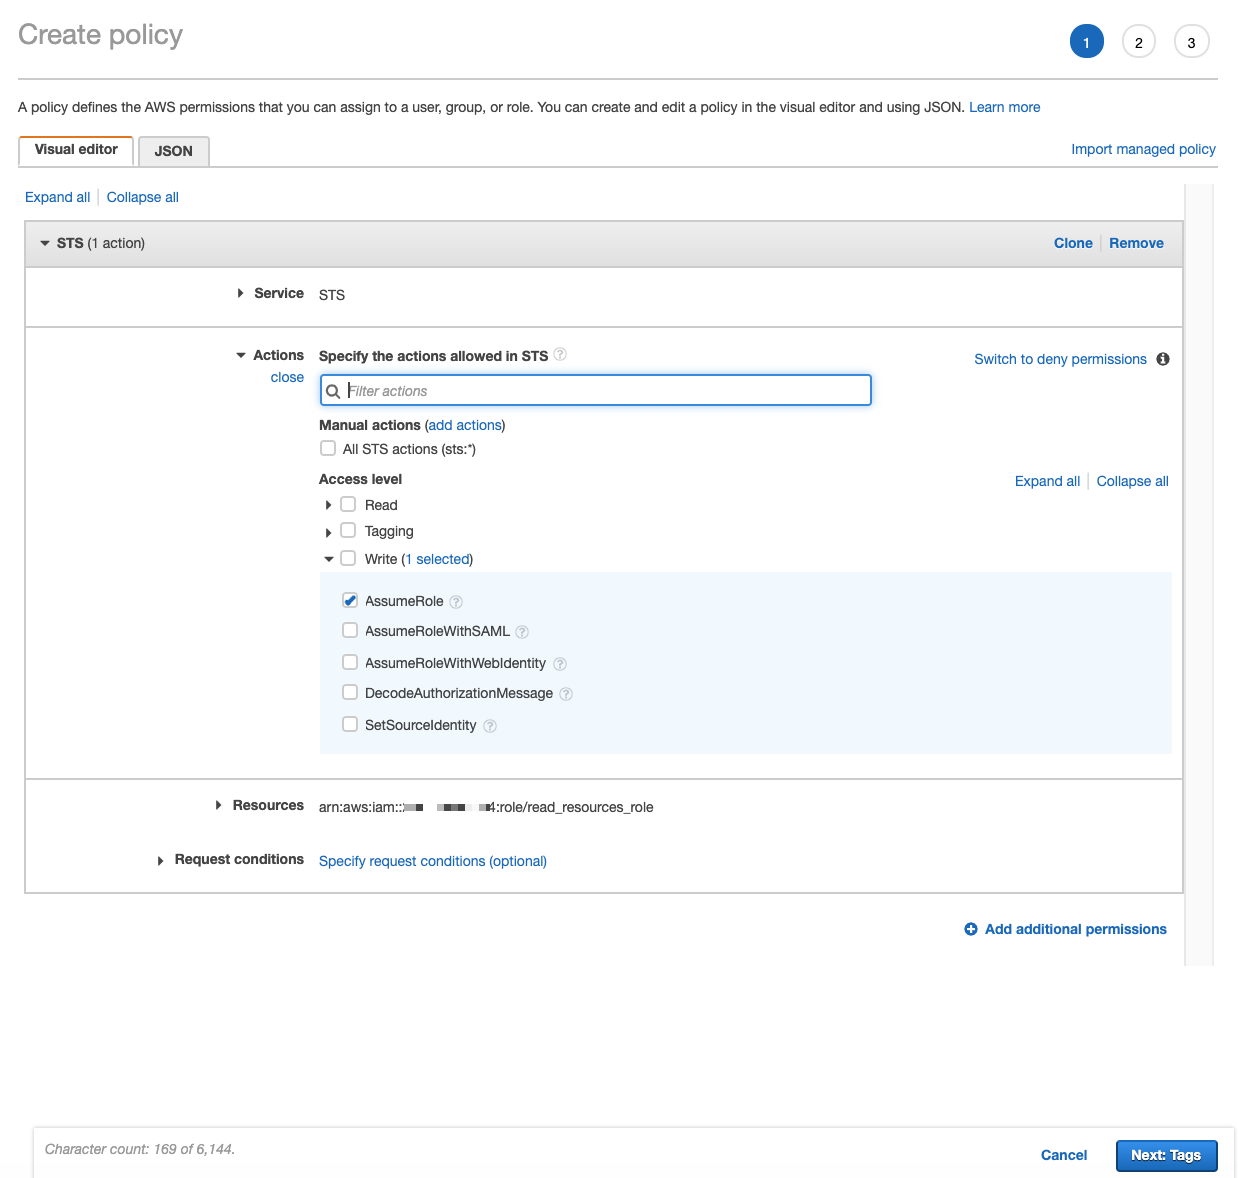
<assume_role_policy>) that allows theAssumeRoleaction for the IAM role created in step 2. When creating this policy:Select STS as Service.
Under Actions > Access Level > Write, select
AssumeRole.Under Resources, specify the ARN of the role that gives access to the AWS resources (your
<read_resources_role>).
Open the Properties page of the role that gives access to the AWS resources (your
<read_resources_role>). Edit the Trust Relationship of this role by adding your IAM user account ARN asPrincipal.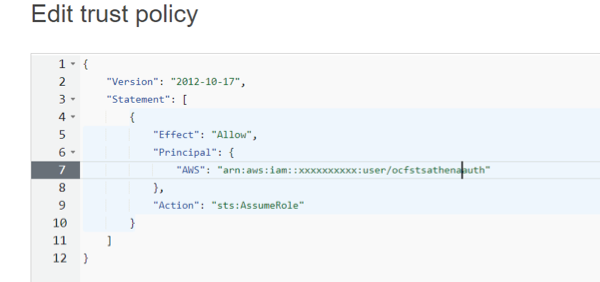
STS Authentication with an AWS IAM Role
STS authentication with an AWS IAM role does not require an IAM user. This authentication method uses an instance profile that assumes a role allowing access to Amazon resources. This authentication method works for authenticating across AWS accounts.
Note
This authentication method is available with connector version 1.2.0.6527 or newer.
To configure STS authentication with an AWS IAM role, use the steps in Configure Authentication via AWS STS and an IAM Role. To provide access to the data source via an IAM role, use the permissions information in Permissions for IAM User Account.
Configuration in Alation
STEP 1: Install the Connector
Alation On-Prem
Important
Installation of OCF connectors requires Alation Connector Manager to be installed as a prerequisite.
To install an OCF connector:
If this has not been done on your instance, install the Alation Connector Manager: Install Alation Connector Manager.
Ensure that the OCF connector Zip file that you received from Alation is available on your local machine.
Install the connector on the Connectors Dashboard page using the steps in Manage Connectors.
Alation Cloud Service
Note
On Alation Service Cloud instances, Alation Connector Manager is available by default.
Ensure that the OCF connector Zip file that you received from Alation is available on your local machine.
Install the connector on the Connectors Dashboard page using the steps in Manage Connectors.
STEP 2: Create and Configure a New Data Source
In Alation, add a new data source:
Log in to Alation as a Server Admin.
Expand the Apps menu on the right of the main toolbar and select Sources.
On the Sources page, click +Add on the top right of the page and in the list that opens, click Data Source. This will open the Add a Data Source wizard.
On the first screen of the wizard, specify a name for your data source, assign additional Data Source Admins, if necessary, and click the Continue Setup button on the bottom. The Add a Data Source screen will open.
On the Add a Data Source screen, the only field you should populate is Database Type. From the Database Type dropdown, select the connector name. After that you will be navigated to the Settings page of your new data source.
Note
Agent-based connectors will have the Agent name appended to the connector name.
The name of this connector is Athena OCF connector.
Access
On the Access tab, set the data source visibility using these options:
Public Data Source—The data source will be visible to all users of the catalog.
Private Data Source—The data source will be visible to the users allowed access to the data source by Data Source Admins.
You can add new Data Source Admin users in the Data Source Admins section.
General Settings
Note
This section describes configuring settings for credentials and connection information stored in the Alation database. If your organization has configured Azure KeyVault or AWS Secrets Manager to hold such information, the user interface for the General Settings page will change to include the following icons to the right of most options:

By default, the database icon is selected, as shown. In the vault case, instead of the actual credential information, you enter the ID of the secret. See Configure Secrets for OCF Connector Settings for details.
Specify Application Settings if applicable. Click Save to save the changes after providing the information.
Parameter |
Description |
|---|---|
BI Connection Info |
This parameter is used to generate lineage between the current data source and another source in the catalog, for example a BI source that retrieves data from the underlying database. The parameter accepts host and port information of the corresponding BI data source connection. Use the following format: You can provide multiple values as a comma-separated list:
Find more details in BI Connection Info. |
Disable Automatic Lineage Generation |
Select this checkbox to disable automatic lineage generation from QLI, MDE, and Compose queries. By default, automatic lineage generation is enabled. |
JDBC URI
The URI format depends on the authentication type you use. You can only include one bucket as the S3OutputLocation parameter value.
Basic Authentication
Format
awsathena://<your_AWS_URL>:<port>;S3OutputLocation=s3://<S3_bucket>
If the S3 output location is defined in the default workgroup:
awsathena://<your_AWS_URL>:<port>;S3OutputLocation=s3://<S3_bucket>
If the S3 output location is defined in a workgroup other than default:
awsathena://<your_AWS_URL>:443;workgroup=<your workgroup>;S3OutputLocation=s3://<S3_bucket>
Example
awsathena://athena.us-east-1.amazonaws.com:443;S3OutputLocation=s3://test94605
STS Authentication
Use this format if you are authenticating with either of the STS-based authentication methods:
Format
awsathena://<your_AWS_URL>:<port>;S3OutputLocation=s3://S3_bucket>;AwsCredentialsProviderClass=com.example.CustomSessionCredentialsProvider
Example
awsathena://athena.us-east-1.amazonaws.com:443;S3OutputLocation=s3://test94605;AwsCredentialsProviderClass=com.example.CustomSessionCredentialsProvider
Connector Settings
Under the Connector Settings section of the General Settings tab, populate the data source connection information and save the values by clicking Save.
Parameter |
Description |
|---|---|
Basic Authentication |
Default. Leave this radio button selected if you are going to authenticate with basic authentication. |
STS Authentication |
Select this radio button if you are going to configure STS Authentication with an IAM User. |
JDBC URI |
Specify the JDBC UI in the required format. Refer to JDBC URI for examples. |
Important
If you are going to Configure STS Authentication with an AWS IAM Role, disregard the Basic Authentication and STS Authentication radio buttons. They will not apply. Only provide a valid JDBC URI.
Configure Basic Authentication
If you selected the Basic Authentication radio button, specify the information in the Basic Authentication section of General Settings. Save the values by clicking Save.
Refer to Basic Authentication for more information about this authentication method.
Parameter |
Description |
|---|---|
Username |
Specify the access key ID of your IAM user account. |
Password |
Specify the secret access key of your IAM user account. |
Configure STS Authentication
If you selected the STS Authentication radio button, specify the information in the STS Authentication section of General Settings. Save the values by clicking Save.
Refer to STS Authentication with an IAM User for more information about this authentication method.
Parameter |
Description |
|---|---|
Region |
Specify your AWS region. |
DB username |
Specify the username of your IAM user account. |
STS: AWS Access Key ID |
Specify the access key ID of your IAM user account. |
STS: AWS Access Key Secret |
Specify the secret access key of your IAM user account. |
STS: Role ARN |
Specify the ARN of the |
STS Duration |
Duration of the role session in seconds. |
Configure STS Authentication with an AWS IAM Role
To use STS authentication with an AWS IAM role, specify the information in the IAM Role Authentication section of General Settings. Save the values by clicking Save.
Parameter
Description
Auth Type
Select AWS IAM.
Authentication Profile
Select the authentication profile you created in Admin Settings.
Role ARN
Provide the ARN of the role that gives access to the Amazon resource.
External ID
Provide the External ID you added to the role that gives access to the Amazon resource.
STS Duration
Provide the STS token duration in seconds. This value must be less than or equal to the Maximum session duration of the IAM role that provides access to the Amazon resource(s).
Test Connection
Under Test Connection, click Test to validate network connectivity.
If the test connection fails, make sure the JDBC URI and Service Account credentials are entered correctly.
If the test connection fails with an error similar to the following:
Caused by: com.Simba.Athena.support.exceptions.GeneralException: [Simba]AthenaJDBC An error has been thrown from the AWS Athena client. Access denied when writing to the location: s3://dmf-alation-sand/1c294091-13ef-47a6-8d2a-6150a5d3bd25.txt
then check the user account permissions on the AWS side. Make sure it has been granted the Glue permission
GetCatalogImportStatus.Check that the user account has been granted the List and Read actions for the Athena service.
Logging Configuration
Select the logging level for the connector logs and save the values by clicking Save in this section. The available log levels are based on the Log4j framework.
Parameter |
Description |
|---|---|
Log level |
Select the log level to generate logs. The available options are INFO, DEBUG, WARN, TRACE, ERROR, FATAL, ALL. |
Obfuscate Literals
Obfuscate Literals—Enable this toggle to hide actual values in the query statements that are ingested during query log ingestion or executed in Compose. This toggle is disabled by default.
Metadata Extraction
You can configure metadata extraction (MDE) for an OCF data source on the Metadata Extraction tab of the Settings page. Refer to Configure Metadata Extraction for OCF Data Sources for information about the available configuration options.
The OCF Athena data source supports default MDE.
Custom query-based extraction is not supported.
Compose
For details about configuring the Compose tab of the Settings page, refer to Configure Compose for OCF Data Sources.
OCF Athena data sources support the SSO authentication flow for Compose. For information on how to set it up, refer to OCF Connector for Amazon Athena: SSO with Compose.
Sampling and Profiling
Sampling and profiling is supported. For details, see Configure Sampling and Profiling for OCF Data Sources.
Query Log Ingestion
For information on configuring QLI, refer to OCF Connector for Amazon Athena: Query Log Ingestion.
Troubleshooting
Refer to Troubleshooting for information about logs.