OCF Connector for Impala on CDP: Install and Configure
Alation Cloud Service Applies to Alation Cloud Service instances of Alation
Customer Managed Applies to customer-managed instances of Alation
Ports
Open outbound TCP port 21050 to the Impala server
Open outbound TCP port 9083 to the metastore
Open outbound TCP port 9870 to the HDFS server
Open outbound TCP port 9871 to the HDFS server if the cluster uses TLS.
Open outbound TCP port 9864 on all cluster data nodes to Alation traffic when using webHDFS
Open outbound TCP port 9865 on all cluster data nodes to Alation traffic when using secure (TLS) webHDFS
Open outbound TCP port 443 on all cluster data nodes to Alation traffic
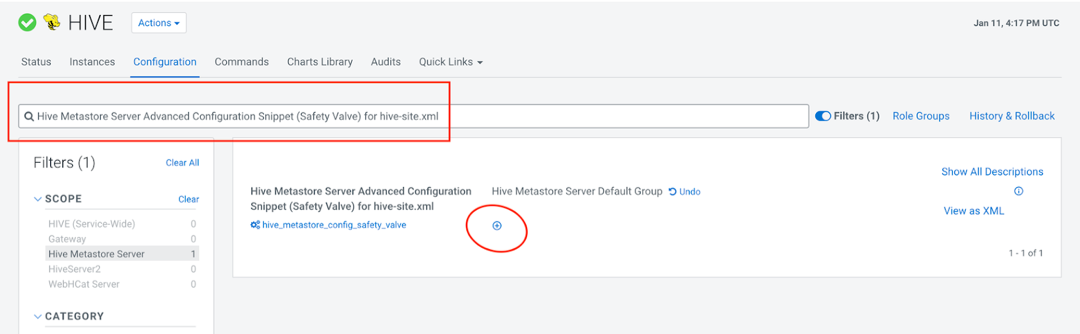
Hive Configuration
Ensure that in the Hive service configuration, the property metastore.storage.schema.reader.impl is set to rg.apache.hadoop.hive.metastore.SerDeStorageSchemaReader.
To check the value or set it:
Open the Cloudera Manager homepage.
Click on Hive.
Click the Configuration tab.
On the Configuration tab, search for Hive Metastore Server Advanced Configuration Snippet (Safety Valve) for hive-site.xml and click the plus icon on Hive Metastore Server Default Group.
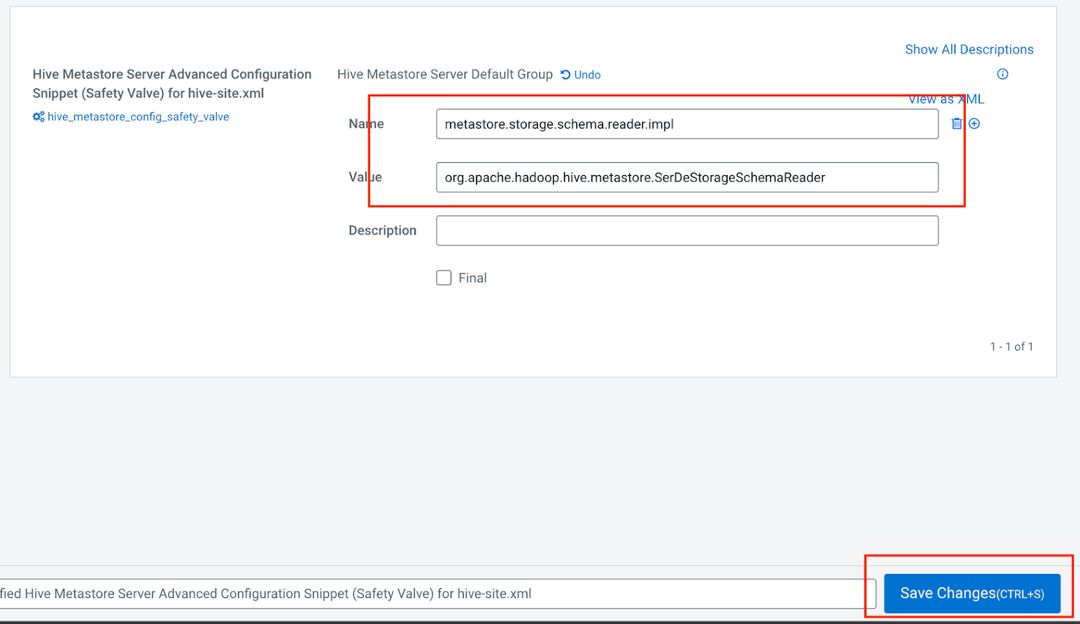
In the Name field, enter the name
metastore.storage.schema.reader.impl.In the Value field, enter the value
org.apache.hadoop.hive.metastore.SerDeStorageSchemaReader.Click Save Changes.
A restart icon will pop up after a few seconds. Click on it to restart the service.
In the window that opens, click Restart Stale Service.
Select Re-deploy client configuration and then click Restart Now.
Wait for the service to restart and then click on the Continue button that will appear after the restart.
Extraction of Complex Data Types
The Impala on CDP OCF connector supports extraction of complex data types, such as map, array, and struct. To enable their representation in the Alation user interface as a tree structure, on your Alation instance, set the alation_conf parameter alation.feature_flags.enable_generic_nosql_support
to True.
Additionally, you can use the parameter alation.feature_flags.docstore_tree_table_depth to define the depth of the display (default is three levels).
For details about using alation_conf, refer to Using alation_conf.
Important
After changing values of these parameters, restart Alation Supervisor from the Alation shell:
alation_supervisor restart all.
Service Account
Prior to adding your Impala data source to the catalog, create a service account for each of these different services used by Alation:
Impala
Metastore
HDFS
Based on your requirement, you can create three different service accounts or one service account for these services.
The service account requires these permissions:
SELECT permission for all schemas which you plan to extract into the catalog.
Read and execute permissions for Impala external tables.
Access to the metastore.
Read permission for the HDFS location that stores Impala query logs.
In case your Impala data source is kerberized, we recommend creating the service account in the same realm as the realm used by Impala users.
Kerberos Configuration File
In case your Impala data source is kerberized, prepare the krb5.conf file and, if applicable, the keytab file for the service account. They will need to be uploaded to Alation.
For private cloud, consult your CDP admin as to locate and downloade the krb5.conf file.
For public cloud, perform these steps:
Download the krb5.conf file from /etc/krb5.conf the DataLake service.
Verify that there is no
includedircommand at the top of the file. If present, remove it.Go to the DataLake environment in the CDP Console and click on the FreeIPA tab.
Open the downloaded krb5.conf file in an editor of your choice.
In the realms section, add two new fields, namely kdc and admin_server.
Use the FreeIPA hostname or IP you copied as the value for kdc and admin_server.
Example
[realms]
CDP-AL13.C1N0-JTR4.CLOUDERA.SITE = {
kdc = 10.13.105.196
admin_server = 10.13.105.196
pkinit_anchors = FILE:/var/lib/ipa-client/pki/kdc-ca-bundle.pem
pkinit_pool = FILE:/var/lib/ipa-client/pki/ca-bundle.pem
Connection over SSL
If your connection from Alation will go over SSL, prepare the corresponding SSL certificate. Alation expects the file to be of JKS stroretype that can usually be found in the directory /var/lib/cloudera-scm-agent/agent-cert. Consult your CDP admin as to locating and downloading the certificate. It will need to be uploaded to Alation in the settings of the Impala data source.
Configuration in Alation
STEP 1: Install the Connector
Alation On-Premise
Important
Installation of OCF connectors requires Alation Connector Manager to be installed as a prerequisite.
To install an OCF connector:
If this has not been done on your instance, install the Alation Connector Manager: Install Alation Connector Manager.
Ensure that the OCF connector Zip file is available on your local machine.
Install the connector on the Connectors Dashboard page using the steps in Manage Connectors.
Alation Cloud Service
Note
On Alation Cloud Service instances, Alation Connector Manager is available by default.
Depending on your network configuration, you may need to use Alation Agent to connect to databases.
Connection via Alation Agent
Ensure that Alation Agent is enabled on your Alation instance. If necessary, create a Support ticket with Alation for an Alation representative to enable the Alation Agent feature on your instance and to receive the Alation Agent installer.
Connection Without Agent
To install an OCF connector:
Ensure that the OCF connector Zip file is available on your local machine.
Install the connector on the Connectors Dashboard page using the steps in Manage Connectors.
STEP 2: Create and Configure a New Data Source
In Alation, add a new data source:
Log in to Alation as a Server Admin.
Expand the Apps menu on the right of the main toolbar and select Sources.
On the Sources page, click +Add on the top right of the page and in the list that opens, click Data Source. This will open the Add a Data Source wizard.
On the first screen of the wizard, specify a name for your data source, assign additional Data Source Admins, if necessary, and click the Continue Setup button on the bottom. The Add a Data Source screen will open.
On the Add a Data Source screen, the only field you should populate is Database Type. From the Database Type dropdown, select the connector name. After that you will be navigated to the Settings page of your new data source.
Note
Agent-based connectors will have the Agent name appended to the connector name.
The connector name is Impala CDP OCF Connector.
JDBC URI
Impala supports different types of authentication methods. Use the JDBC URI format that corresponds to your authentication method.
Authentication
Use this format for all the applicable authentication types.
Format
impala://<HOSTNAME>:21050
Example
impala://ip-10-13-28-190.alation-test.com:21050
Metastore URI Format
thrift://ip-10-13-22-251.alation-test.com:9083
Metastore Principal
hive/ip-10-13-6-82.alation-test.com@ALATION-TEST.COM
Compose URI Format
Private Cloud Base
No Auth Authentication
impala://<hostname>:<port>;AuthMech=<0;TransportMode=<transport-mode>Example:
impala://ip-10-13-32-87.alation-test.com:21050;AuthMech=0;TransportMode=binary
Username Authentication
impala://<hostname>:<port>;AuthMech=2;TransportMode=<transport-mode>Example:
impala://ip-10-13-32-87.alation-test.com:21050;AuthMech=2;TransportMode=binary
Username and Password Authentication
impala://<hostname>:<port>;AuthMech=3;TransportMode=<transport-mode>Example:
impala://ip-10-13-32-87.alation-test.com:21050;AuthMech=3;TransportMode=binary
SSL and No Auth Authentication
impala://<hostname>:<port>;AuthMech=<0;SSL=1;TransportMode=<transport-mode>Example:
impala://ip-10-13-32-87.alation-test.com:21050;AuthMech=0;SSL=1;TransportMode=binary
SSL and Username Authentication
impala://<hostname>:<port>;AuthMech=2;SSL=1;TransportMode=<transport-mode>Example:
impala://ip-10-13-32-87.alation-test.com:21050;AuthMech=2;SSL=1;TransportMode=binary
SSL, Username, and Password Authentication
impala://<hostname>:<port>;AuthMech=3;SSL=1;TransportMode=<transport-mode>Example:
impala://ip-10-13-32-87.alation-test.com:21050;AuthMech=3;SSL=1;TransportMode=binary
Private Cloud Cloudera Data Warehouse (CDW)
SSL and No Auth Authentication
impala://<hostname>:<port>;AuthMech=<0;SSL=1;TransportMode=<transport-mode>;httpPath=<http-path>Example:
impala://ip-10-13-32-87.alation-test.com:21050;AuthMech=0;SSL=1;TransportMode=http;httpPath=cliservice
SSL and Username Authentication
impala://<hostname>:<port>;AuthMech=2;SSL=1;TransportMode=<transport-mode>;httpPath=<http-path>Example:
impala://ip-10-13-32-87.alation-test.com:21050;AuthMech=2;SSL=1;TransportMode=http;httpPath=cliservice
SSL, Username, and Password Authentication
impala://<hostname>:<port>;AuthMech=3;SSL=1;TransportMode=<transport-mode>;httpPath=<http-path>Example:
impala://ip-10-13-32-87.alation-test.com:21050;AuthMech=3;SSL=1;TransportMode=http;httpPath=cliservice
Public Cloud: Datahub and CDW
SSL and No Auth Authentication
impala://<hostname>:<port>;AuthMech=<0;SSL=1;TransportMode=<transport-mode>;httpPath=<http-path>Example:
impala://ip-10-13-32-87.alation-test.com:21050;AuthMech=0;SSL=1;TransportMode=http;httpPath=cliservice
SSL and Username Authentication
impala://<hostname>:<port>;AuthMech=2;SSL=1;TransportMode=<transport-mode>;httpPath=<http-path>Example:
impala://ip-10-13-32-87.alation-test.com:21050;AuthMech=2;SSL=1;TransportMode=http;httpPath=cliservice
SSL, Username, and Password Authentication
impala://<hostname>:<port>;AuthMech=3;SSL=1;TransportMode=<transport-mode>;httpPath=<http-path>Example:
impala://ip-10-13-32-87.alation-test.com:21050;AuthMech=3;SSL=1;TransportMode=http;httpPath=cliservice
Access
On the Access tab, set the data source visibility using these options:
Public Data Source—The data source will be visible to all users of the catalog.
Private Data Source—The data source will be visible to the users allowed access to the data source by Data Source Admins.
You can add new Data Source Admin users in the Data Source Admins section.
General Settings
Note
This section describes configuring settings for credentials and connection information stored in the Alation database. If your organization has configured Azure KeyVault or AWS Secrets Manager to hold such information, the user interface for the General Settings page will change to include the following icons to the right of most options:

By default, the database icon is selected, as shown. In the vault case, instead of the actual credential information, you enter the ID of the secret. See Configure Secrets for OCF Connector Settings for details.
Perform the configuration on the General Settings tab.
Application Settings
Specify Application Settings if applicable. Click Save to save the changes after providing the information.
Parameter |
Description |
|---|---|
BI Connection Info |
This parameter is used to generate lineage between the current data source and another source in the catalog, for example a BI source that retrieves data from the underlying database. The parameter accepts host and port information of the corresponding BI data source connection. Use the following format: You can provide multiple values as a comma-separated list:
Find more details in BI Connection Info. |
Disable Automatic Lineage Generation |
Select this checkbox to disable automatic lineage generation from QLI, MDE, and Compose queries. By default, automatic lineage generation is enabled. |
Connector Settings
The Impala on CDP OCF connector supports multiple combinations of authentication types for data source connection and metastore connection. For details, see OCF Connector for Impala on CDP: Supported Combinations of Authentication Types.
CDP Deployment
Select the CDP distribution type from the CDP Distribution dropdown:
Select Private Cloud for Private Cloud CDP Distribution
Select Public Cloud for Public Cloud CDP Distribution
Data Source Connection
Populate the data source connection information and save the values by clicking Save in this section.
Parameter |
Description |
|---|---|
JDBC URI |
Specify the JDBC URI in the required format. See JDBC URI. |
Authentication Method |
Select the JDBC authentication type:
This field is available from connector version 2.0.0. |
Username |
Specify the service account username. |
Password |
Specify the service account password. |
Enable SSL |
Enable SSL authentication by selecting the Enable SSL checkbox. If the Enable SSL checkbox is enabled, upload the SSL certificate using the upload link below. |
Truststore password |
Specify the password for the SSL certificate. Note: The password will be deleted if the data source connection is deleted. |
Transport Mode |
Specify the transport mode.
This field is available from connector version 2.0.0. |
HTTP Path |
Specify the HTTP path. This field is required if the Transport Mode specified is http. This field is available from connector version 2.0.0. |
Kerberos Configuration File |
If Kerberos/Username/Password or Kerberos/Username/Keytab is selected upload the krb5.conf file using the upload link This field is available from connector version 2.0.0. |
Use keytab |
Kerberos/Username/Keytab is selected, upload the keytab file for the service account using the upload link. |
Impala Kerberos Principal |
Specify the Impala Kerberos principal in this format, if Kerberos authentication is used. Format: <Impala_Service_Name>/<Kerberos.Hostname _or_IP>@<REALM> Example: impala/kerberos.domain.com@DOMAIN.COM This field is available from connector version 2.0.0. |
Metastore Connection
Populate the metastore connection information and save the values by clicking Save in this section.
The fields described in this section are available from Impala on CDP OCF connector version 2.0.0.
Parameter |
Description |
|---|---|
Metastore URI |
Specify the Metastore URI in the required format. See Metastore URI Format. |
|
|
Authentication Method |
Select the JDBC authentication type:
This field is available from connector version 2.0.0. |
Metastore Username |
Specify the metastore service account username. |
Metastore Password |
Specify the metastore service account password. |
Metastore Kerberos Configuration File |
If Kerberos/Username/Password or Kerberos/Username/Keytab is selected upload the krb5.conf file using the upload link This field is available from connector version 2.0.0. |
Metastore keytab File |
Kerberos/Username/Keytab is selected, upload the keytab file for the service account using the upload link. |
Metastore Kerberos Principal |
Specify the metastore Kerberos principal in this format, if Kerberos authentication is used. Format: <Hive_Service_Name>/<Kerberos.Hostname _or_IP>@<REALM> Example: hive/kerberos.domain.com@DOMAIN.COM This field is available from connector version 2.0.0. |
Hadoop RPC Protection |
Select the Hadoop RPC Protection value from the dropdown:
This field is available from connector version 2.0.0. |
Logging Configuration
Select the logging level for the connector logs and save the values by clicking Save in this section. The available log levels are based on the Log4j framework.
Parameter |
Description |
|---|---|
Log level |
Select the log level to generate logs. The available options are INFO, DEBUG, WARN, TRACE, ERROR, FATAL, ALL. |
You can view the connector logs in Admin Settings > Manage Connectors > Impala CDP OCF Connector.
Obfuscate Literals
Obfuscate Literals—Enable this toggle to hide actual values in the query statements that are ingested during query log ingestion or executed in Compose. This toggle is disabled by default.
Test Connection
After specifying the connector settings, under Test Connection, click Test to validate network connectivity.
Metadata Extraction
The OCF Connector for Impala on CDP supports default extraction—This type of MDE is based on default Metastore API calls that are built in the connector code.
Custom query-based MDE is not supported.
Note
Complex data types are extracted. See Extraction of Complex Data Types for information on how to enable their representation in the Alation user interface.
You can configure metadata extraction (MDE) for an OCF data source on the Metadata Extraction tab of the Settings page. Refer to Configure Metadata Extraction for OCF Data Sources for information about the available configuration options.
Compose
For details about configuring the Compose tab of the Settings, refer to Configure Compose for OCF Data Sources.
Note
Compose is not available for on-prem databases connected to the Alation Cloud Service instances through Alation Agent.
For JDBC URI formats for Compose, Compose URI Format.
Note
For Impala OCF Connector version 2.0.0, Compose is supported only with Alation version 2023.3.3.2 or later.
Sampling and Profiling
For Impala on CDP, Alation supports a number of ways to retrieve data samples and column profiles. For details, see Configure Sampling and Profiling for OCF Data Sources.
Query Log Ingestion
On the Query Log Ingestion tab, you can select the QLI options for your data source and schedule the QLI job if necessary.
For Impala, Alation supports QLI from query log files stored on HDFS or Amazon S3.
Prerequisites for QLI
In order to run Query Log Ingestion for an Impala data source, you will need to ensure that query logs are available on HDFS or Amazon S3.
Enable Audit for Impala
Enable the audit log for Impala. For specific details refer to documentation for your CDP version. Follow these generic guidelines:
Decide how many queries will be represented in each log file. Limiting the size manages disk space by archiving older logs and reduces the amount of text to process when analyzing activity for a particular period. Follow Impala documentation when configuring this aspect of Impala auditing.
Periodically pull audit logs from Impala coordinator nodes to HDFS. By default, the audit logs are located in the directory /var/log/impalad/audit/ inside Impala coordinator nodes. An admin can also configure a custom place for audit logs. In each environment, the location of the audit logs depends on the current audit log configuration.
Create a directory in HDFS or Amazon S3 for storing all Impala audit logs you want to be ingested into Alation, provided the HDFS service must be installed in the Cloudera Manager cluster.
The audit log files from each Impala coordinator node should stay in an HDFS subdirectory of the audit log directory. We recommend naming the subdirectory using the ID of the Impala coordinator node, for example, the IP address, or some other unique identifier.
You can automate the process by writing a script to pull audit logs from Impala coordinator nodes to HDFS and run it as a cron job every day.
Place Query Log Files on HDFS
Alation supports query log extraction from files located on HDFS and accessible through WebHDFS. Ensure that the HDFS service is installed on the Cloudera Manager cluster for Alation to access WebHDFS.
To set up QLI:
Make sure there are Impala audit event log files in the audit directories on Impala coordinator nodes that you want to track in Alation. The file names use the format:
impala_audit_event_log_1.0-*.Note
The default audit directory is /var/log/impalad/audit. However, your environment may be using a custom audit log directory. Look for the audit files in the audit directory that has been configured as the audit log directory in your CDP environment. To get the audit directory, select the Impala cluster in the CDP Manager, click on Configuration and search for Impala Daemon Audit Log Directory.
After confirming the files exist, create a directory on HDFS (example: /user/history/done), for example:
sudo -u hdfs hadoop fs -mkdir -p /user/history/done/log_1
The name of the directory can be anything you want. We named it
log_1in this example.After creating the log storage directory on HDFS, recursively modify the permission of the parent directory /done and its sub-directories with the following command:
sudo -u hdfs hadoop fs -chmod -R 744 /user/history/done
Copy the
impala_audit_event_log_1.0-*files into thelog_1directory, for example:hadoop fs -put impala_audit_event_log_1.0-* /user/history/done/log_1
As an alternative to the above steps that manually copy log files to a directory, you can use A.8 Impala QLI Script as an example of how to periodically copy the log file to the HDFS.
Place Query Logs on Amazon S3
Alation supports query log extraction from files located in an Amazon S3 bucket. You will need to provide an AWS access key and secret for an account that has Read permissions for this bucket when configuring QLI in Alation.
To set up QLI from Amazon S3:
Make sure there are Impala audit event log files in the audit directories on Impala coordinator nodes that you want to track in Alation. The file names use the format:
impala_audit_event_log_1.0-*.Note
The default audit directory is /var/log/impalad/audit. However, your environment may be using a custom audit log directory. Look for the audit files in the audit directory that has been configured as the audit log directory in your CDP environment. To get the audit directory, select the Impala cluster in the CDP Manager, click on Configuration and search for Impala Daemon Audit Log Directory.
Copy log file to the home directory.
cp impala_audit_event_log_1.0-* /home/<your_user>/
Download the log file to your local machine.
Upload the file to the S3 bucket that you can allow Alation to access. Grant read access to the service account.
Configure QLI in Alation
You can configure QLI on the Query Log Ingestion tab of the data source settings page.
Open the Query Log Ingestion tab of the settings page.
Under Configure Connection Type, select either WebHDFS or Amazon S3, depending on where you made the logs available.
If the logs are on HDFS, provide the following information and click Save:
Parameter
Description
Logs Directory
/user/history/doneWebHDFS Server
IP address or the name of the CDP server
WebHDFS Port
Specify the HDFS port number for your environment. The default is 9870. If you are using a different port, clear the Use Default checkbox under the WebHDFS Port field.
Use Default
Leave it selected if you are using the default port. Clear this checkbox if you are using a port number other than the default.
Use JDBC Auth Credentials
Select this checkbox to use the same auth credentials that are used in the Data Source Connection section. You do have to fill in the configurations that already exists in the Data Source Connection section. Clear the checkbox if you are using a different authentication mechanism for WebHDFS.
This field is available from connector version 2.0.0.
WebHDFS Authentication Method
Select the required WebHDFS authentication type from the dropdown:
Username
Username/Password
Kerberos/Username/Password
Kerberos/Username/Keytab
This field is available from connector version 2.0.0.
WebHDFS User
Specify the WebHDFS user if Username/Password is selected in WebHDFS Authentication Method
WebHDFS password
Specify the WebHDFS password if Username/Password is selected in WebHDFS Authentication Method
This field is available from connector version 2.0.0.
Enable SSL
Select the Enable SSL checkbox to enable SSL. If enabled, upload the SSL certificate using the upload link. The supported certificate type is .jks.
This field is available from connector version 2.0.0.
WebHDFS Truststore password
Specify the password for the SSL certificate.
Note
The password is deleted when you delete the data source connection.
This field is available from connector version 2.0.0.
WebHDFS Kerberos Configuration File
If Kerberos/Username/Password or Kerberos/Username/Keytab is selected upload the krb5.conf file using the upload link
This field is available from connector version 2.0.0.
WebHDFS Keytab File
If Kerberos/Username/Keytab is is selected in the WebHDFS Authentication Method field, upload the keytab file using the upload link
This field is available from connector version 2.0.0.
If the logs are on Amazon S3, provide the following information and click Save:
Parameter
Description
Impala Log Path
Your Amazon S3 bucket name
Impala Log File Name Prefix
Log file name prefix
Number of Log files
Number of log files to ingest
AWS Access Key ID
Access key ID to access the bucket
AWS Access Key Secret
Access key secret to access the bucket
AWS Region
Your AWS region
Perform QLI
You can either perform QLI manually on demand or enable automated QLI:
To perform manual QLI, under the Automated and Manual Query Log Ingestion section of the Query Log Ingestion tab, ensure that the Enable Automated Query Log Ingestion toggle is disabled.
Note
Metadata extraction must be completed first before running QLI.
Click Preview to get a sample of the query history data to be ingested.
Click the Import button to perform QLI on demand.
To schedule QLI, enable the Enable Automated Query Log Ingestion toggle.
Set a schedule under Automated Query Log Ingestion Time by specifying values in the week, day, and time fields. The next QLI job will run on the schedule you have specified.
Note
The hourly schedule for automated QLI is not supported.
Migrate to OCF Connector
See Migrate Native Sources to Open Connector Framework to OCF to migrate native Impala on CDP data source to Impala OCF connector version 2.0.0.
After you successfully migrate to Impala OCF connector version 2.0.0, perform the following tasks for these authentication types:
Migration of native Impala on CDP data source with No Auth authentication
Ensure that the Compose URI format for No Auth matches with the URI format for version 2.0.0. For details, see the Compose URI Format. Make the changes manually, if required.
Perform the QLI configuration. See Configure QLI in Alation.
Migration of native Impala on CDP data source with SSL
Upload the SSL certificate again. The supported certificate type is .jks.
Upgrade your OCF Connector
Upgrade your current version of Impala on CDP OCF connector to version 2.0.0 or higher using the steps in the Manage Connectors section. After you upgrade, verify that your connector settings match those described in the General Settings section. If not, manually make the required changes.