Update Alation to 2023.3
Customer Managed Applies to customer-managed instances of Alation
2023.3 Update Version Dependencies
Alation supports a direct update to version 2023.3.x from the following previous versions:
2023.1.x
2022.4.x
Version 2022.3.x and Older
Direct update to 2023.3.x is not supported from version 2022.3 and older versions. First, update Alation to a version that supports the update to 2023.3.x using the update instructions specific to your release. Then perform a second update to 2023.3.x.
2023.3 Release-Specific Information
Note
The full list of new features is available in Release Notes 2023.3 (General Availability).
Postgres Upgrade
Applies from version 2023.3.0
The Postgres component (the internal PostgreSQL database) was upgraded from version 13.8 to version 13.11 to take advantage of improvements and bug fixes in the newer version. No manual action is required from Alation admins as the database version upgrade happens automatically during the Alation update.
Alation Analytics PostgreSQL Upgrade
Applies from version 2023.3.0
The Alation Analytics database was upgraded from version 13.8 to version 13.11. No additional manual actions are required from Alation admins as the Alation Analytics database version upgrade happens automatically during the update of the Alation Analytics application.
Alation Analytics: Basic Authentication for RabbitMQ
Applies from version 2023.3.2
The RabbitMQ component of Alation Analytics V2 now requires basic authentication for incoming connections from other Alation components.
Important
The RabbitMQ password will be auto-generated during the update of Alation Analytics V2. Before you can initialize the Alation Analytics V2 database after the update, you must set this password in the alation_conf parameter
alation_analytics-v2.rmq.config.password. This is a one-time task that must be completed as part of the Alation Analytics V2 update steps.
Support for Larger Volumes of Metadata
Applies from version 2023.3.4
We’ve made some updates to the Alation database schema to support larger volumes of metadata. This means you can now ingest more metadata on a frequent basis without running into issues with integer overflow. Note that the migrations during the upgrade could add an additional 30 minutes depending on the volume of your metadata.
Filtering by Catalogs
Applies from version 2023.3.5
In version 2023.3.5, we’ve introduced the Catalog search facet that can be used to refine search results by catalog objects within metadata. This enhancement is applicable to data sources with multipart schema names (“catalog.schema”).
Important
After the update, some Alation instances may require a search index rebuild for users to leverage the Catalog facet for search filtering. This requirement depends on your current search index status. Refer to the specific instructions in Step 8: Rebuild Search Index.
Rebuilding the search index does not require downtime.
User Sign-Up Moderation Enabled by Default
Applies from version 2023.3.5
In version 2023.3.5, user sign-up moderation is enabled by default across all installation types, including both customer-managed and Alation Cloud Service on the cloud-native architecture. Alation Cloud Service instances that are newly migrated to the cloud-native architecture will also have it enabled after the migration.
Important
If you have never previously adjusted your user sign-up moderation preferences, expect these to switch to enabled by default post-update.
If you’ve previously changed your user sign-up moderation preferences, these preferences will remain unchanged post-update.
Recommendations
Enabling user sign-up moderation is recommended for all instance types to enhance security.
After upgrading to 2023.3.5, please check and adjust your user sign-up moderation settings to align with your organization’s security policies. Navigate to Admin Settings > Authentication > User Signup Moderation Preference to review or modify your settings.
Ability to Set a Preferred Homepage Disabled by Default
Applies from version 2023.3.5
In version 2023.3.5, users’ ability to set a preferred homepage is disabled by default. Server and Catalog Admins now have the default responsibility to assign homepages to user groups. Users will view the homepage assigned by an admin without the option to select a preferred one. If a user belongs to multiple groups, they will see the latest homepage enabled by an admin for one of their groups.
Important
This change impacts the functionality of group-based homepages introduced in version 2023.3.4. If your users already set their preferred homepages in the previous release, expect this functionality to be initially unavailable in the user interface after the update to 2023.3.5. The list of accessible homepages will not appear under the My Account menu for a user. Instead, users will view the latest homepage enabled by an admin for one of their groups.
If needed, the users’ ability to select a preferred homepage can be re-enabled by setting the alation_conf flag
alation.feature_flags.homepage.enable_admin_assigned_homepagetoFalse(default isTrue).
Update Known Issues
Compatibility Issue with Alation Version 2023.3.1 or Higher for FIPS-Enabled Operating Systems
Important
The issue is resolved in version 2023.3.5, ensuring updates now proceed successfully on FIPS-enabled systems. This problem is specific to versions 2023.3.1 through 2023.3.4.
At the moment, systems with the Federal Information Processing Standards (FIPS) mode enabled are not compatible with Alation versions 2023.3.1 to 2023.3.4. On FIPS-enabled systems, the upgrade to 2023.3.1 or higher will fail with the following error: ValueError: [digital envelope routines: EVP_DigestInit_ex] disabled for FIPS.
For those affected, we recommend these options:
Remain on your current version until the issue is resolved.
Consider upgrading to a version that is newer than your current version but remains below version 2023.3.1.
If you have further questions about this issue, please contact your Alation account executive.
Reset Postgres Password
If you have a password set on the internal PostgreSQL database (Rosemeta), the update will result in an error similar to the following:
WARN: unable to check pg-1: [DbConnectError] unable to connect to 'dbname='postgres' port=5432':
FATAL: password authentication failed for user "postgres"
password retrieved from file "/home/postgres/.pgpass"
ERROR: [056]: unable to find primary cluster - cannot proceed
The update process requires that the password on the internal PostgreSQL database should be cleared for the time of the update. The password can be set again after the update is completed. On how to set the Postgres password, see Set Password for Internal PostgreSQL Instances.
Use Cluster Splitting for HA Pair Update
The Alation update of an HA pair without splitting the cluster fails. We recommend upgrading HA instances using the cluster splitting upgrade method until this issue is resolved.
Index Row Size Error
If during the upgrade you run into the error below, refer to this troubleshooting article in Alation’s Knowledge Base. Contact Alation Support if you require help with this issue or if you have questions about any of the troubleshooting steps.
psycopg2.errors.ProgramLimitExceeded: index row size 2712 exceeds
btree version 4 maximum 2704 for index "rosemeta_attributevalue_attr_id_value_5fee90cc_uniq"
DETAIL:  Index row references tuple (304577,3) in relation "rosemeta_attributevalue".
HINT:  Values larger than 1/3 of a buffer page cannot be indexed.
Consider a function index of an MD5 hash of the value, or use full text indexing.
Upgrade Fails for Dockerized Postgres
The upgrade to 2023.3.1 or a later minor version of 2023.3 may fail if you have a custom deployment of Alation where you had dockerized the Postgres component or had made changes to the /etc/passwd file (added or removed users). The upgrade on such instances fails due to Postgres failing to start and an error in the Postgres logs similar to the following:
runuser: warning: cannot change directory to /home/postgres: No such file or directory
postmaster: could not access directory "/var/lib/pgsql/13/data": Permission denied
You can apply a workaround described in 2023.3.x Upgrade Fails Due to Postgres Not Starting.
Update Alation to 2023.3.x
Use the steps in this section to update Alation to 2023.3.x from versions 2023.1.x and 2022.4.x.
Note
If you are updating from release 2022.4.x and skipping release 2023.1, review the information specific to release 2023.1 in the corresponding release notes.
Follow the steps below to update. You may need to perform more or fewer steps depending on the release you are updating from. If a step is Alation version dependent, this is called out in the instructions.
Step 1: Scan Postgres
We recommend using the scan_postgres action to validate that the internal Postgres database is in a healthy state before the update. For steps, see How to Scan Postgres for Corrupted Indexes.
Note
If in your instance the Postgres scan runs on a schedule, you can check the scan-postgres.log file in /opt/alation/site/logs inside the Alation shell to check the Postgres state.
Step 2: Verify Backup Availability
Ensure you have a valid latest Alation backup.
Step 3: Update the Alation Application
Update instructions:
Update on the HA pair:
with splitting the HA cluster: Update HA Pair with Cluster Splitting
Note
See Use Cluster Splitting for HA Pair Update under Update Known Issues for this release.
Step 4: Update Alation Connector Manager
This step applies if you are using Open Connector Framework (OCF) and OCF connectors.
Update Alation Connector Manager using the steps in Update Alation Connector Manager.
Step 5: Update Alation Analytics
This step applies if you are using the Alation Analytics application.
Use the steps in Update Alation Analytics V2 to update the Alation Analytics application. Please take note of the change in Alation Analytics: Basic Authentication for RabbitMQ.
Step 6: Take a Full Manual Backup
This step applies if you have updated Alation from 2022.4.x to 2023.3. The upgrade from 2022.4.x skips release 2023.1, where the default backup tool was changed to pgBackRest. If you have updated Alation from 2023.1 to 2023.3, this section does not apply and you can skip it.
Take a full manual backup to ensure that you have the first full backup of the updated instance taken with pgBackRest.
Step 7: Run Alation Analytics Scripts
This step applies if you are using Alation Analytics and have updated Alation and Alation Analytics from 2022.4.x to 2023.3. If you have updated Alation and Alation Analytics from 2023.1 to 2023.3, this section does not apply and you can skip it.
In 2023.1, we optimized the migrations of the database which were slowing down the upgrade of the Alation Analytics app. To apply the change, run the two scripts described below. In case of the HA pair configuration, run the scripts on the primary server.
Enter the Alation shell. You should be in the Alation shell to tail the log files and to run the scripts.
sudo /etc/init.d/alation shell
Make sure that the Alation Analytics ETL process is not running. The scripts should not be executed when the ETL process is running. You can check this by logging in to Alation, navigating to Admin Settings > Monitor > Active Tasks and making sure that the Alation Analytics ETL (alation_analytics_v2.tasks.etl_manager.ETLManager) job is not listed as an active task. Alternatively, you can use the tail command on the
celery-alationanalytics_error.logfile from the Alation shell. If Alation Analytics ETL is running, the log will be printing messages similar to the following:{"message": "ETL job manager has been triggered to run.", "timestamp": "2023-08-25T09:50:31.644434Z", "level": "INFO"} {"message": "Created channel=1", "timestamp": "2023-08-25T09:50:31.651979Z", "level": "INFO"} {"message": "Starting TimePeriodExtractJob", "timestamp": "2023-08-25T09:50:31.654666Z", "level": "INFO"} {"message": "Starting UserExtractJob", "timestamp": "2023-08-25T09:50:31.685582Z", "level": "INFO"} {"message": "Starting AlationGroupExtractJob", "timestamp": "2023-08-25T09:50:31.725311Z", "level": "INFO"} {"message": "Starting UserGroupMembershipExtractJob", "timestamp": "2023-08-25T09:50:31.761310Z", "level": "INFO"}
To tail the log:
tail -f /opt/alation/site/logs/celery-alationanalytics_error.log
After ensuring that the ETL process is not running, from the Alation shell, change the user to alation.
sudo su alation
Navigate to the directory /opt/alation/django/alation_analytics_v2/one_off_scripts/.
cd /opt/alation/django/alation_analytics_v2/one_off_scripts/
Run the flags script with the command below. The logs will be redirected to the
reconcile_flag.logfile.nohup python -u reconcile_flag.pyc >> reconcile_flag.log &
This command will launch a process with a PID. Save the PID value as you may need it. You can monitor this process by either tailing the corresponding log inside of the Alation shell or checking on the corresponding PID outside of the Alation shell.
5.1 To use the log for monitoring, in a separate Terminal window, from the Alation shell, tail the
reconcile_flag.logfile. When the script run is completed, you should see a message that the flags have been reconciled and the number of flags. Execution errors, should any occur, will be printed to the log too. Contact Alation Support if the script execution ends in an error.tail -f /opt/alation/django/alation_analytics_v2/one_off_scripts/reconcile_flag.log
5.2 To check if the process is still active, in a Terminal window connected to the Alation host, outside of the Alation shell, use the command below to list the current processes and check if there is a process with the corresponding PID.
ps -aAfter completing the flags script, in a similar way, run the script to reconcile tags. The script should also be run from the directory /opt/alation/django/alation_analytics_v2/one_off_scripts/ in the Alation shell and as user
alation.nohup python -u reconcile_tags.pyc >> reconcile_tags.log &
This command will launch a process with a PID. Save the PID value as you may need it. You can monitor this process by either tailing the corresponding log inside of the Alation shell or checking on the corresponding PID outside of the Alation shell.
7.1 To use the log for monitoring, in a separate Terminal window, from the Alation shell, tail the
reconcile_tags.logfile. When the script run is completed, you should see a message that the tags have been reconciled and the number of tags. Execution errors, should any occur, will be printed to the log too. Contact Alation Support if the script execution ends in an error.tail -f /opt/alation/django/alation_analytics_v2/one_off_scripts/reconcile_tags.log
7.2 To check if the process is still active, in a Terminal window connected to the Alation host, outside of the Alation shell, use the command below to list the current processes and check if there is a process with the corresponding PID.
ps -aAfter completing the scripts, to exit from the user
alation, use theexitcommand.
Important
Depending on whether or not you have to perform other post-upgrade actions, consider taking a second full backup after running these scripts.
If none of the next steps apply to your instance, we recommend creating a second backup after running the Alation Analytics scripts. If your instance is large and this requirement is not feasible, you can plan to take the next backup on your schedule. However, if there is a need to restore from a backup that was taken before applying the scripts, you’ll need to run the scripts again on the restored instance.
If you have more scripts to run after the update, consider taking a second full backup after running all the scripts.
Step 8: Rebuild Search Index
Rebuild your search index if:
You’ve updated to Alation version 2023.3.5 from version 2022.4 or earlier.
Your search index hasn’t been updated since version 2022.4. Even if you’ve updated from version 2023.3.x, the index may still be using the old search schemas.
Determine if Search Index Requires Rebuilding
To determine if your search index requires rebuilding:
Use SSH to connect to the Alation server.
Enter the Alation shell using the following command:
sudo /etc/init.d/alation shell
Run the following command to inspect the schema of your search index:
curl localhost:9200/live/_mappings | grep dbtype.
In the output, look for the
dbtypefield output:If
dbtypeistext, then a rebuild is required.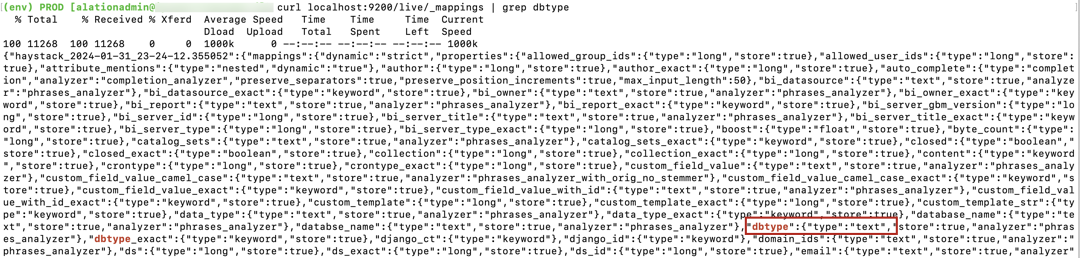
If
dbtypeiskeyword, then no action is needed.
If you’ve determined that an index rebuild is required, proceed to index rebuilding.
Rebuild Search Index
Rebuilding the search index aligns it with the latest search schemas of version 2023.3.5 and can be performed without downtime. For detailed steps, see How to Rebuild Search Index Without Downtime.