Configure Connection to Power BI Scanner Source
Alation Cloud Service Applies to Alation Cloud Service instances of Alation
Customer Managed Applies to customer-managed instances of Alation
After you install the Azure Power BI Scanner OCF connector, you must configure the connection to the BI source.
The various steps involved in configuring the Azure Power BI Scanner source connection are:
Provide Access
Go to the Access tab on the Settings page of your BI source
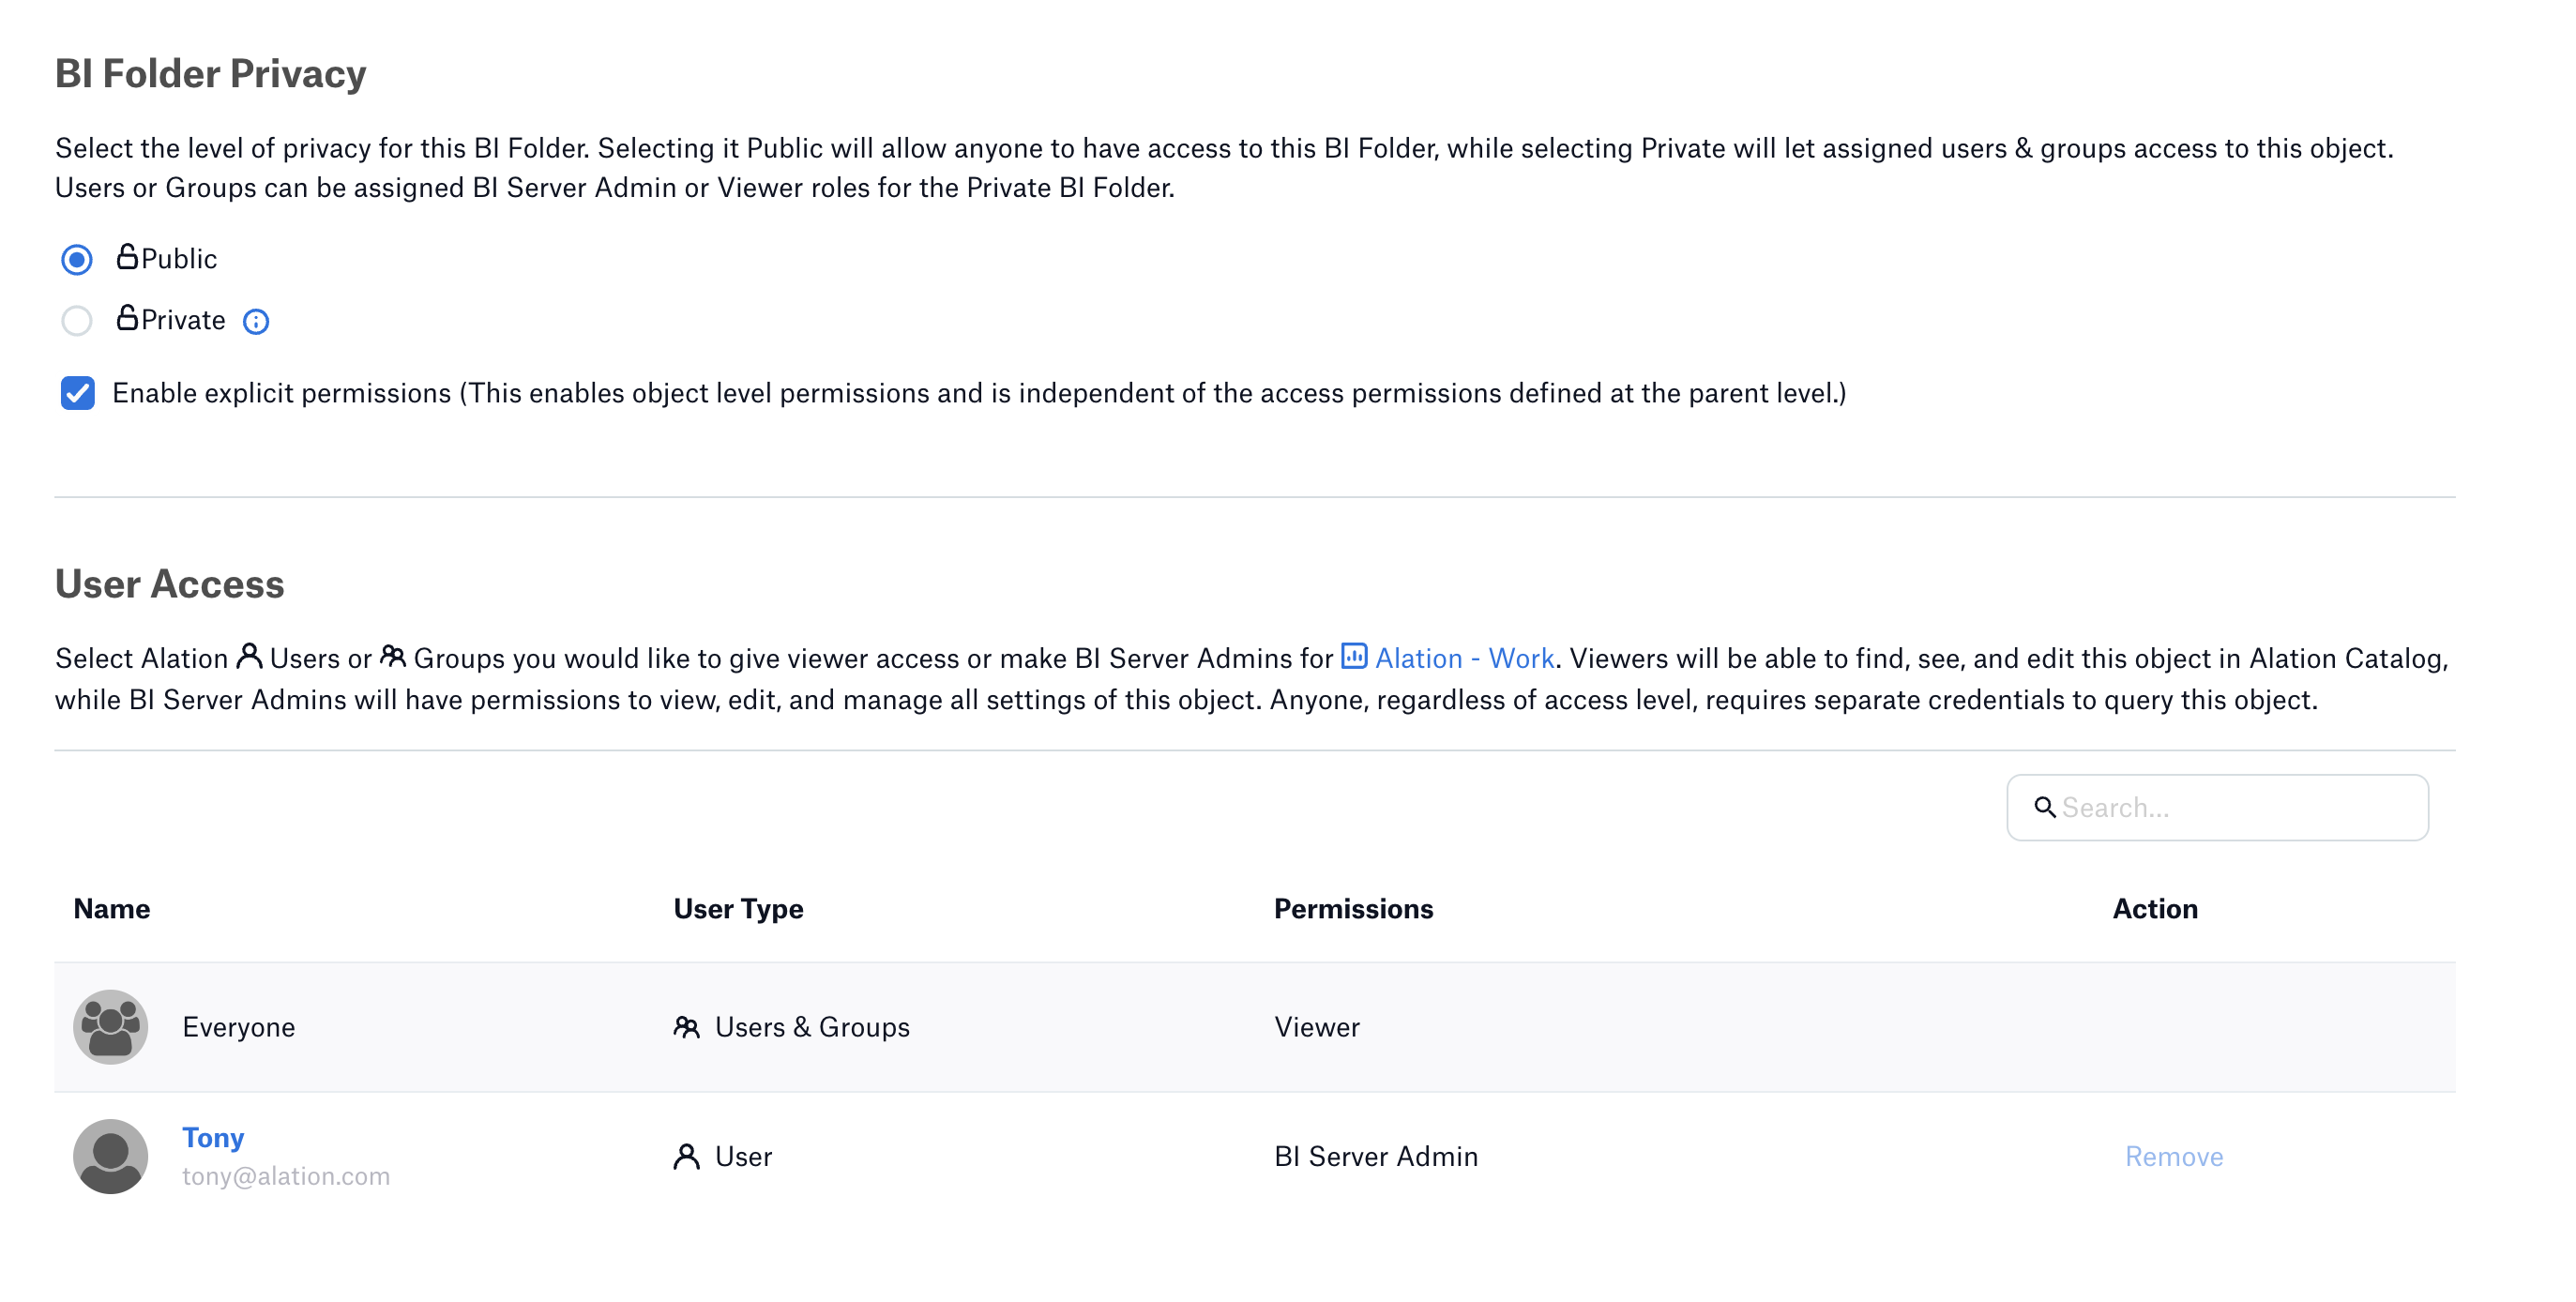
You can configure the visibility of a BI source and its child objects such as Folders and Reports on the Access tab of the settings page.
Configure BI Source Visibility
Applies from release 2023.3.5
On the Access tab, follow these steps to set the BI source visibility:
Select one of the following options for setting privacy level:
Public BI Server—The BI source will be visible to all users of the catalog.
Private BI Server—The BI Source will be visible to users who have been granted the BI Server Admin or Viewer permissions. It will be hidden for all other users.
Add one or more BI Server Admins or Viewers in the User Access section if required.
For more information on access to BI sources, see Configure Access to OCF BI Sources.
Configure BI Folder and Report Visibility
Applies from release 2024.1.4
On the Settings under a BI Folder or Report, follow these steps to set visibility:
Check the option Enable explicit permission to change access permission defined at the parent level object.
This enables and allows permissions at the object level. By default, the access permissions are inherited from the parent level and are not editable.
Select one of the following options to set a privacy level:
Public—The BI folder or report will be visible to all users of the catalog.
Private—The BI folder or report will be visible to users that have been granted the BI Server Admin or Viewer permissions. It will be hidden for all other users.
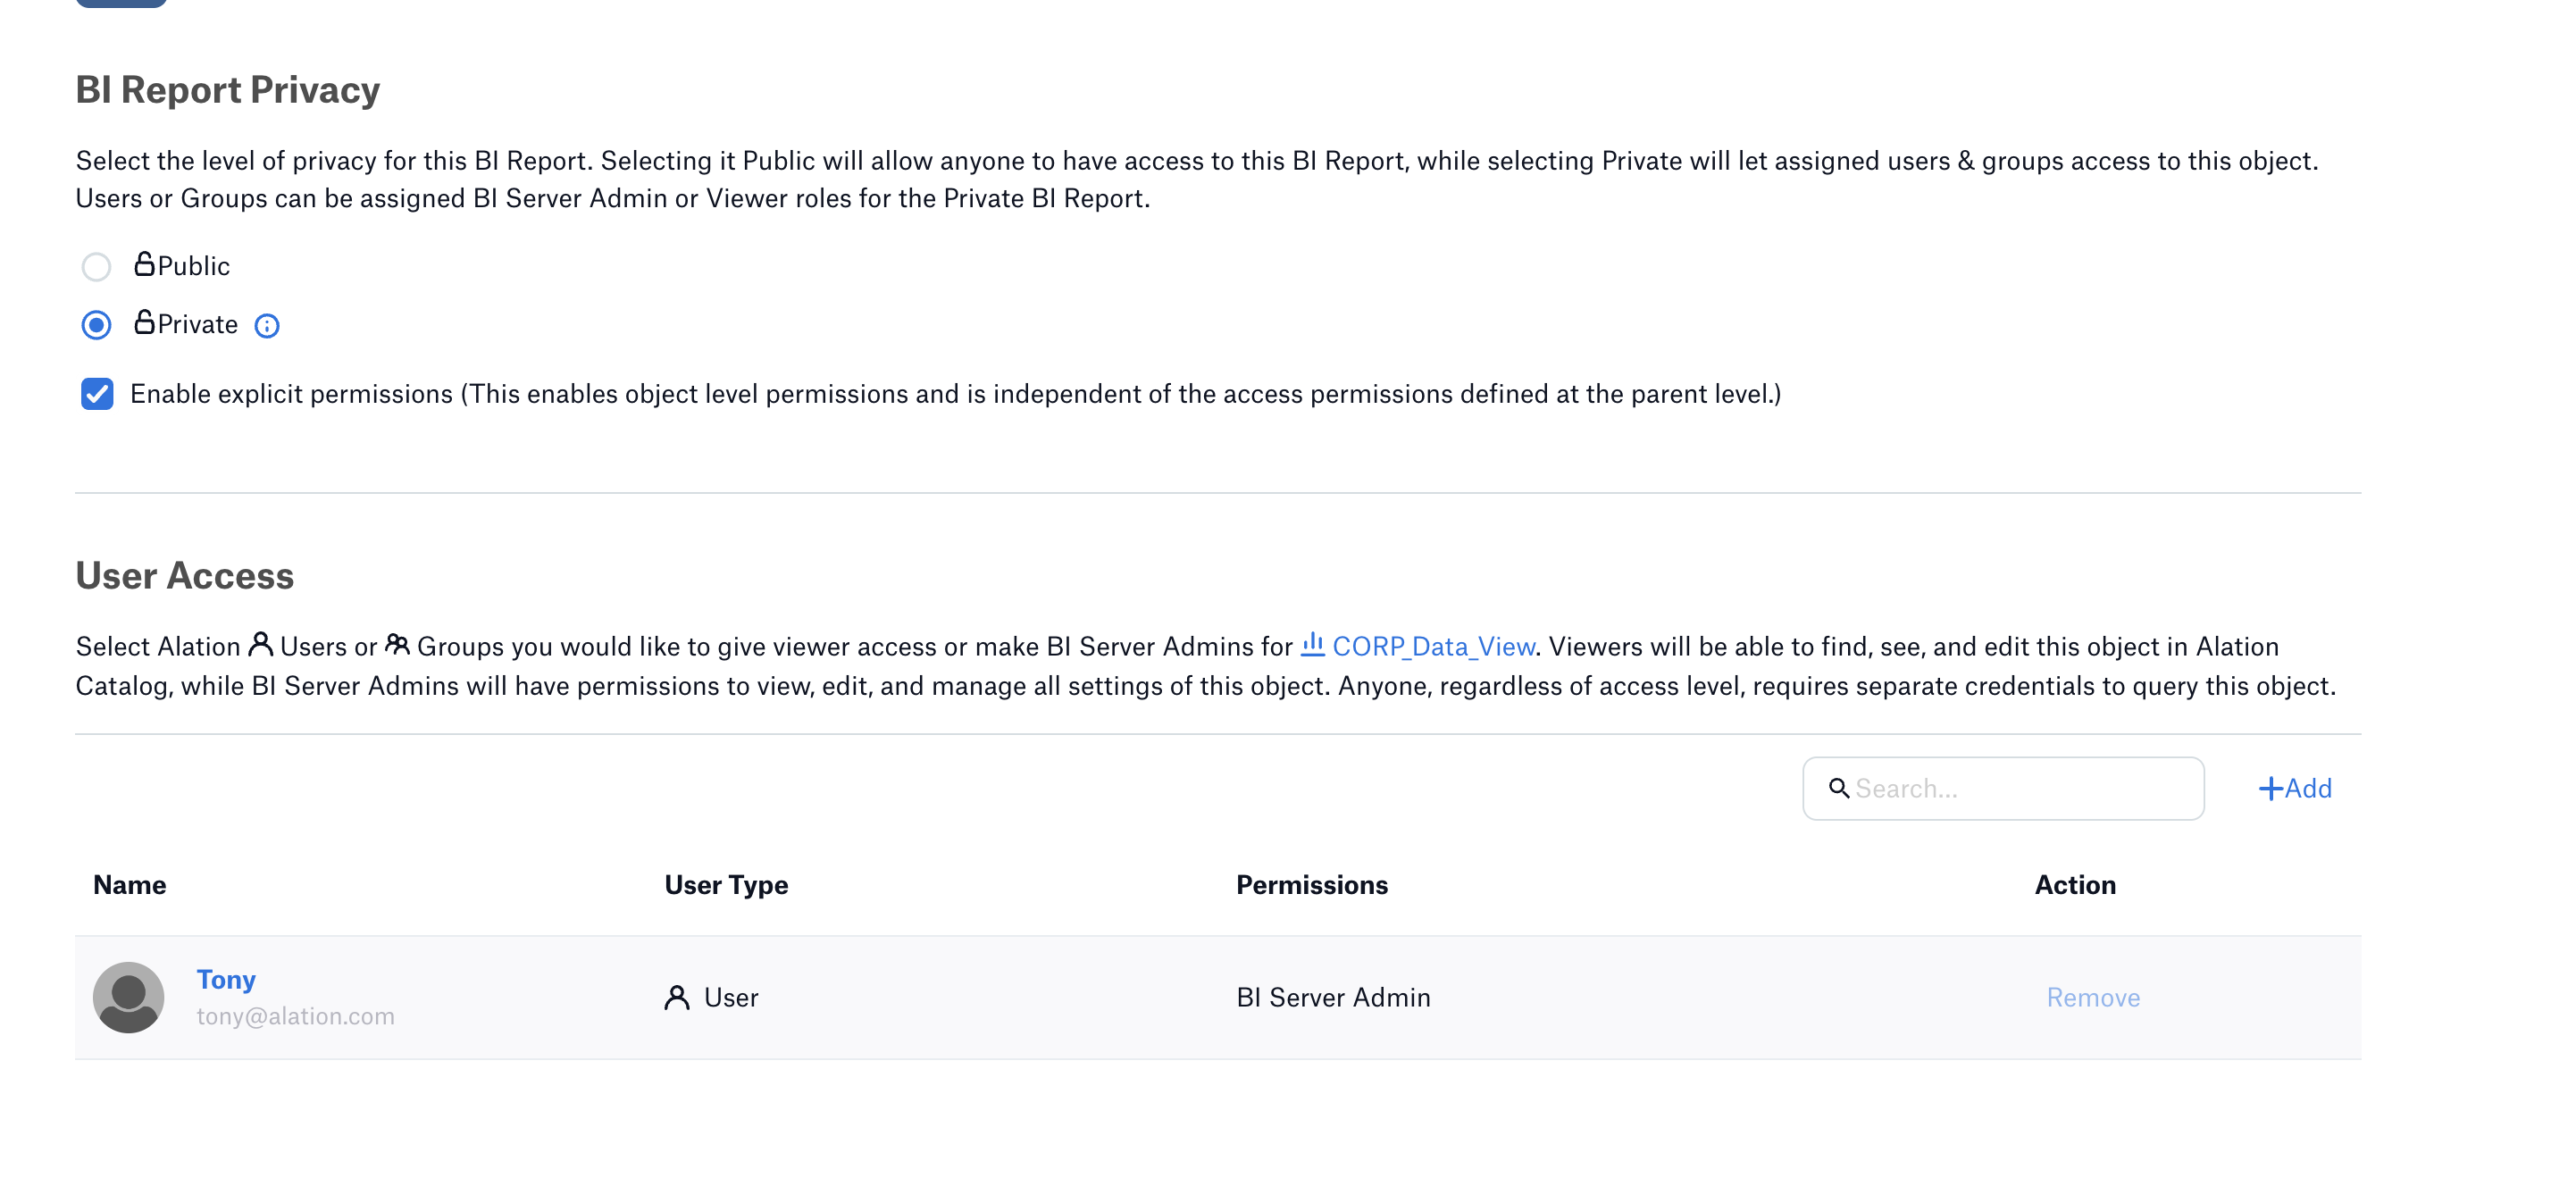
Add one or more BI Server Admins or Viewers in the User Access section if required.
For more information on how to enable the feature and configure access to a folder or report, see Configure Access to OCF BI Folders and Reports.
Connect to BI Source
To connect to the BI source, you must perform these steps:
Provide the Connection URLs
To provide to the connection URL in the Alation UI, perform these steps:
From Alation version 2024.1.4 and connector version 2.3.0
On the Settings page of your BI source, go to the General Settings tab.
In the Provide the connection URLs section, enter the following details:
Parameter
Description
PowerBI API URL
Specify the API URL to access Power BI APIs. The default values are:
https://api.powerbi.com/v1.0/myorg/for enterprise andhttps://api.powerbigov.us/v1.0/myorg/for Azure Government CloudAccess Token URL
Specify the API URL to generate the Access Token. The default value is
https://login.microsoftonline.com/common/oauth2/tokenPowerBI Resource URL
Specify the Power BI Resource URL to grant access scope to Power BI APIs. The default values are:
https://analysis.windows.net/powerbi/apifor enterprise andhttps://analysis.usgovcloudapi.net/powerbi/apifor Azure Government Cloud
Click Save.
From Alation version prior to 2024.1.4 or connector version prior to 2.3.0
On the Settings page of your BI source, go to the General Settings tab.
Go to the Connector Settings > Power BI Connector section and enter the following details:
Parameter
Description
Power BI Web URL
Specify the URL to access Power BI. The default values are:
https://app.powerbi.com/andhttps://app.powerbigov.us/- for Gov CloudPower BI API URL
Specify the API URL to access Power BI APIs. The default values are:
https://api.powerbi.com/v1.0/myorg/andhttps://api.powerbigov.us/v1.0/myorg/- for Gov CloudAPI URL for Access Token
Specify the API URL to generate the Access Token. The default value is
https://login.microsoftonline.com/common/oauth2/tokenPower BI Resource URL
Specify the Power BI Resource URL to grant access scope to Power BI APIs. The default values are:
https://analysis.windows.net/powerbi/apiandhttps://analysis.usgovcloudapi.net/powerbi/api- for Gov CloudPower BI Tenant ID
Specify the Power BI tenant ID.
Power BI Client ID
Specify the Power BI client ID.
Power BI Client Secret
Specify the Power BI client secret.
Proxy URL
Specify the URL to access Power BI via proxy server. This is an optional field and should be used only if Azure Power BI Scanner is connected using proxy connection.
Proxy Port
Specify the proxy port number. This is an optional field and should be used only if Azure Power BI Scanner is connected using proxy connection.
Proxy Username
Specify the proxy server username. This is an optional field and should be used only if Azure Power BI Scanner is connected using proxy connection.
Proxy Password
Specify the proxy server password. This is an optional field and should be used only if Azure Power BI Scanner is connected using proxy connection.
Power BI Workspace Extraction Batch Size
Provide the workspace extraction batch size. Alation supports a maximum of 100 batches per extraction. Reducing this parameter will increase the number of API calls against the Azure Power BI Scanner to fetch the data, but decrease the size of data fetched during each call.
Enable Apps Extraction
Enable this checkbox to extract the apps from Azure Power BI Scanner.
Enable Report Fields Extraction
Enable this checkbox to extract the report fields from Azure Power BI Scanner. Additionally, enabling this option also enables Column Level Lineage (CLL) to work in supported Alation versions (2024.1.2 onwards). However, enabling this option increases the extraction time.
Enable Extraction For Service Principal
Enable the checkbox to enable service principal-based extraction and listing of projects that the user has access to view. - This option is not available in connector version prior to 2.4.0 and also from version 2.2.4 and newer
Log Level
Select the log level to generate logs. The available options are INFO, DEBUG, WARN, TRACE, ERROR, FATAL, ALL.
Pause Extraction if API limit is reached
Enable this checkbox to pause the extraction if the API limit is reached. The extraction will be paused until the API limit is refreshed which will take a maximum of one hour time. If this checkbox is disabled, the extraction will complete if the API limit is reached. The metadata that was extracted before this time will be added to the Catalog. Extraction will not resume when the API limit is refreshed.
Note
From connector versions prior to 2.2.4 and also from versions 2.4.0 and newer support both admin-based and service principal-based extraction:
Admin-based extraction –The connector extracts all workspaces present in the tenant using the admin API.
Service principal-based extraction–The connector only extracts workspaces that the service principal can access.
From connector versions prior to 2.4.0 and also from version 2.2.4 and newer:
Service principal-based extraction is now the default and sole method of extraction. The Enable Extraction For Service Principal checkbox is removed from the Connector Settings tab.
Note
Enabling Service principals can use Fabric APIs is mandatory for Service principal-based extraction.
Click Save.
Configure Authentication
To configure authentication in the Alation UI, perform these steps:
From Alation version 2024.1.4 and connector version 2.3.0
On the Settings page of your BI source, go to the General Settings tab.
In the Configure authentication section, enter the following details:
Parameter
Description
Azure tenant ID
Specify the Directory (tenant) ID of the application registration.
Client ID
Specify the Application (client) ID of the application registration.
Client Secret
Specify the client secret of the application registration.
Click Save.
From Alation version prior to 2024.1.4 or connector version prior to 2.3.0
On the Settings page of your BI source, go to the General Settings tab.
Go to the Connector Settings > Power BI Connector section and enter the following details:
Parameter
Description
Power BI Tenant ID
Specify the Power BI tenant ID.
Power BI Client ID
Specify the Power BI client ID.
Power BI Client Secret
Specify the Power BI client secret.
Click Save.
Configure Proxy Settings
Note
This step is optional.
If Azure Power BI Scanner is connected using proxy connection, provide the following details:
From Alation version 2024.1.4 and connector version 2.3.0
On the Settings page of your BI source, go to the General Settings tab.
In the Proxy configuration section, enter the following details:
Parameter
Description
Proxy URL
Specify the URL to access Power BI using a proxy server.
Proxy Port
Specify the proxy port number.
Proxy Username
Specify the proxy server username.
Proxy Password
Specify the proxy server password.
Click Save.
From Alation version prior to 2024.1.4 or connector version prior to 2.3.0
On the Settings page of your BI source, go to the General Settings tab.
Go to the Connector Settings > Power BI Connector section and enter the following details:
Parameter
Description
Proxy URL
Specify the URL to access Power BI using a proxy server.
Proxy Port
Specify the proxy port number.
Proxy Username
Specify the proxy server username.
Proxy Password
Specify the proxy server password.
Click Save.
Test the Connection
The connection test checks BI server connectivity. Alation uses the connection information you provided to confirm when the connection is established.
After specifying the connection details in Configure Authentication , test the connection.
To validate the network connectivity, go to General Settings > Test connection of the Settings page of your BI server source and click Test.
A dialog box appears confirming the status of the connection test.
Alation checks to ensure that the Service Principal is valid and also verifies the connection details before establishing the connection.
Configure Advanced Settings
Note
This step is optional.
Apart from the mandatory configurations that you perform to connect to the BI Server source in the General Settings tab, you can configure the following additional settings:
Configure BI Server Lookup URI
You ust provide the BI Server Lookup URI to redirect users to BI objects from their respective catalog pages using the Connector link on the catalog page. Perform these steps to provide the BI Server Lookup URI:
From Alation version 2024.1.4 and connector version 2.3.0
Go to General Settings > Advanced settings section of the Settings page of your BI Server source.
Provide the BI server URI for in the BI server lookup URI field to redirect users to BI objects from their respective catalog pages using the Connector link on the catalog page.
For example: For PowerBI enterprise, you can include https://app.powerbi.com/ as a BI server lookup URI.
Click Save.
From Alation version prior to 2024.1.4 or connector version prior to 2.3.0
On the Application Settings section of General Settings tab, provide the following information.
Parameter
Description
Disable Permission Enforcement
Leave this checkbox selected.
Permission enforcement is not supported between Azure Power BI Scanner and Alation
Disable Certification
Leave this checkbox selected.
Certification of BI objects in Azure Power BI Scanner from Alation is not supported.
Server URI
Enter the server URI used to access Azure Power BI Scanner.
Enable or Disable Automatic Lineage Generation
You can enable or disable the lineage for the BI Server source to be generated automatically during metadata extraction.
From Alation version 2024.1.4 and connector version 2.3.0
Go to General Settings > Advanced settings of the Settings page of your BI Server source and enable or disable the Disable automatic lineage generation toggle.
Turn off the Disable automatic lineage generation toggle to skip the creation of automatic Lineage after extraction. When automatic Lineage generation is disabled, during extraction Alation does not calculate lineage data for this BI source.
Turn on this option when you want generate lineage automatically.
From Alation version prior to 2024.1.4 or connector version prior to 2.3.0
On the Application Settings section of General Settings tab, turn off the Disable automatic lineage generation toggle when you want to skip the creation of automatic lineage.
Enable this option when you want generate lineage automatically.
Configure Logging
To set the logging level for your BI source logs, perform these steps:
From Alation version 2024.1.4 and connector version 2.3.0
On the Settings page of your BI Server source, go to General Settings > Connector logs.
Select a logging level for the connector logs and click Save.
The available log levels are based on the Log4j framework.
From Alation version prior to 2024.1.4 or connector version prior to 2.3.0
On the Settings page of your BI Server source, go to Connector Settings section of General Settings tab.
Select a logging level for the connector logs from the Log level dropdown list and click Save.
The available log levels are based on the Log4j framework.